Glacier Photography in Alaska: 18 Scenes Worth Chasing
Alaska is home to some of the most photogenic ice on Earth—but not all glacier photos are created equal. Some are about sheer scale. Others capture motion, texture, or a fleeting trick of light. A few happen by luck. Most take planning. This guide breaks down 18 distinct Alaska glacier photography scenes you can chase across Alaska—from glowing blue melt pools to abstract aerials, grounded icebergs to collapsing towers of ice.
Some of these shots you can get on a day cruise or a short hike. Others require a helicopter, joining a glacier photo tour, or showing up at the exact right moment when light, weather, and tide all line up. Whether you’re carrying a DSLR or a smartphone, this article shows you what’s possible—and how to go after it.
We’ve structured this around three main vantage points:
• From a Boat
• From a Fixed-Wing Flightseeing Tour
• From a Helicopter
Each scene includes what to look for, where to get it, and tips for getting the shot. We’ve also included photos from both professionals and travelers—real images made in real conditions. If you’re serious about glacier photography, this list is your starting point.
From a Boat – Up Close and On the Water
Alaska’s tidewater glaciers tower straight out of the sea. From a boat or kayak, you’re close enough to hear the glacier shift, see ice crash into the ocean, or frame wildlife and watercraft for scale. These are the shots of power, proximity, and reflection.

Scale Shot – Glacier Walls and Human Scale
What you’re seeing:
David Arment captured this shot in front of Aialik Glacier in Kenai Fjords National Park. Tidewater glaciers (where the glacier ends in the sea) are immense. It’s hard to grasp the scale. If you’re on a boat tour and you see an airplane or birds flying near the glacier, you start to understand just how massive these ice walls really are. One of the classic glacier photos is to capture a boat or kayaker in the foreground. That’s when the scale hits you.
In most places, it’s unlikely there will be another boat or kayak in the scene. But if you do see it, get the shot. In Southcentral Alaska, one of the most reliable places for this is on a day cruise or private boat charter out of Whittier to Blackstone Glacier. Another good option is Aialik Glacier in Kenai Fjords. If you stay at Kenai Fjords Glacier Lodge, they offer day kayaking trips to the glacier. You can also reach Aialik on a day tour from Seward. Contact Liquid Adventures, Kenai Fjords Tours (they recommend their Captain’s Choice tour for photography!), Major Marine Tours, or Expeditions Northwest to discuss tour options.
This type of shot is also really easy to get on multi-day cruises with Discovery Voyages from Whittier or UnCruise Adventures in Southeast, Alaska.
Tips for getting the shot:
Use Foreground for Scale: Look for boats, kayaks, or even birds to show how massive the glacier really is. Without that reference, it’s hard for people to grasp the size.
Choose the Right Lens: A 70–200mm lens works great for bringing the glacier and your subject into a tight, dramatic frame.
Keep Things Steady: You won’t be setting up a tripod on a boat, so rely on image stabilization and shoot at 1/500s or faster to stay sharp. “I took this this photo from the back of the boat where things were more stable”, said the photographer David.
Polarizing Filters. Lisa Merril, a photography guide with Uncruise Adventures recommends “circular polarizing filters when photographing at sea since they intensify reflections by removing sheen from water surfaces, and saturate colors. We highly recommend them to anyone who uses dSLR or mirrorless cameras.”

Calving Shot – Catching the Fall
Kelly Gordon had the right timing with this shot at Twin Sawyer Glacier in Tracy Arm, near Juneau. Tidewater glaciers are constantly advancing. As they march into the sea, ice at the front breaks off and crashes into the water. This process is called calving. It’s fast, loud, and powerful—one of the most dramatic things you can witness in Alaska.
You’ll often get a warning. Just before a big calving event, you may hear deep, low rumblings coming from within the glacier. That sound means the ice is shifting—things are collapsing or moving inside. But sound travels slower than light, and you’re not as close to the glacier as it looks. So if you’re watching, you’ll see the ice fall a second or two before you hear the boom. That’s your window to catch the shot.
When things are quiet, there’s usually nothing imminent. But if one piece calves, another might follow. The glacier’s unstable in that moment, so don’t look away.
In Southcentral Alaska, two of the most active calving glaciers near Anchorage are Surprise Glacier in Harriman Fjord and Harvard Glacier in College Fjord. Harvard is farther out and, on a clear day, is visible on the 26 Glacier Cruise from Whittier. Both can also be seen on private charters from Whittier, such as with Lazy Otter Charters—Surprise being the closer and more affordable option. In Southeast Alaska, South Sawyer Glacier is known for its awesome calving action. Small ship cruises like UnCruise Adventures can often get you close.
Tips for getting the shot:
Keep your camera on the glacier face. If you’re not already framed, you’ll miss it.
Use burst mode. Calving unfolds over 1–2 seconds, and you’ll want options.
Use a shutter speed of 1/1000s or faster to freeze the fall and splash. There is usually plenty of light bouncing of the ice, so you can shoot a high shutter speed without having to increase your ISO.
A 100–400mm lens helps reach across the bay and capture detail.
Watch for signs: shifting ice, small collapses, or birds flying off can signal a bigger event is coming. Also pay attention to your captain and onboard guides who are trained to recognize the signals of potential calving.
Stay ready after the first calving—follow-ups are common.
Wide Shot – Ice in Its Landscape
What you’re seeing:
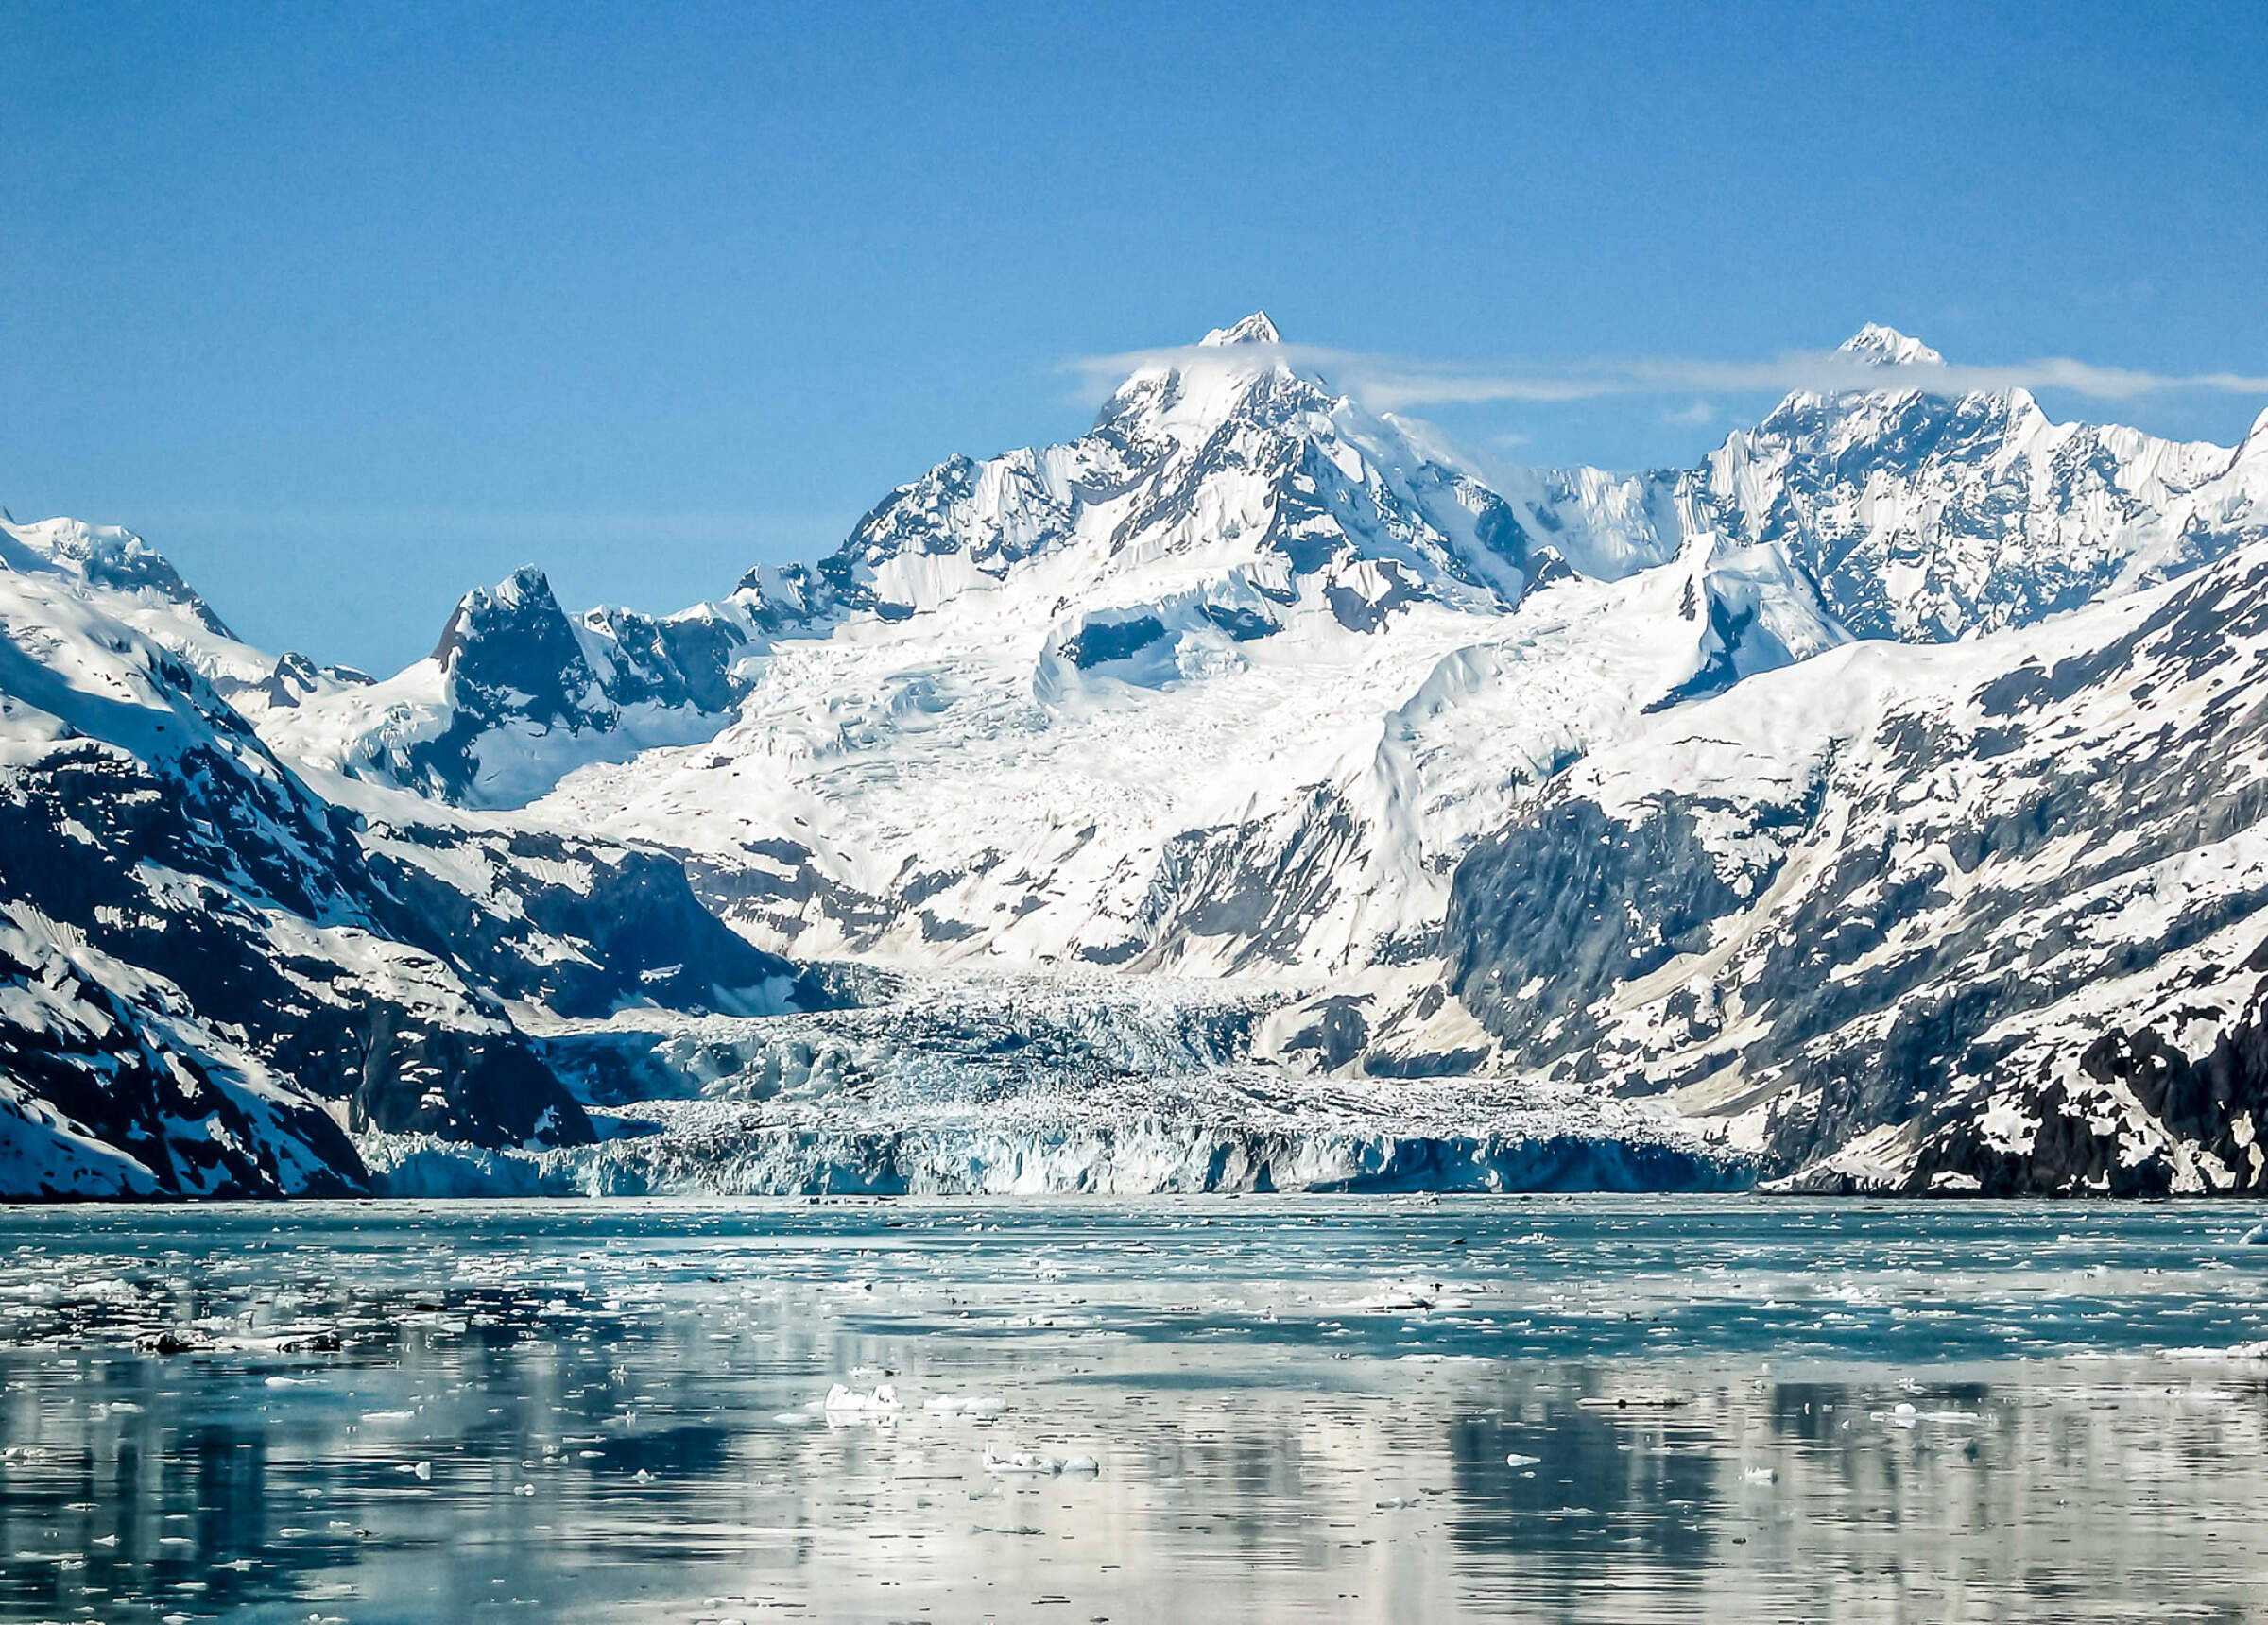
Bob Baglini made this image of John Hopkins Glacier on a cruise in Glacier Bay National Park (a glacier that is often skipped due to harbor seal pupping season in May and June). He shows how a glacier isn’t just a wall of ice—it’s part of a much larger landscape system. It begins high in the mountains, gathering snowfall that compacts into ice, then flows downhill over time. A wide shot puts the glacier in context. You see the ice in relation to the surrounding peaks, the valley it carved, and often the bay it flows into. Baglini was aboard the MV Wilderness Adventurer with UnCruise Adventures, “As we progressed up into the inlet, I witnessed perhaps the most spectacular sight I have ever seen; the Johns Hopkins Glacier with Mounts Wilber and Oval on the right and the Fairweather range as the backdrop.”
This kind of photo doesn’t rely on action or human presence. It’s about showing the glacier as part of the terrain. On calm days, the surface of the water can act like a mirror, doubling the scale and adding stillness to the image. As Baglini described it, “the water was calm so our Captain shut the engines down and we just drifted... there was virtually no-one talking. It was as if we were witnessing a glimpse of Heaven.” The conditions for photographing the glacier were ideal—perfect lighting, a stationary boat, and no passengers walking about.
You can get this shot from virtually any tidewater glacier in Alaska on a day cruise, kayaking trip, or private boat charter. The Glacier Bay Day Cruise in Glacier Bay National Park that departs from Gustavus is a great option for capturing this type of scene. The day cruise often visits Margerie or Grand Pacific Glacier. Harvard Glacier in College Fjord in Prince William Sound is another great opportunity for this type of scene, and can be viewed with Phillips 26 Glacier Cruise or Lazy Otter Charters. Or, from Seward, cruise to Northwestern Glacier with Major Marine Tours or Kenai Fjords Tours. Other options include a multi-day cruise with UnCruise or Discovery Voyages.
Tips for getting the shot:
Look for symmetry—if the water is still, include the reflection for added depth.
Choose your composition carefully: try placing the glacier low in the frame to emphasize the mountains, or center it for balance.
Use f/8 to f/11 to keep everything sharp from foreground to background.
Don’t zoom in too much—the power of this shot is in the space and stillness.
These types of landscape shots are taken tens of miles away because these glaciers are massive. Don't hesitate to step outside while the boat is commuting to get these great landscape shots.
Ice Patterns from a Distance – Texture in Motion
What you’re seeing:
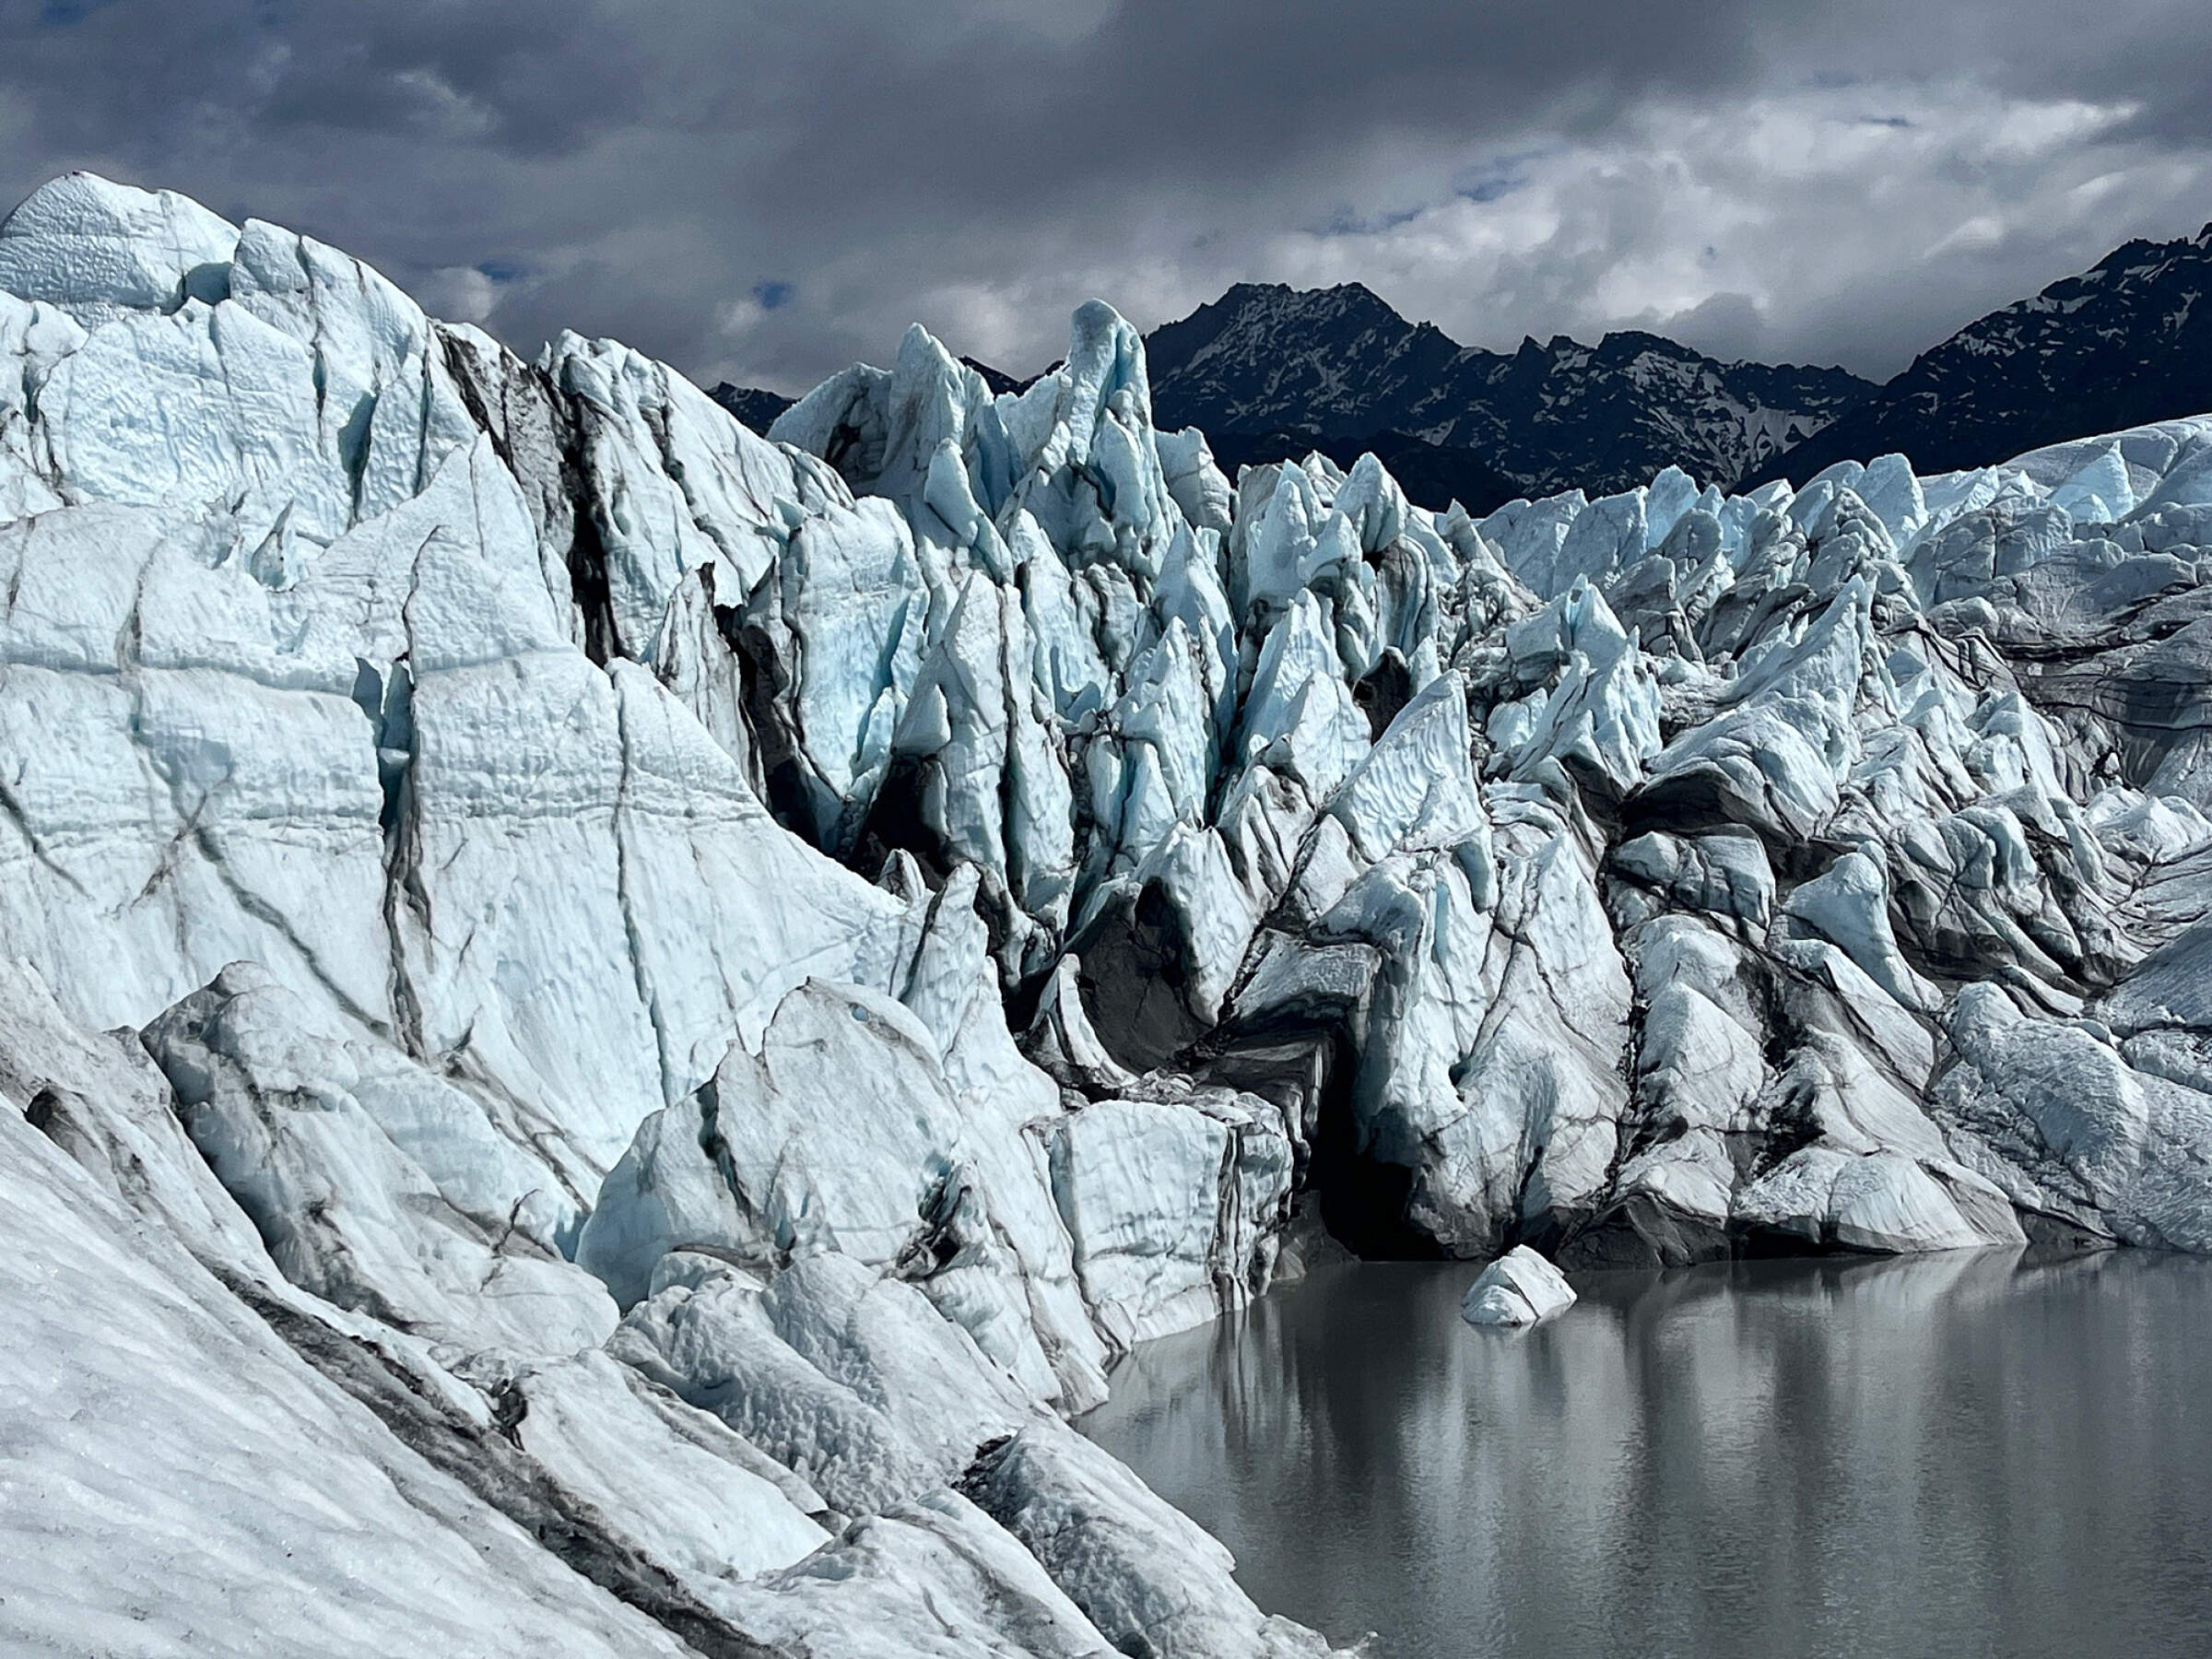
As glaciers flow downhill, they stretch, compress, and crack under their own weight. These stresses leave visible patterns—serrated ridges, deep crevasses, wave-like folds, or repeating textures across the surface. Some of the most interesting shots come when you isolate a section of the glacier and focus just on the pattern, rather than the whole thing. Look for repeating forms with one element that breaks the rhythm—that contrast is what makes the shot.
From a distance, these textures can feel abstract or geometric. But they’re not random—they’re shaped by how fast the glacier is moving, what’s happening underneath it, and how the ice is deforming as it flows. When you frame them right, these shots tell a quieter story about the glacier’s structure and momentum.
Where to get it:
Some of the best angles are from land or water, using a long lens. Day cruises in places like Prince William Sound, Kenai Fjords, or Glacier Bay give you long views across the surface of tidewater glaciers, where you can isolate texture and shape. ATV tours to the base of Knik Glacier; glacier trekking in Seward, McCarthy, or the Matanuska Glacier; and helicopter tours offer a similar vantage, especially when you climb a moraine or ridge that overlooks the ice. Glacial lakes such as Bear Glacier Lagoon or Grewingk Glacier Lake also work—icebergs often collect along one shoreline, and with the right angle, you can zoom in and pick out patterns without having to be directly on the ice.
Tips for getting the shot:
Use a telephoto lens (100–400mm or more) to isolate sections of the glacier surface.
Look for repeating patterns—then frame the spot where something breaks that pattern.
Shoot from a stable platform if possible. Even slight movement will blur detail at long focal lengths.
Consider converting to black and white in post if the light is flat—this can enhance contrast and make the structure pop.
Ice Detail Shot on the Ground – Ancient Ice, Up Close
What you’re seeing:
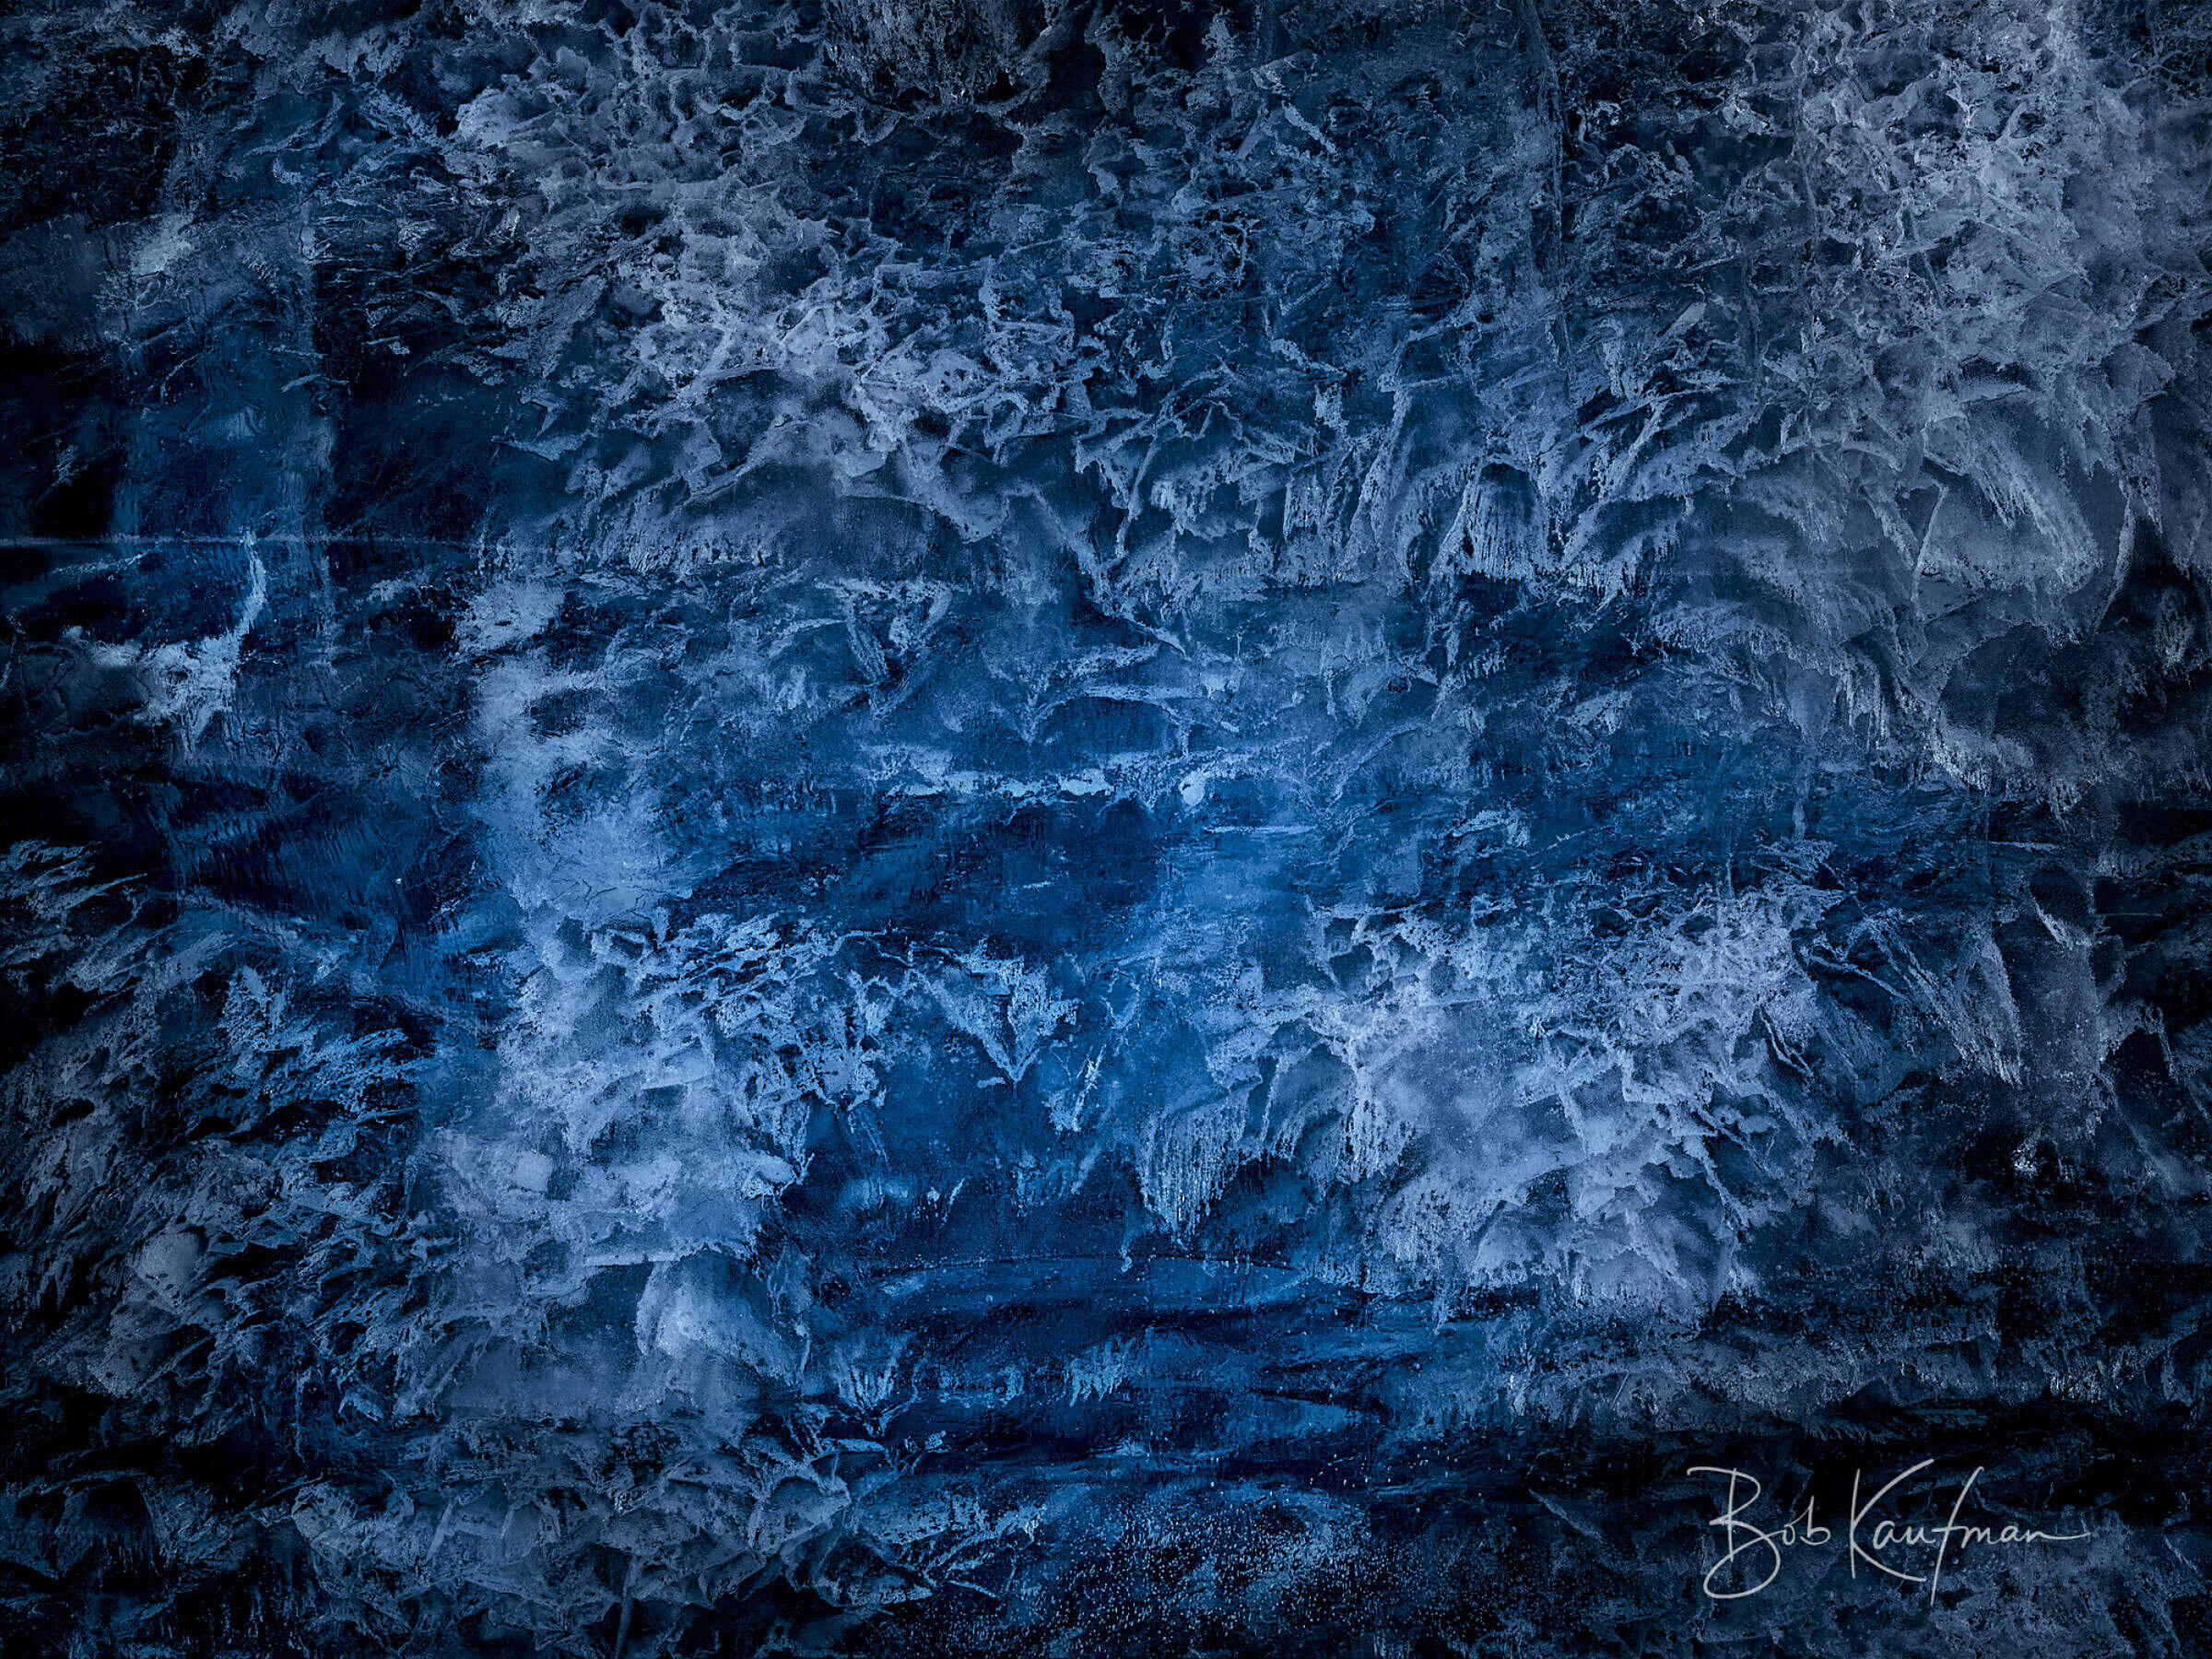
Glacier ice forms over time as layers of snow compact and squeeze out air. What’s left is dense, ancient ice that can be clear, blue, or full of embedded bubbles and fracture lines. Up close, it can look like glass, stone, or something entirely abstract.
These shots aren’t about the glacier as a whole—they’re about texture, density, and light. Some ice will be rough and chalky. Other spots will be smooth and polished from meltwater. What makes these shots work is contrast: sharp edges against soft light, deep blues against white crust, or fine cracks that catch the sun just right.
Where to get it:
You’ll find this kind of ice on glacier hikes, or where broken chunks collect—on beaches, in melt pools, or near calving zones (at a safe distance). Matanuska, Exit, and Root Glaciers are good options for guided walks. Bear Glacier Lagoon and Spencer Glacier also offer access to grounded ice.
Tips for getting the shot:
Use a Tripod: A tripod helps with precise framing and keeps everything sharp—especially important if you’re shooting at smaller apertures or in lower light.
Get Close—Really Close: You might be just a couple feet away. Use a macro lens if you have one to capture fine textures like bubbles, cracks, and layering.
Watch Your Edges: Once you’ve focused, re-check your corners. If the ice curves away or you’re not shooting straight on, the edges of your frame can fall out of focus fast.
Find the Shade: Sunlight can bounce off the surface and block your view into the ice. Shade or indirect light lets you see the clarity and structure inside.
Avoid Auto Exposure: Auto settings tend to blow out the bright parts. Dial down exposure manually to hold detail in the highlights.
Icebergs on Ground – Beached Giants
What you’re seeing:
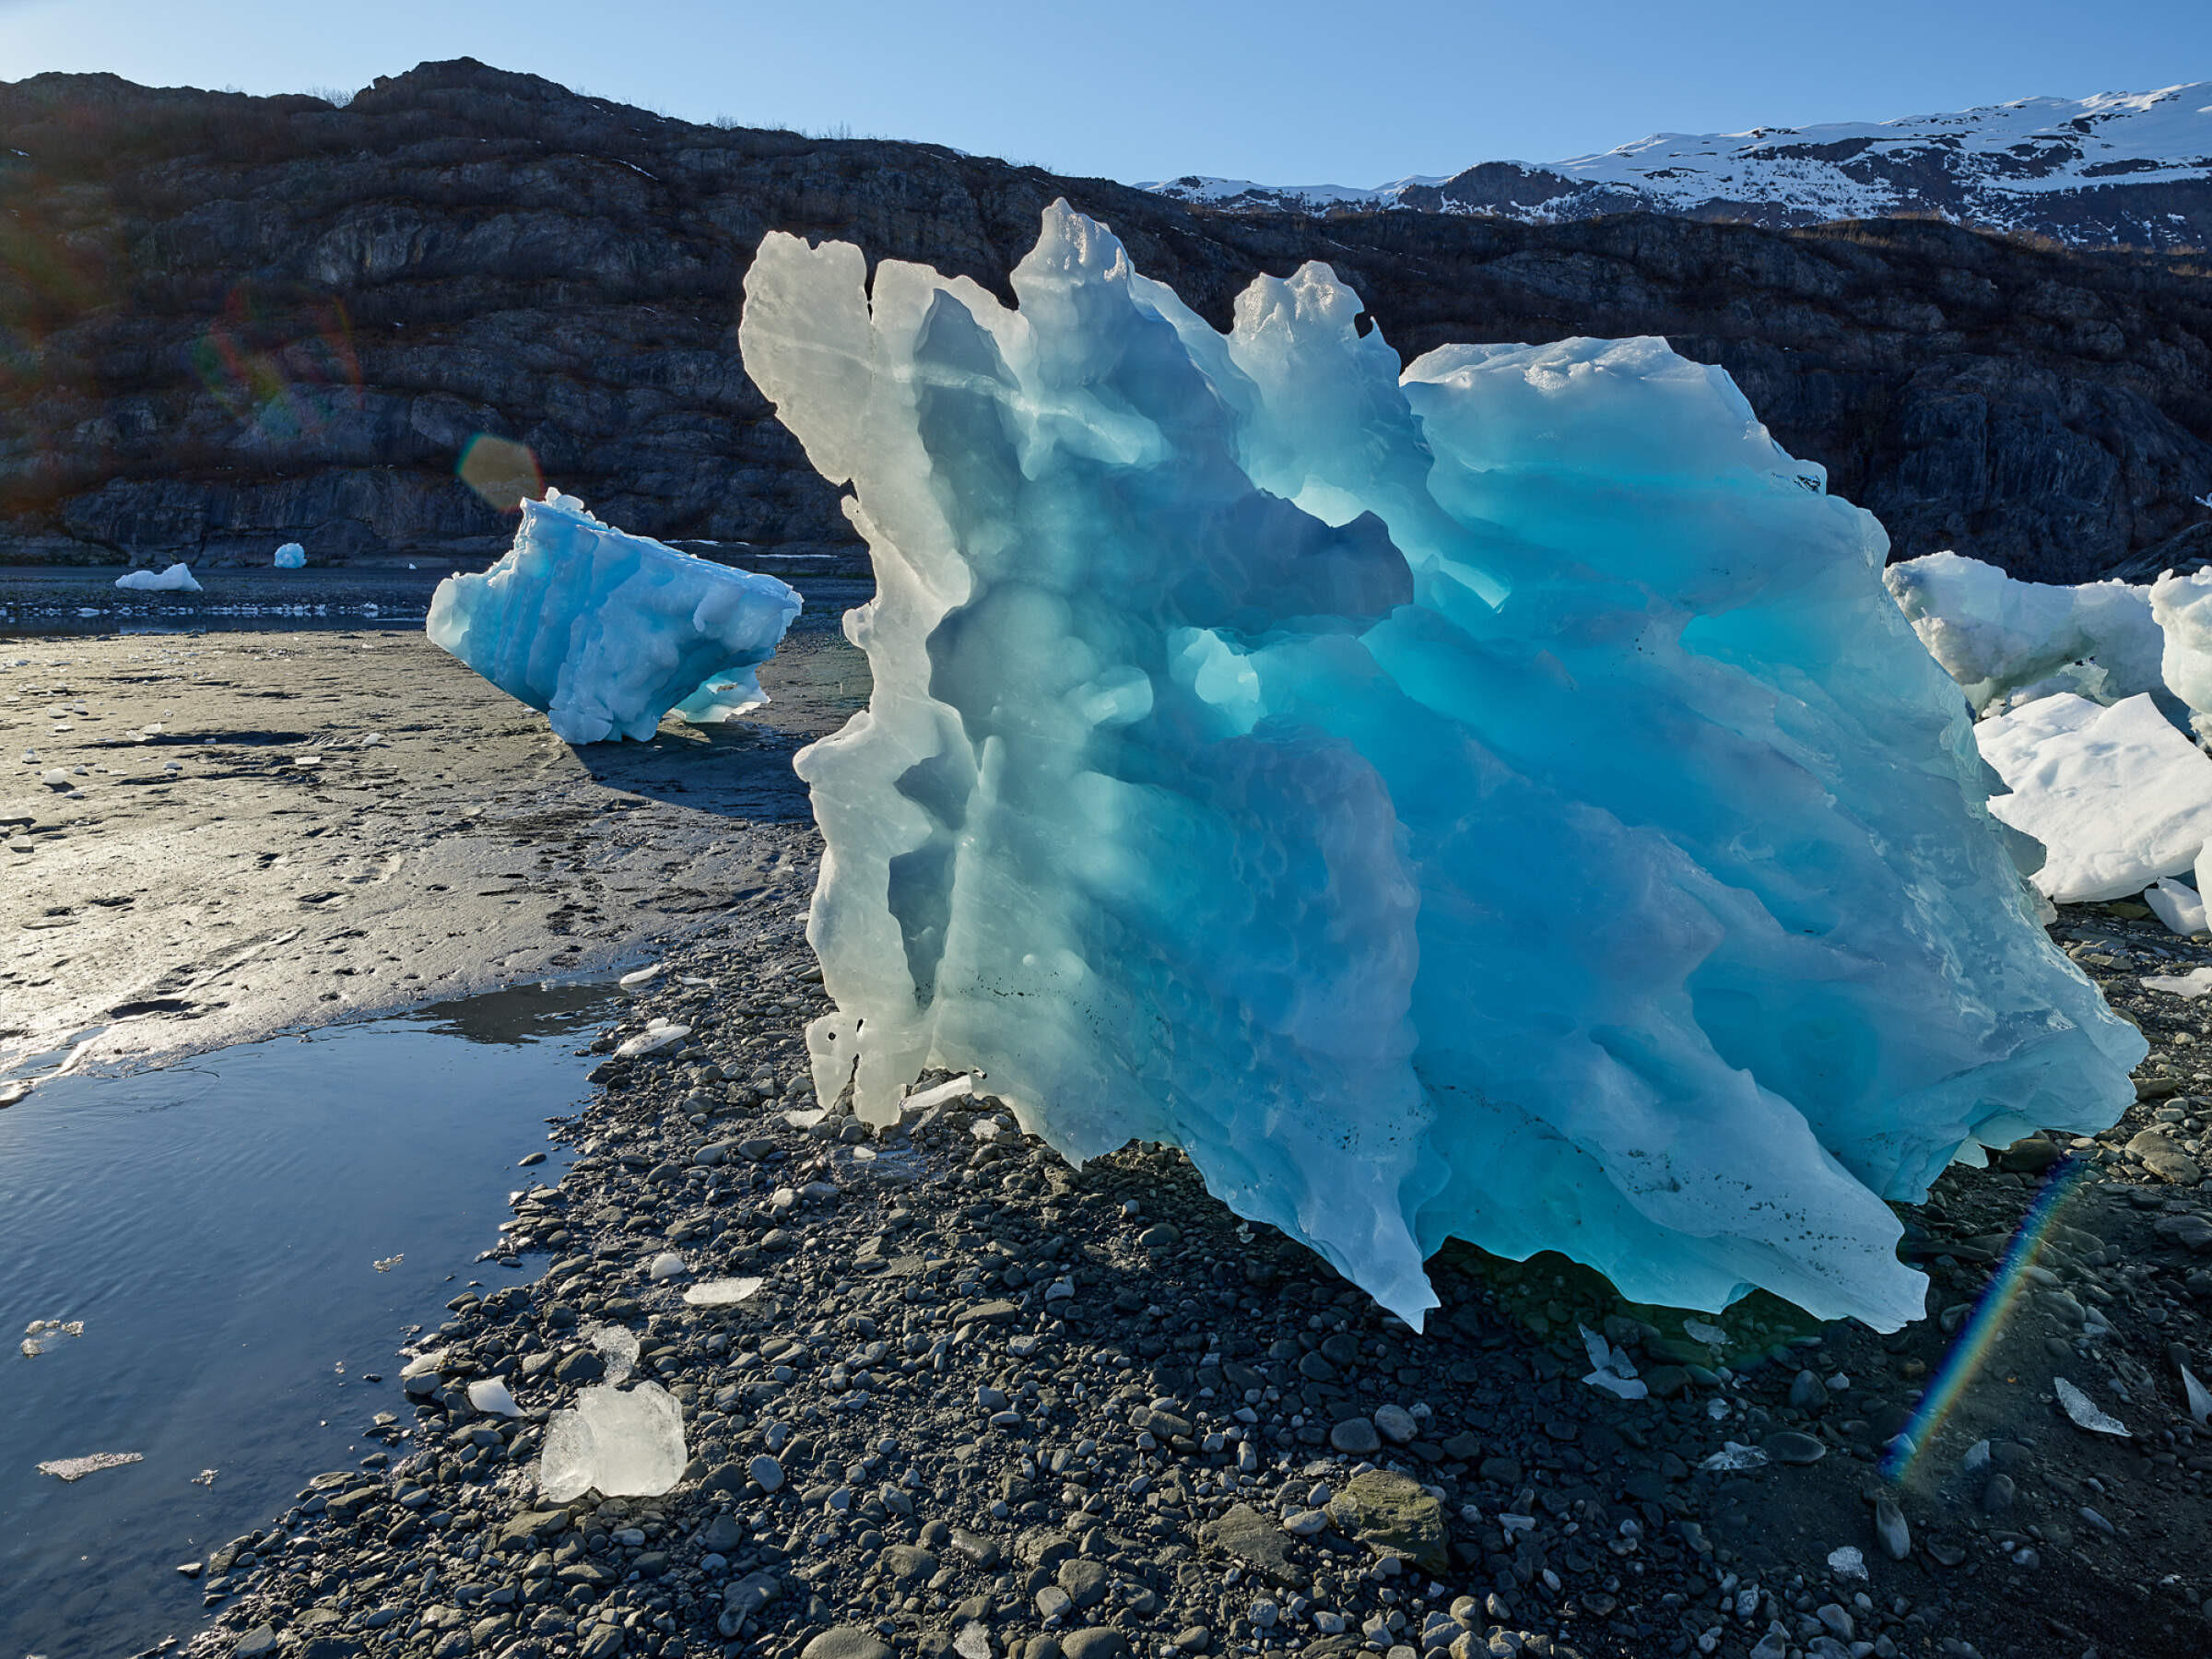
After breaking off from a glacier, icebergs sometimes drift into shallow bays or onto beaches, especially in calm conditions or with a falling tide. When the water recedes or the ice gets pushed by wind, some of these chunks get left behind—temporarily stranded on gravel, sand, or silt flats.
Unlike glacier hikes, you don’t need to be roped up or walk on ice to get close. These grounded bergs give you full access to the shape, texture, and color of the ice from all sides. Many are melting and reshaping by the hour. What makes these shots work is the unexpected setting: raw glacier ice sitting quietly on land.
Where to get it:
In Southcentral Alaska, Bear Glacier Lagoon is a reliable spot to find grounded icebergs, often reached by jet boat or kayak out of Seward. In spring, you can sometimes find them at Spencer Lake as well. If you’re serious about photographing icebergs, consider a cruise with Discovery Voyages in Prince William Sound or chartering Lazy Otter Charters to go to Black Sand Beach, Harriman, or other spots in Prince William Sound.
Tips for getting the shot:
Get low. Shooting from near ground level makes the ice feel more monumental and lets you use the background better.
Use the surrounding terrain. Pebbles, grass, or shoreline debris can add texture and contrast.
Pay attention to the light. Icebergs often glow when backlit—especially in early morning or evening.
Shoot with both wide and mid-length lenses. Wide for context, tighter for detail and shape.
Avoid midday sun. Overhead light flattens the contours and blows out the edges.
If there’s a sheen of water on the sediment or a shallow pool in front of the iceberg, get the shot—it may be gone in minutes. If the tide’s going out, that water will vanish. If it’s coming in, the foreground may soon be too deep to use.
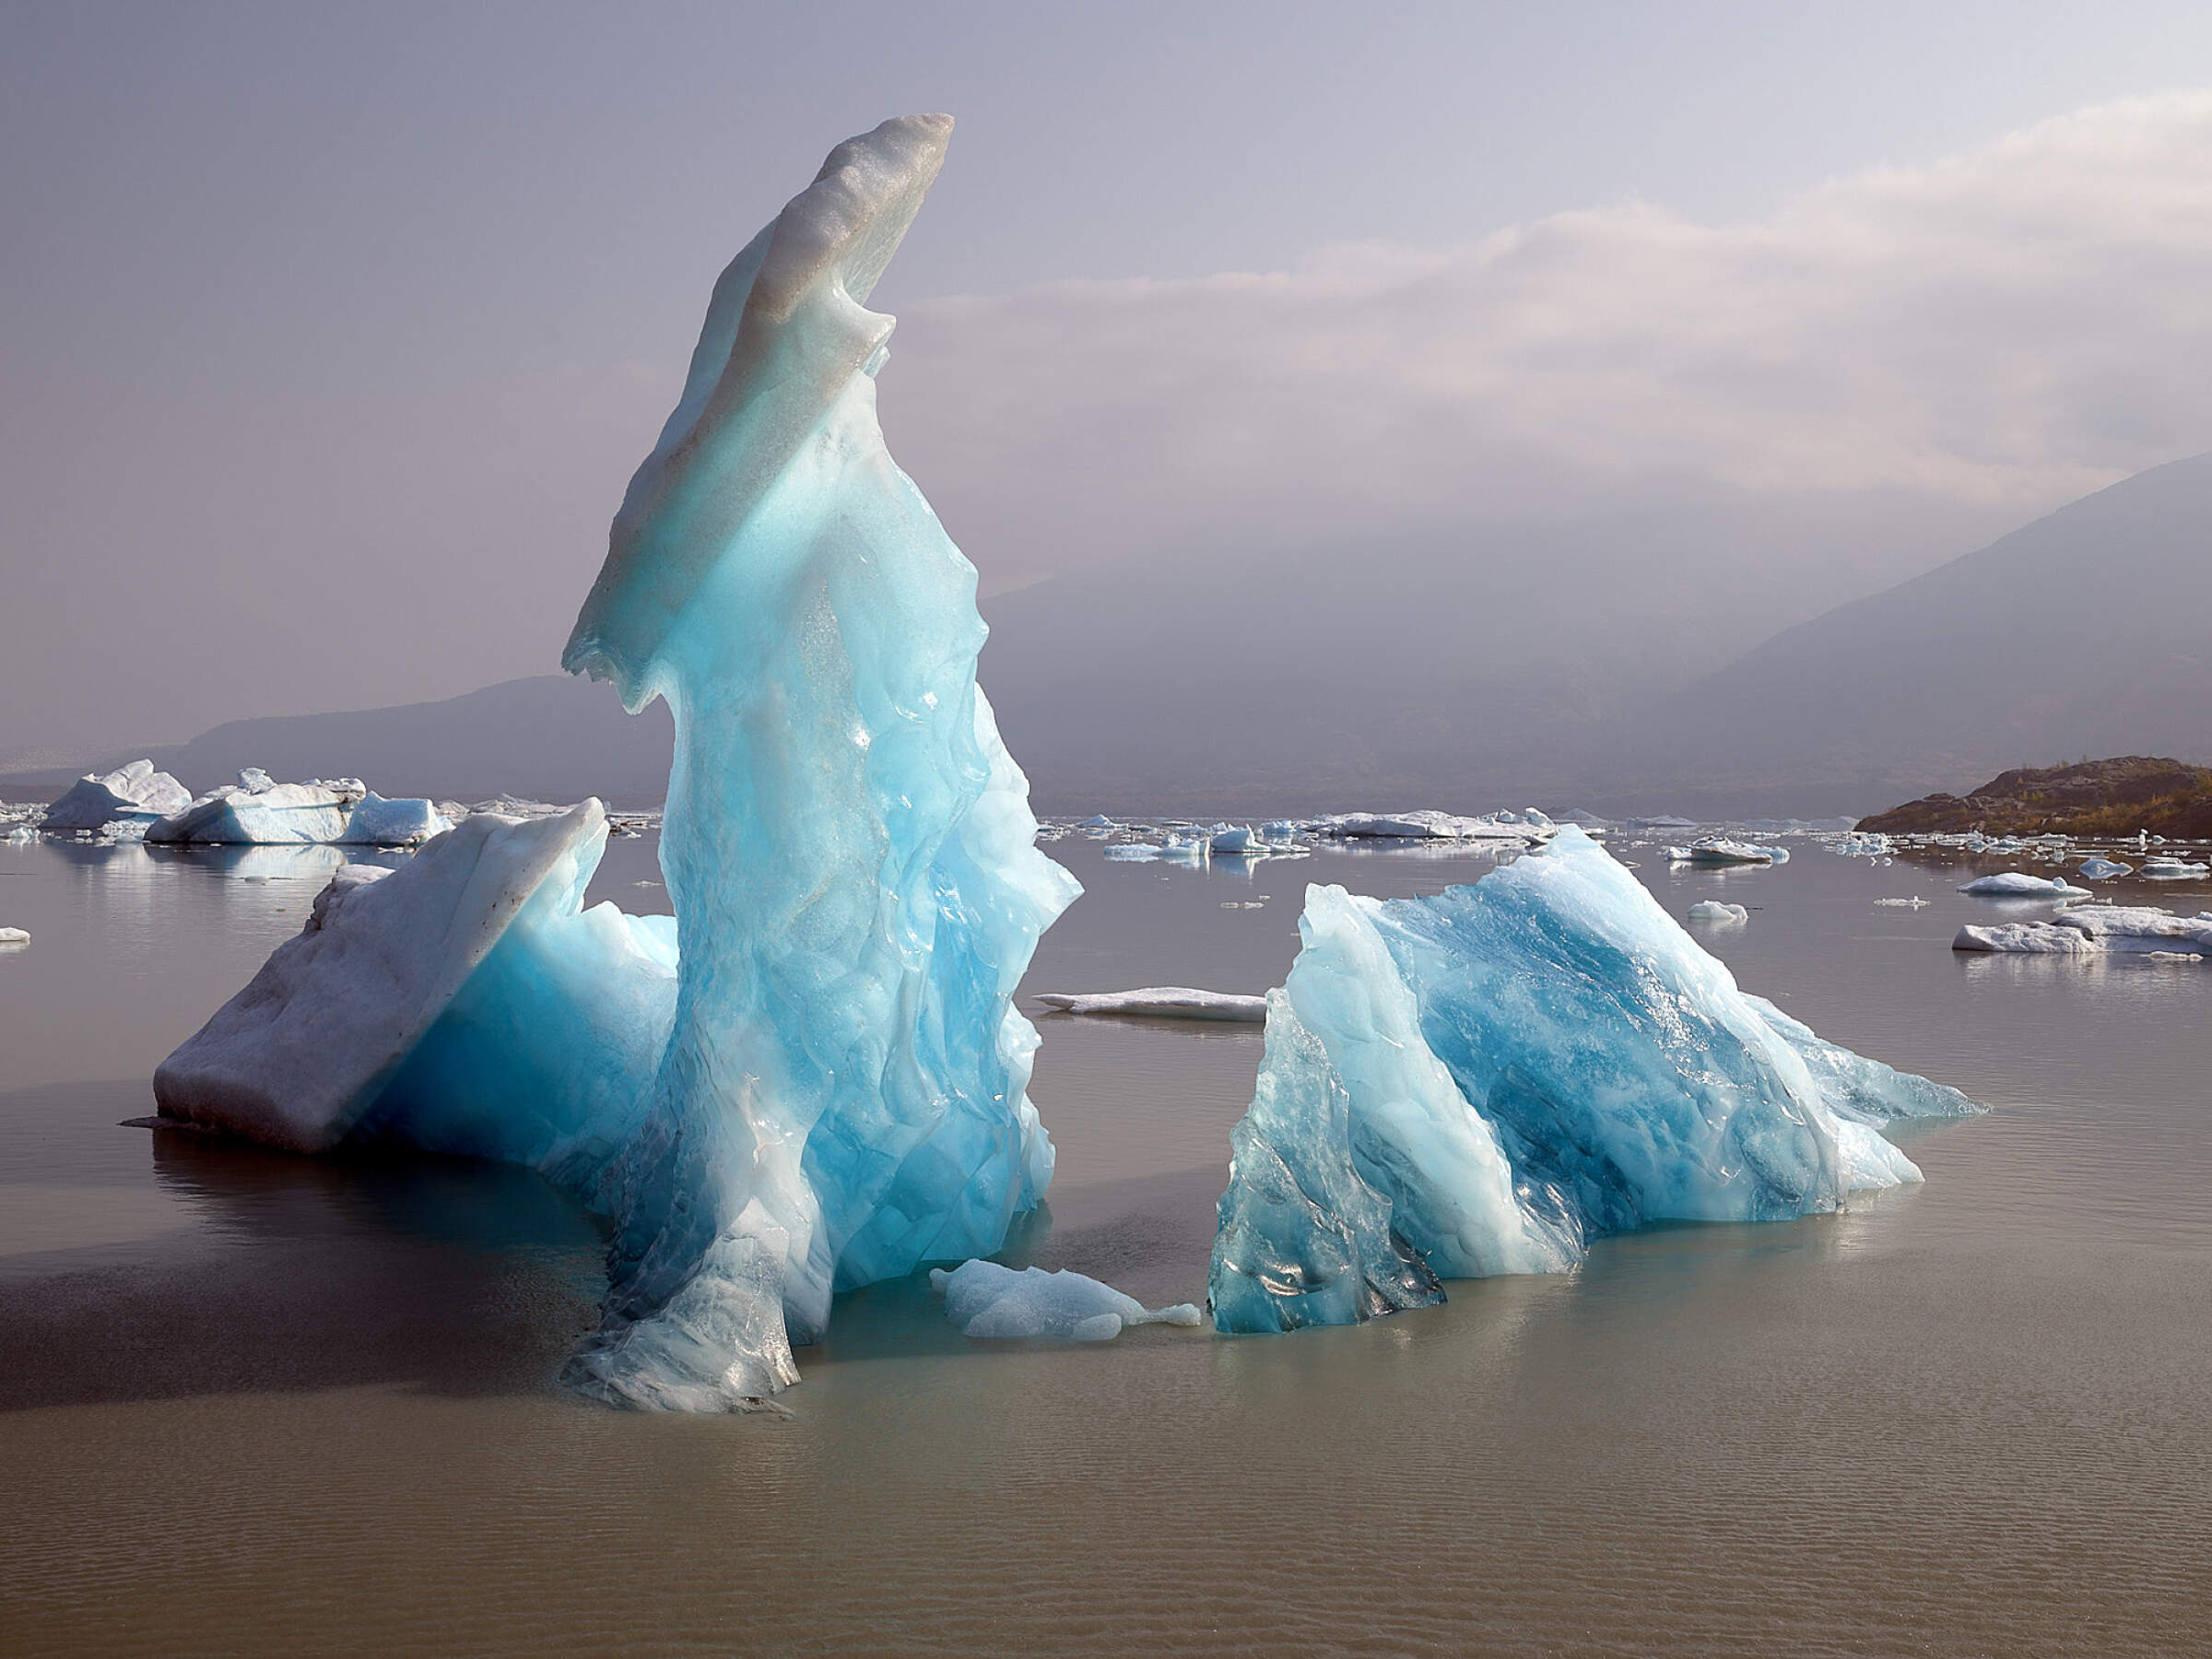
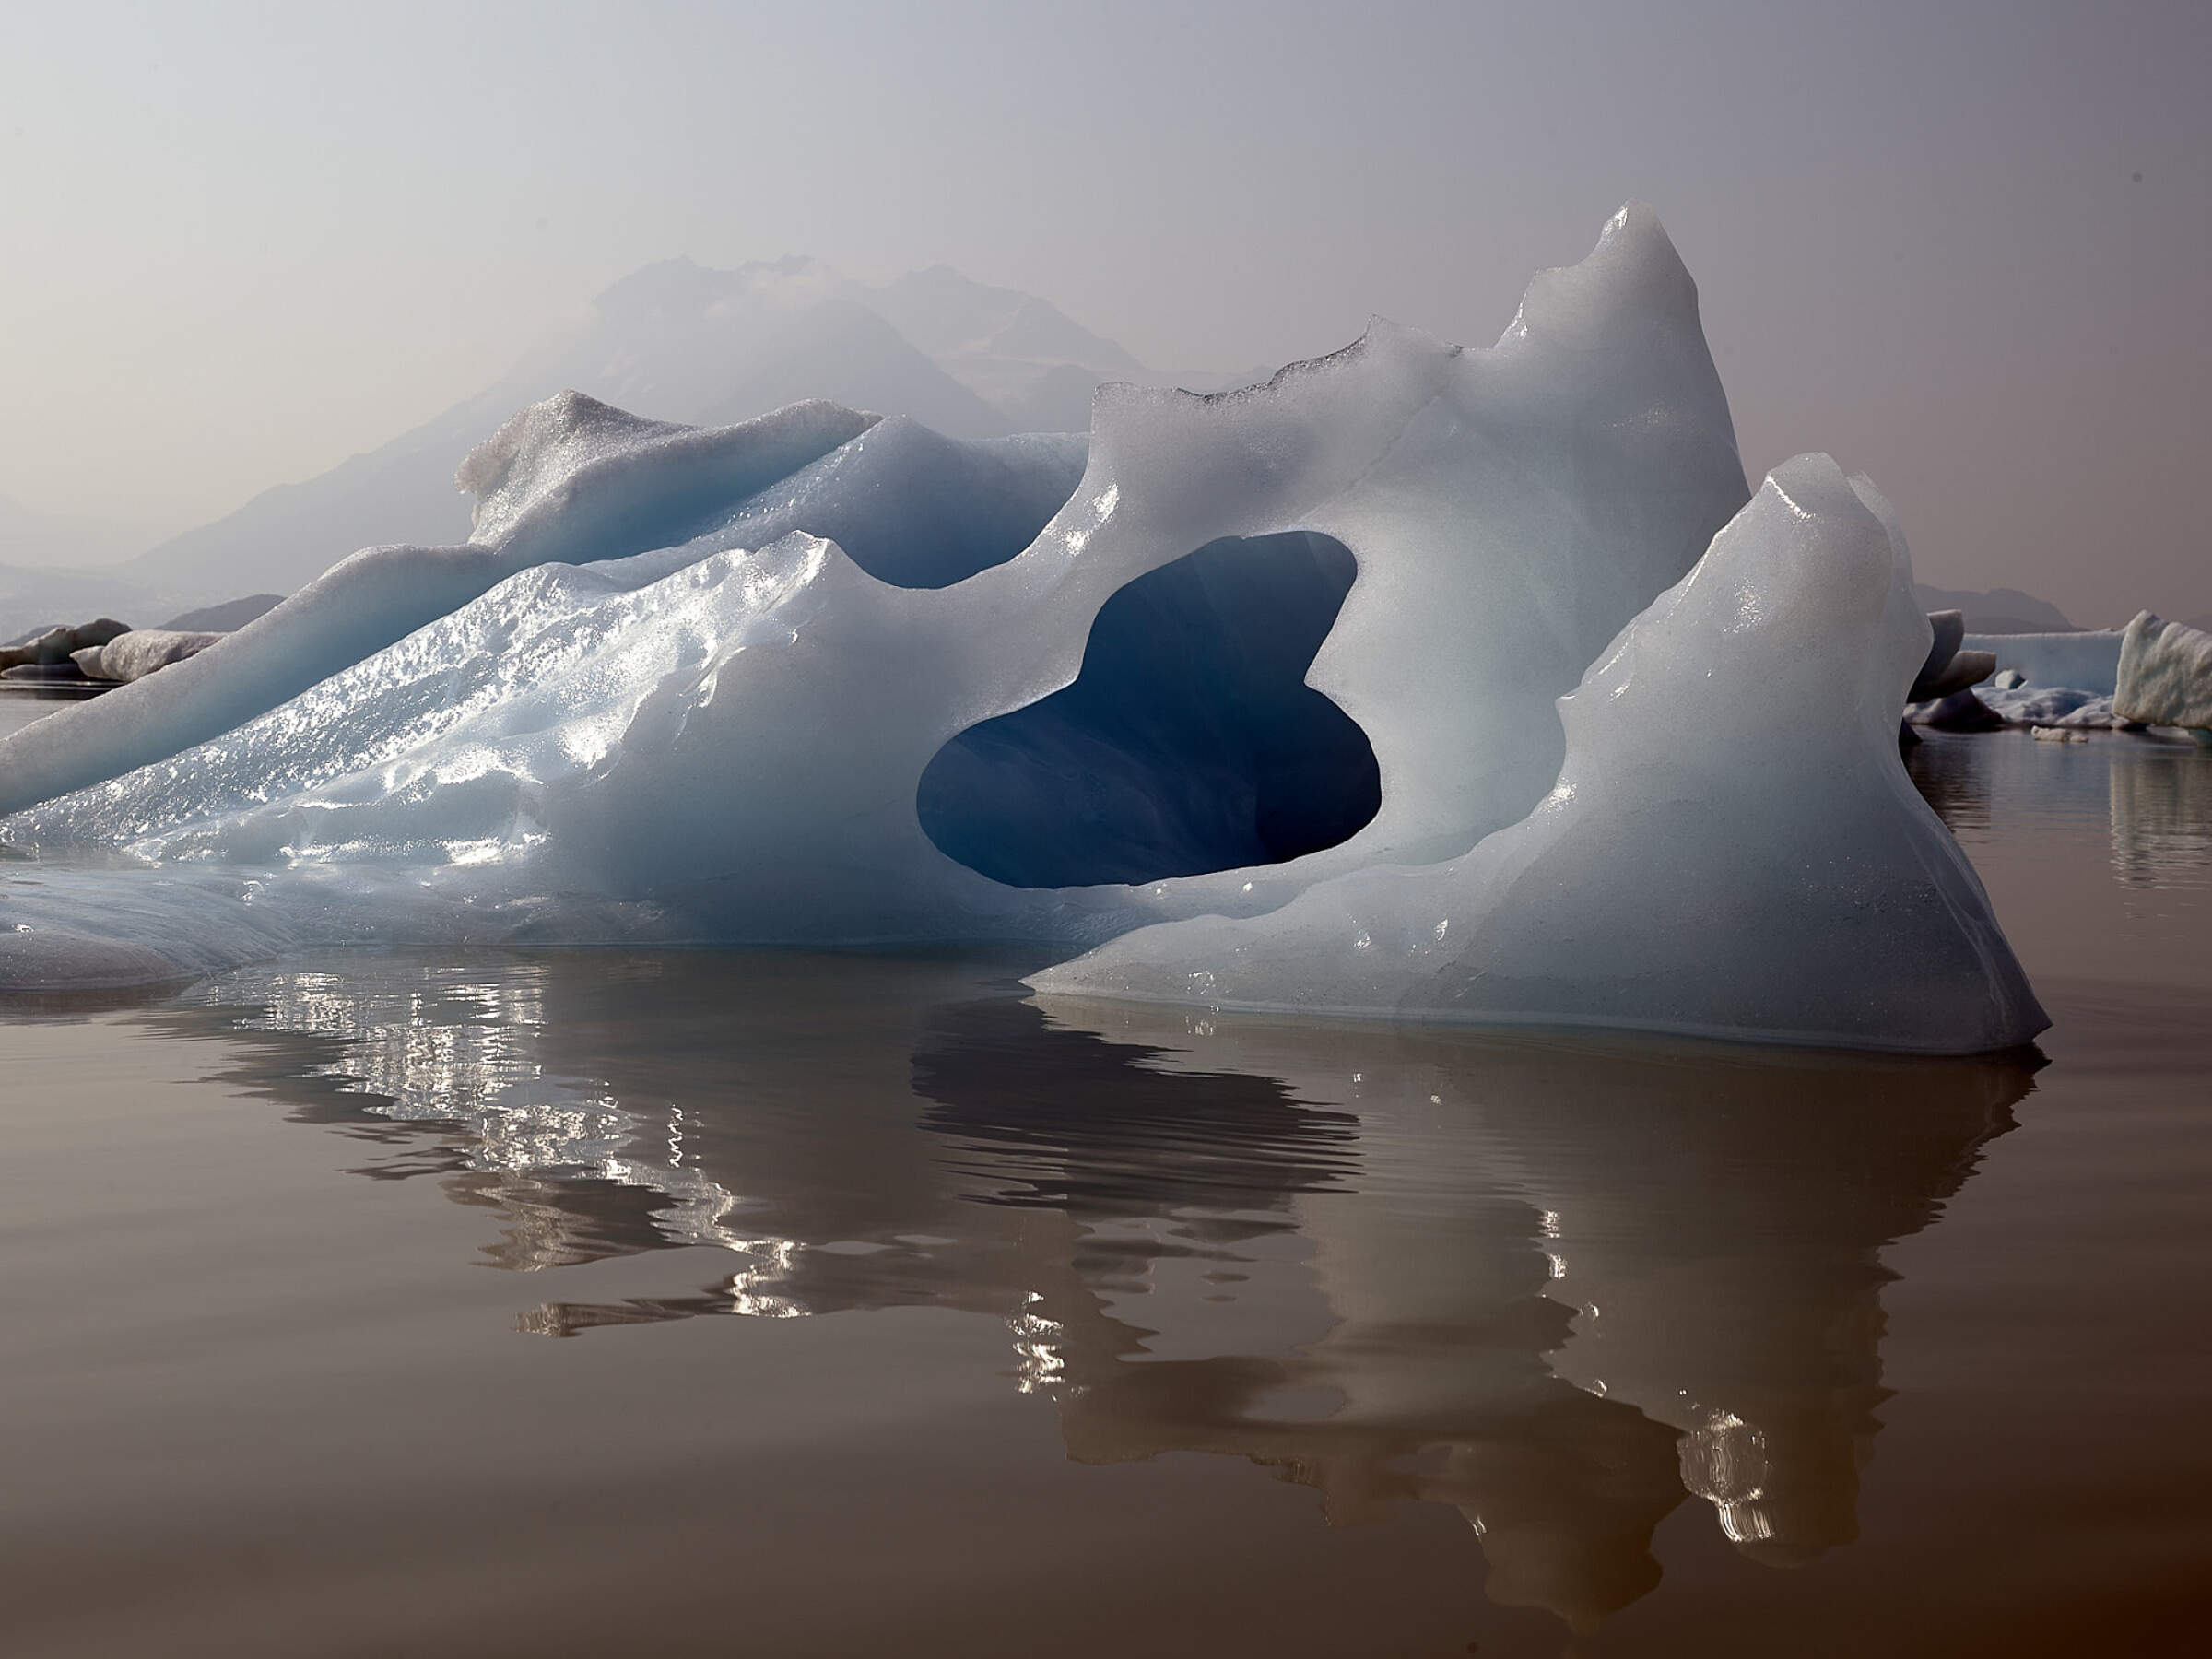
Floating Icebergs – Form, Light, and Drift
What you’re seeing:
When a tidewater glacier calves, the broken chunks drift out into bays, fjords, or lakes. Some are the size of a car, others as big as buildings. What you see above the surface is just a fraction—usually around 10% of the total mass. The rest is underwater.
As they melt, icebergs roll, crack, and reshape. Some become arches, towers, or slabs. Others turn milky white or glow deep blue. The motion is slow, but constant. These shots are about form, light, and reflection. Calm water adds mood. Open space emphasizes isolation. And when the shape is just right, the photo tells its own story.
Where to get it:
One of the most photogenic places to shoot floating icebergs is Bear Glacier Lagoon, accessed by jet boat or kayak from Seward. Grewingk Glacier Lake in Kachemak Bay State Park is another excellent option, reached by boat and a short hike from Homer. Valdez Glacier Lake has icebergs that can be seen on a kayaking tour with Anadyr Adventures. You’ll also find good iceberg scenes at Spencer Lake on a guided float with Chugach Adventures or Lake George which can be reached on a flightseeing tour from Anchorage or Palmer.
In a multi-day setting, UnCruise Adventures makes this possible via kayak and skiff tours. Getting off and on the ship is fast and easy thanks to their EZ Dock floating launch platform. Including a skiff, kayaks, or even the ship near a glacier helps provide a sense of scale. Getting eye-level with seals on ice is another bonus of a kayak or skiff tour near glaciers. They even offer a photography specific itinerary.
Tips for getting the shot:
Keep your shutter speed at 1/500s or faster—icebergs drift more than you think, and so do boats.
Shoot low to the waterline if possible. This increases reflection and gives the ice more visual weight.
Watch for light shining through thinner parts of the ice—those spots often glow.
Overcast light works well for revealing texture and color without harsh shadows.
Be ready for quick changes. If a shape catches your eye, shoot immediately—it may rotate before you get a second chance.
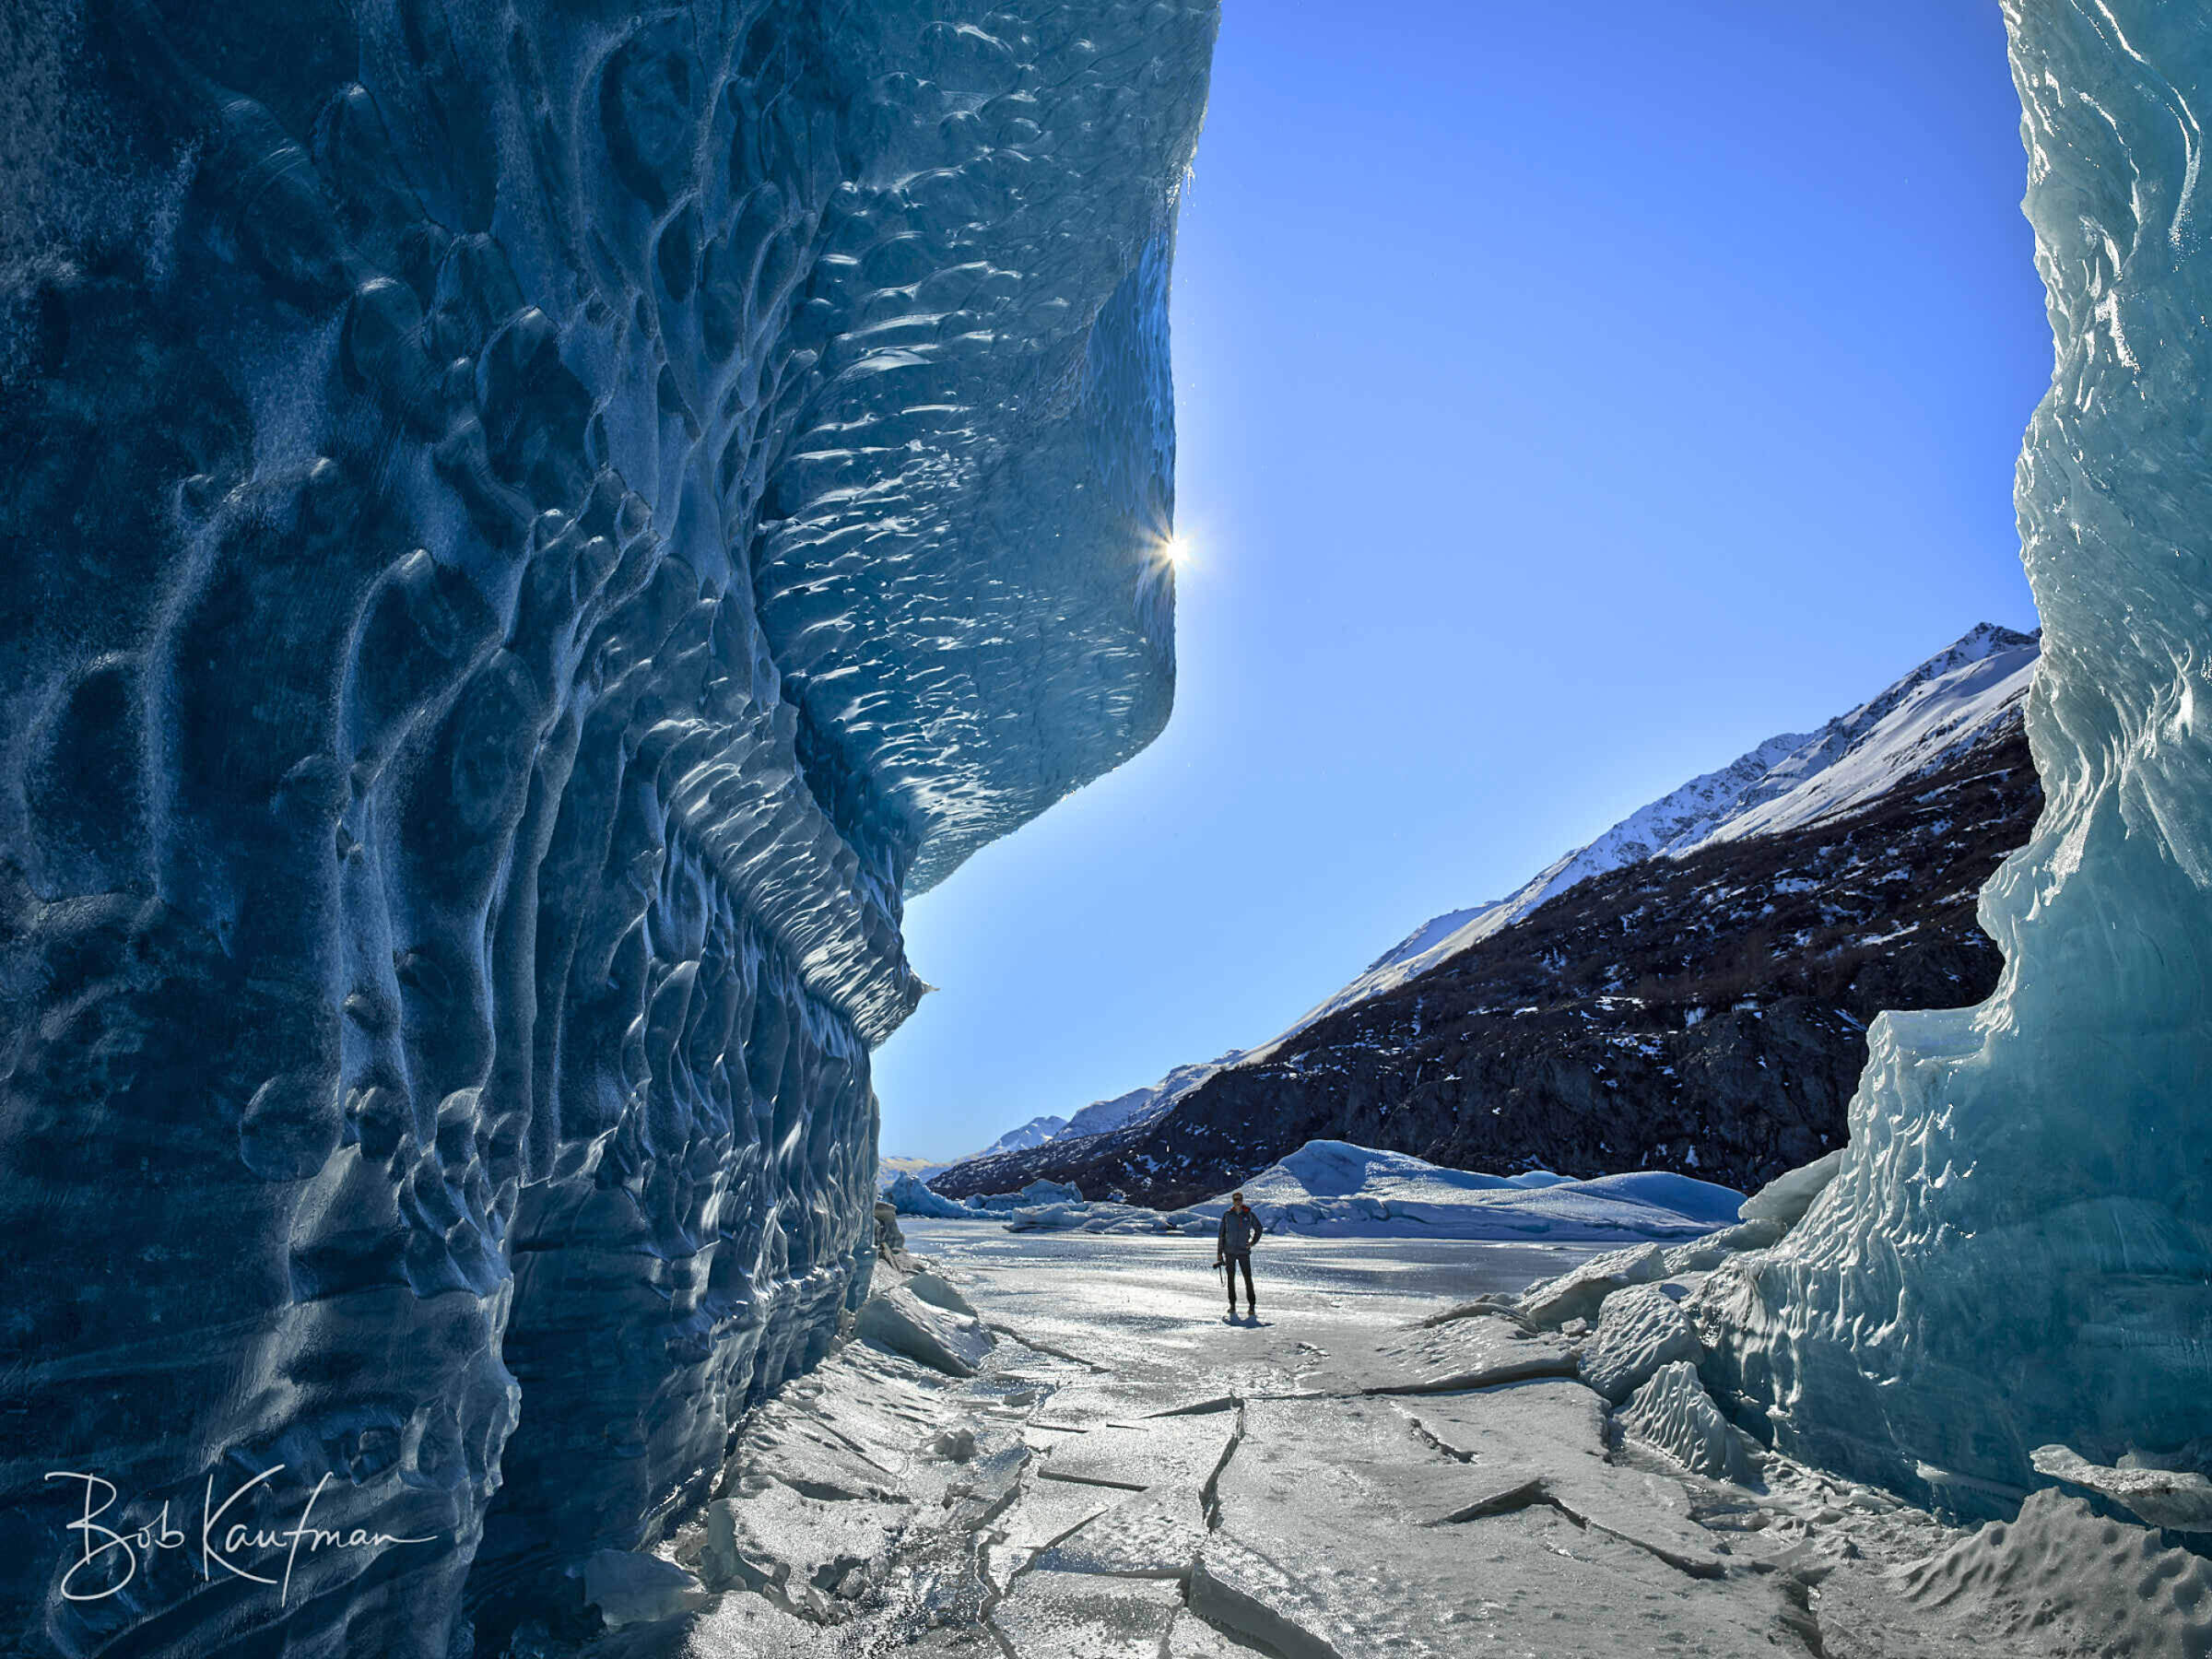
Ice Cave – Light from Within
What you’re seeing:
Ice caves form when meltwater cuts tunnels through or under a glacier. In winter and early spring, after water flow slows and temperatures drop, some of these tunnels stabilize and become accessible. Inside, the walls are made of solid glacier ice—often layered, compressed, and partially translucent. When light filters in, the ice glows blue from how it absorbs and scatters light.
These caves constantly change. Some collapse in a few days, others last a season. Most form low on the glacier near the terminus, where meltwater exits. Some caves are dry inside; others are flowing with water or blocked by icefalls. They’re not permanent and should never be entered without a guide who knows current conditions.
Where to get it:
Good places to find them include Matanuska Glacier in late winter or early spring (guided only), Spencer Glacier via snowmachine or fat bike tours, and the Root Glacier in Wrangell St. Elias National Park on a guided tour with St. Elias Alpine Guides.
Tips for getting the shot:
Bring a Tripod: Light levels inside caves are low. Even in the middle of the day, you’ll often need multi-second exposures to do the scene justice.
Bracket Your Shots: The contrast between a glowing entrance and the dark interior can be extreme. Bracketing or HDR gives you flexibility in post.
Use a Wide Lens: A 14–24mm or similar wide-angle lens helps you capture the full sweep of the chamber—walls, ceiling, and floor.
Set Custom White Balance: Auto won’t cut it. Manually dial in your white balance to keep the subtle glacier blues from getting lost or turning gray.
Work the Edges: Some of the best light and texture is where the ice curves near the entrance. Don’t just aim for the middle of the cave.
Never Go In Without a Guide: Ice caves can collapse without warning, even in cold weather. Only enter with someone who knows the cave and the current conditions.
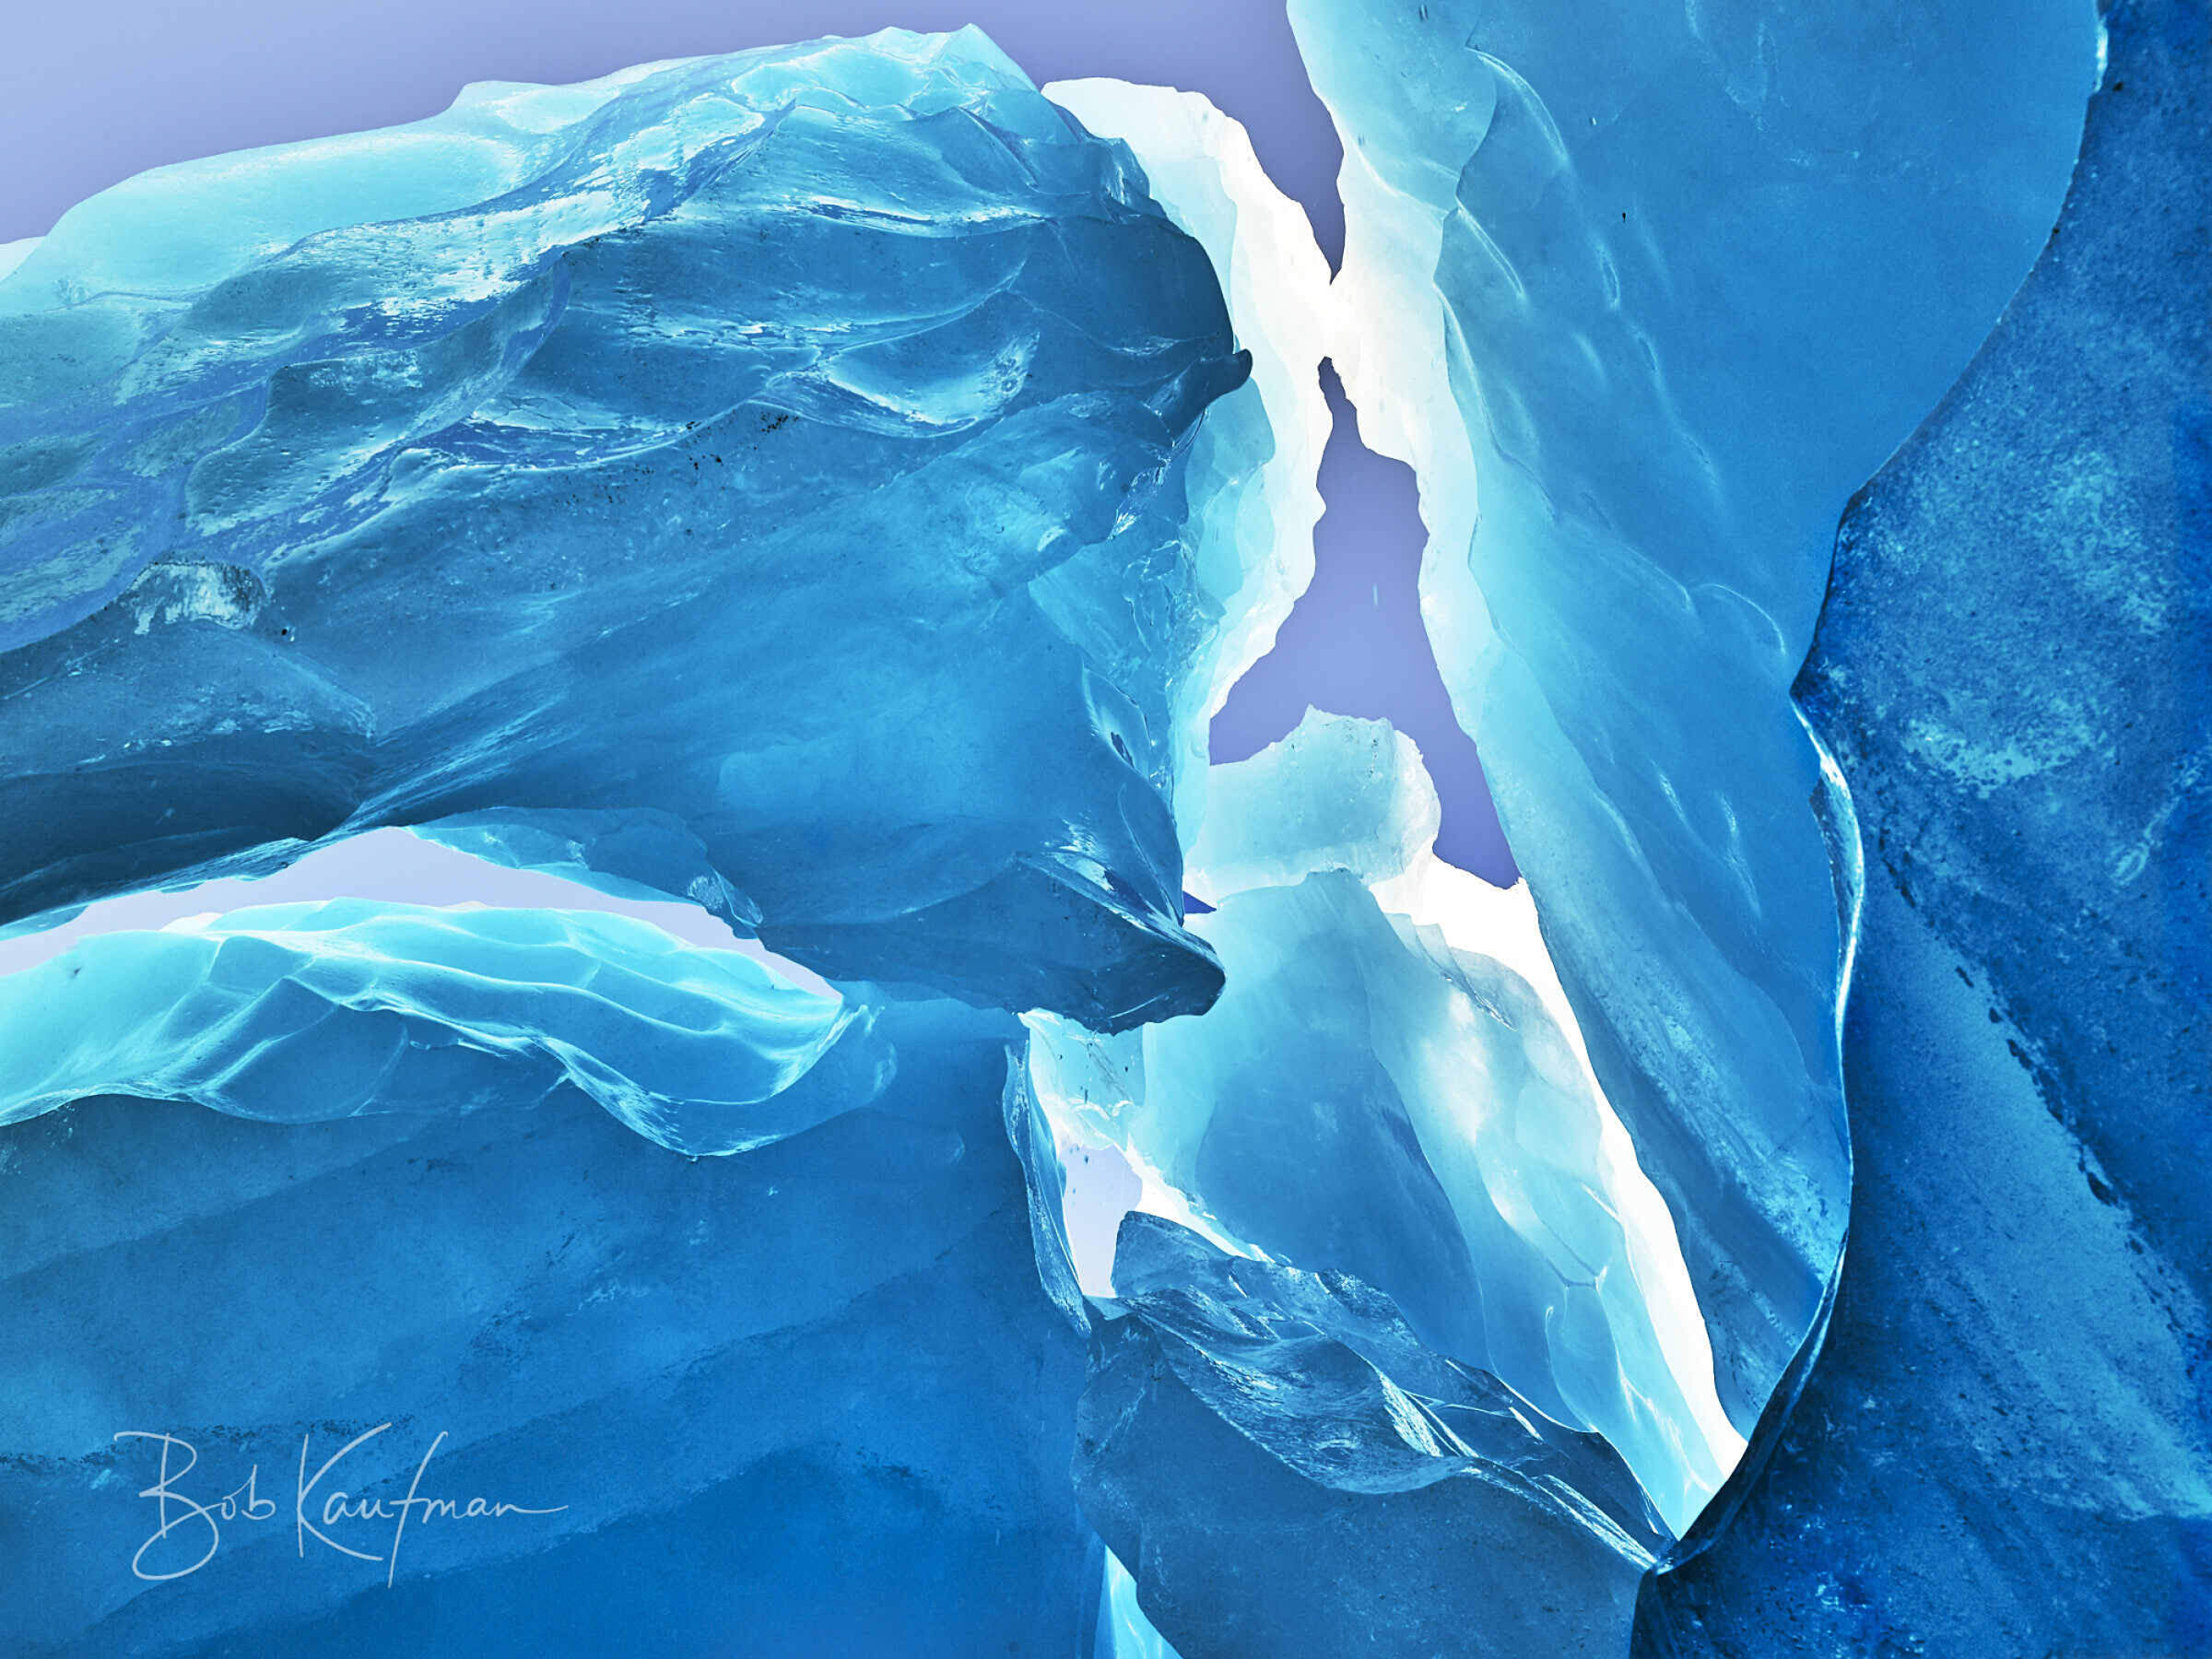
Ice as Sculpture – Nature’s Impossible Shapes
What you’re seeing:
When glaciers calve near moraines, massive towers or icebergs can end up stranded on shore. They melt unevenly and collapse in on themselves. What’s left can look like it was carved on purpose—blades, spires, fins, arches, or twisting forms that seem too delicate to last. The appeal is in the form—the sense that nature has sculpted something you couldn’t invent if you tried.
Where to get it:
These formations are rare and hard to find. Glaciers that have pulled back onto their moraines, like the side of Harriman Glacier in Prince William Sound, are a good candidate. So are certain beaches in Prince William Sound. Jökulhlaups—sudden glacier lake drainage events—can leave dramatic ice formations behind at places like Strandline Lake or Blockade Lake, both within an hour helicopter flight from Anchorage. Another spot that’s produced results in recent years is the side of Lake George Glacier, also accessible by helicopter from Anchorage. But there’s no guarantee. These features change quickly, and some years they don’t form at all.
Tips for getting the shot:
Shoot Fast: These forms are delicate and can collapse or shift without warning. Don’t waste time—work the scene quickly and efficiently.
Use Side Light: Early morning or late evening light brings out curves and texture. Midday light tends to flatten everything.
Try Multiple Lenses: A wide-angle lens shows the ice in its environment. A telephoto lets you isolate the most interesting shapes.
Get Low: If you can safely get below the sculpture, frame it against sky or water. That separation helps define the shape and gives the shot more impact.
Skip the Fill Flash: Flash flattens ice and kills its natural glow. Use available light.
Shoot from Several Angles: A sculpture can look ordinary from one side and extraordinary from another. Move around—you often won’t know the best angle until you see it.
From a Fixed-Wing Plane – Big Picture Perspectives
Flightseeing tours give you the scale. From the air, you see how glaciers twist through valleys, crack under pressure, and merge with others across vast mountain landscapes. These images are about geography, flow, and the glacier as part of something bigger.
Many fixed-wing flightseeing companies, including Wrangell Mountain Air, Rust’s Flying Service, and Regal Air offer custom flightseeing charters or photography specific tours.
Wide Aerial of Tidewater or Lakebound Glacier – The Glacier’s Full Path
What you’re seeing:
While on a flightseeing tour near Anchorage, AJ Krat captured this scene of the several mile wide face of Knik Glacier. It shows the classic aerial perspective of a glacier flowing into a body of water—looking straight down the length of a glacier, often from thousands of feet elevation. From this height, you can see the entire flow: how the glacier twists and bends through the mountains, where it begins, and where it ends. Medial moraines (dark lines formed by rock and debris) act like fingerprints, showing how tributary glaciers merged together over time. The shot is big-picture—it’s about scale and geography, not texture or detail. Tidewater glaciers end in the ocean, and the closer you get to the terminus, the more broken and chaotic the surface becomes. From above, you see how it’s all moving at different speeds—compressing in places, stretching in others.
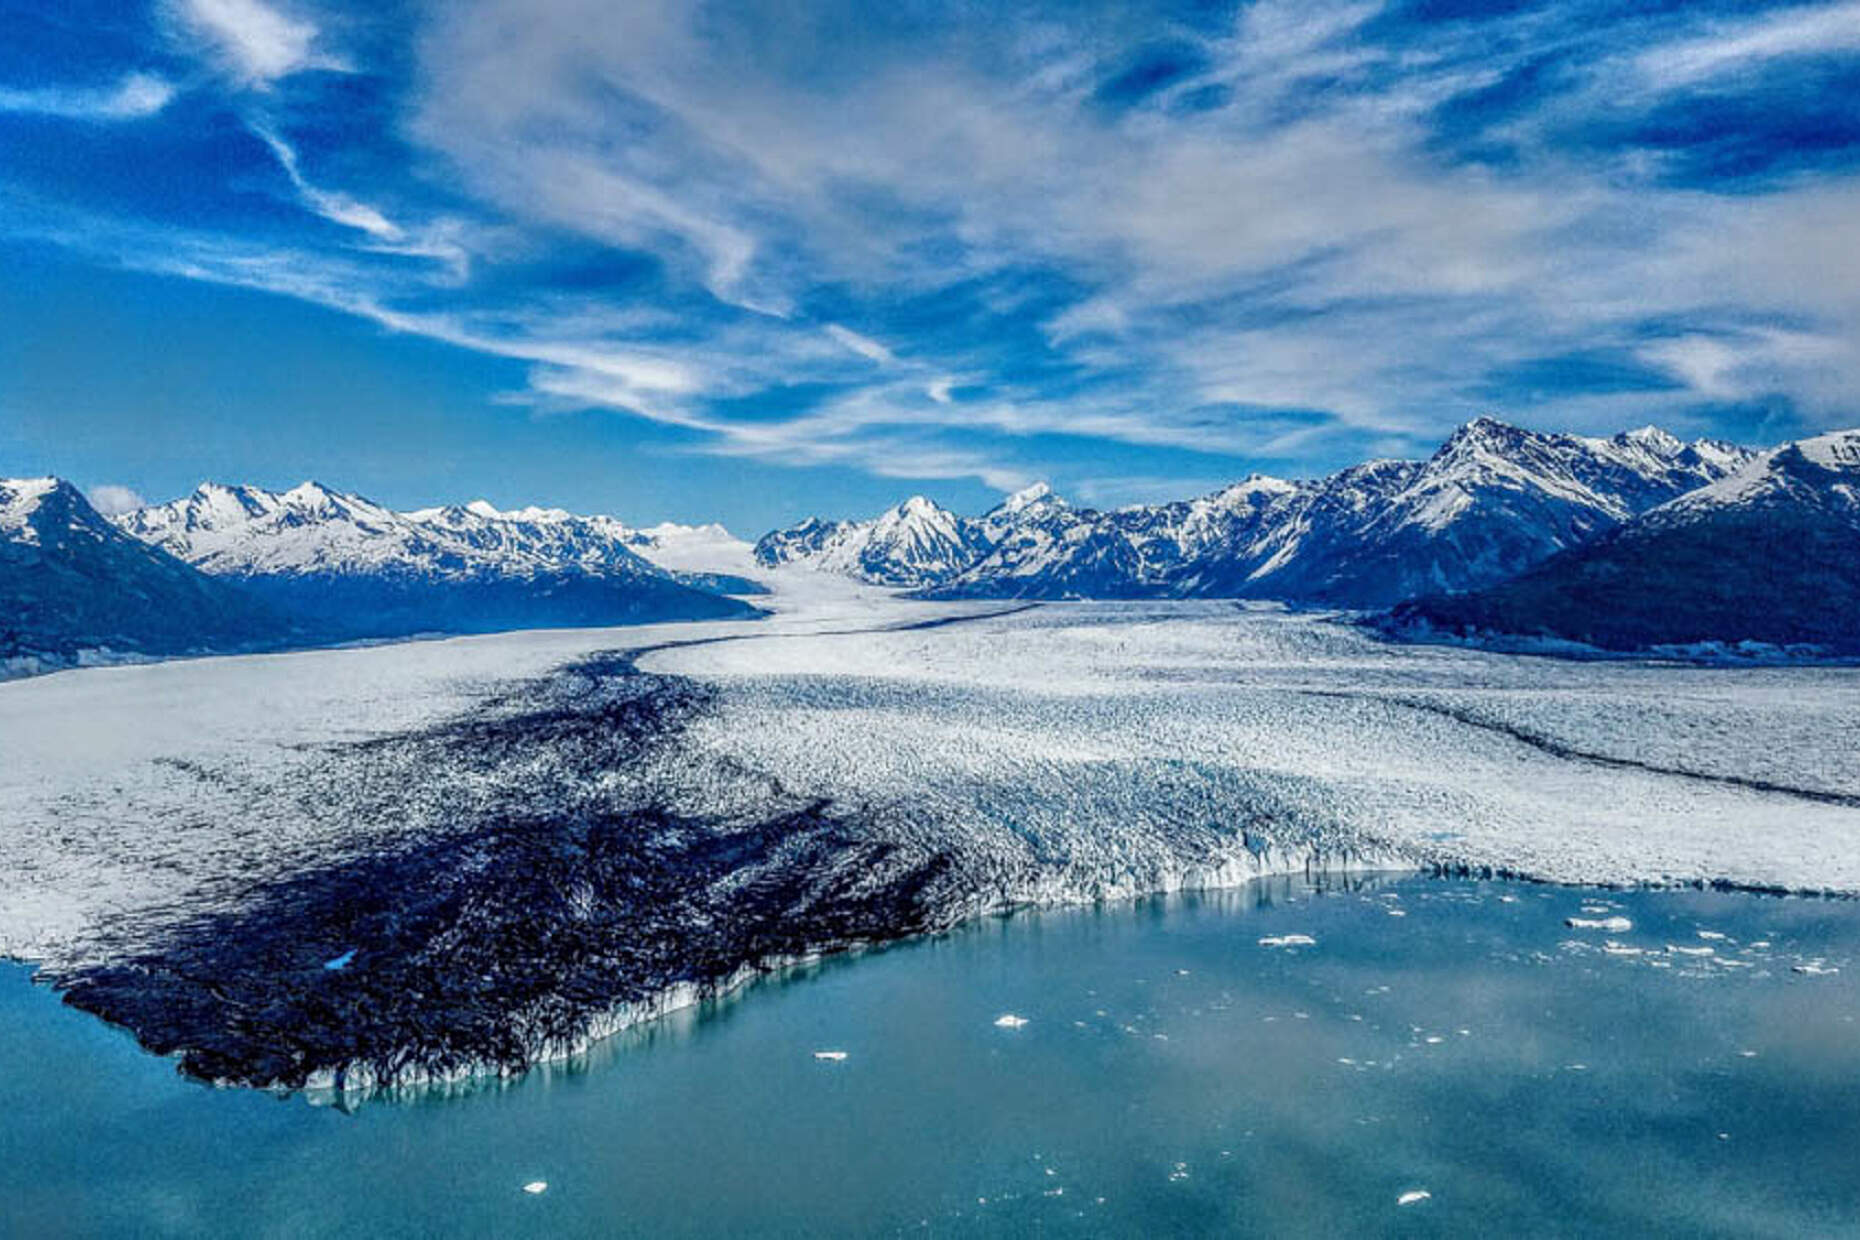
Where to get it:
You can get this kind of shot on a flightseeing tour from Anchorage into Prince William Sound, or from Southeast Alaska over tidewater glaciers near Juneau, Gustavus, or Yakutat. It helps if your pilot is willing to fly close along the glacier face or down the middle of the ice.
Tips for getting the shot:
Use a Fast Shutter: Set your shutter speed to at least 1/1000s to freeze motion and overcome any vibration from the plane.
Choose a Midrange Aperture: f/5.6 to f/8 gives you enough depth of field without slowing your shutter too much.
Keep the Lens Near the Glass: Don’t let it touch the window (it’ll vibrate), but get close to avoid reflections.
Wear Dark Clothing: It reduces reflections in the glass, especially if you’re shooting across your own lap.
Watch the Glacier’s Lines: Frame along the flow of the glacier or use medial moraines to draw the eye through the shot.
Stay Alert to Light Changes: The glacier’s surface is constantly shifting from white to shadow to reflective ice—adjust exposure as you go.
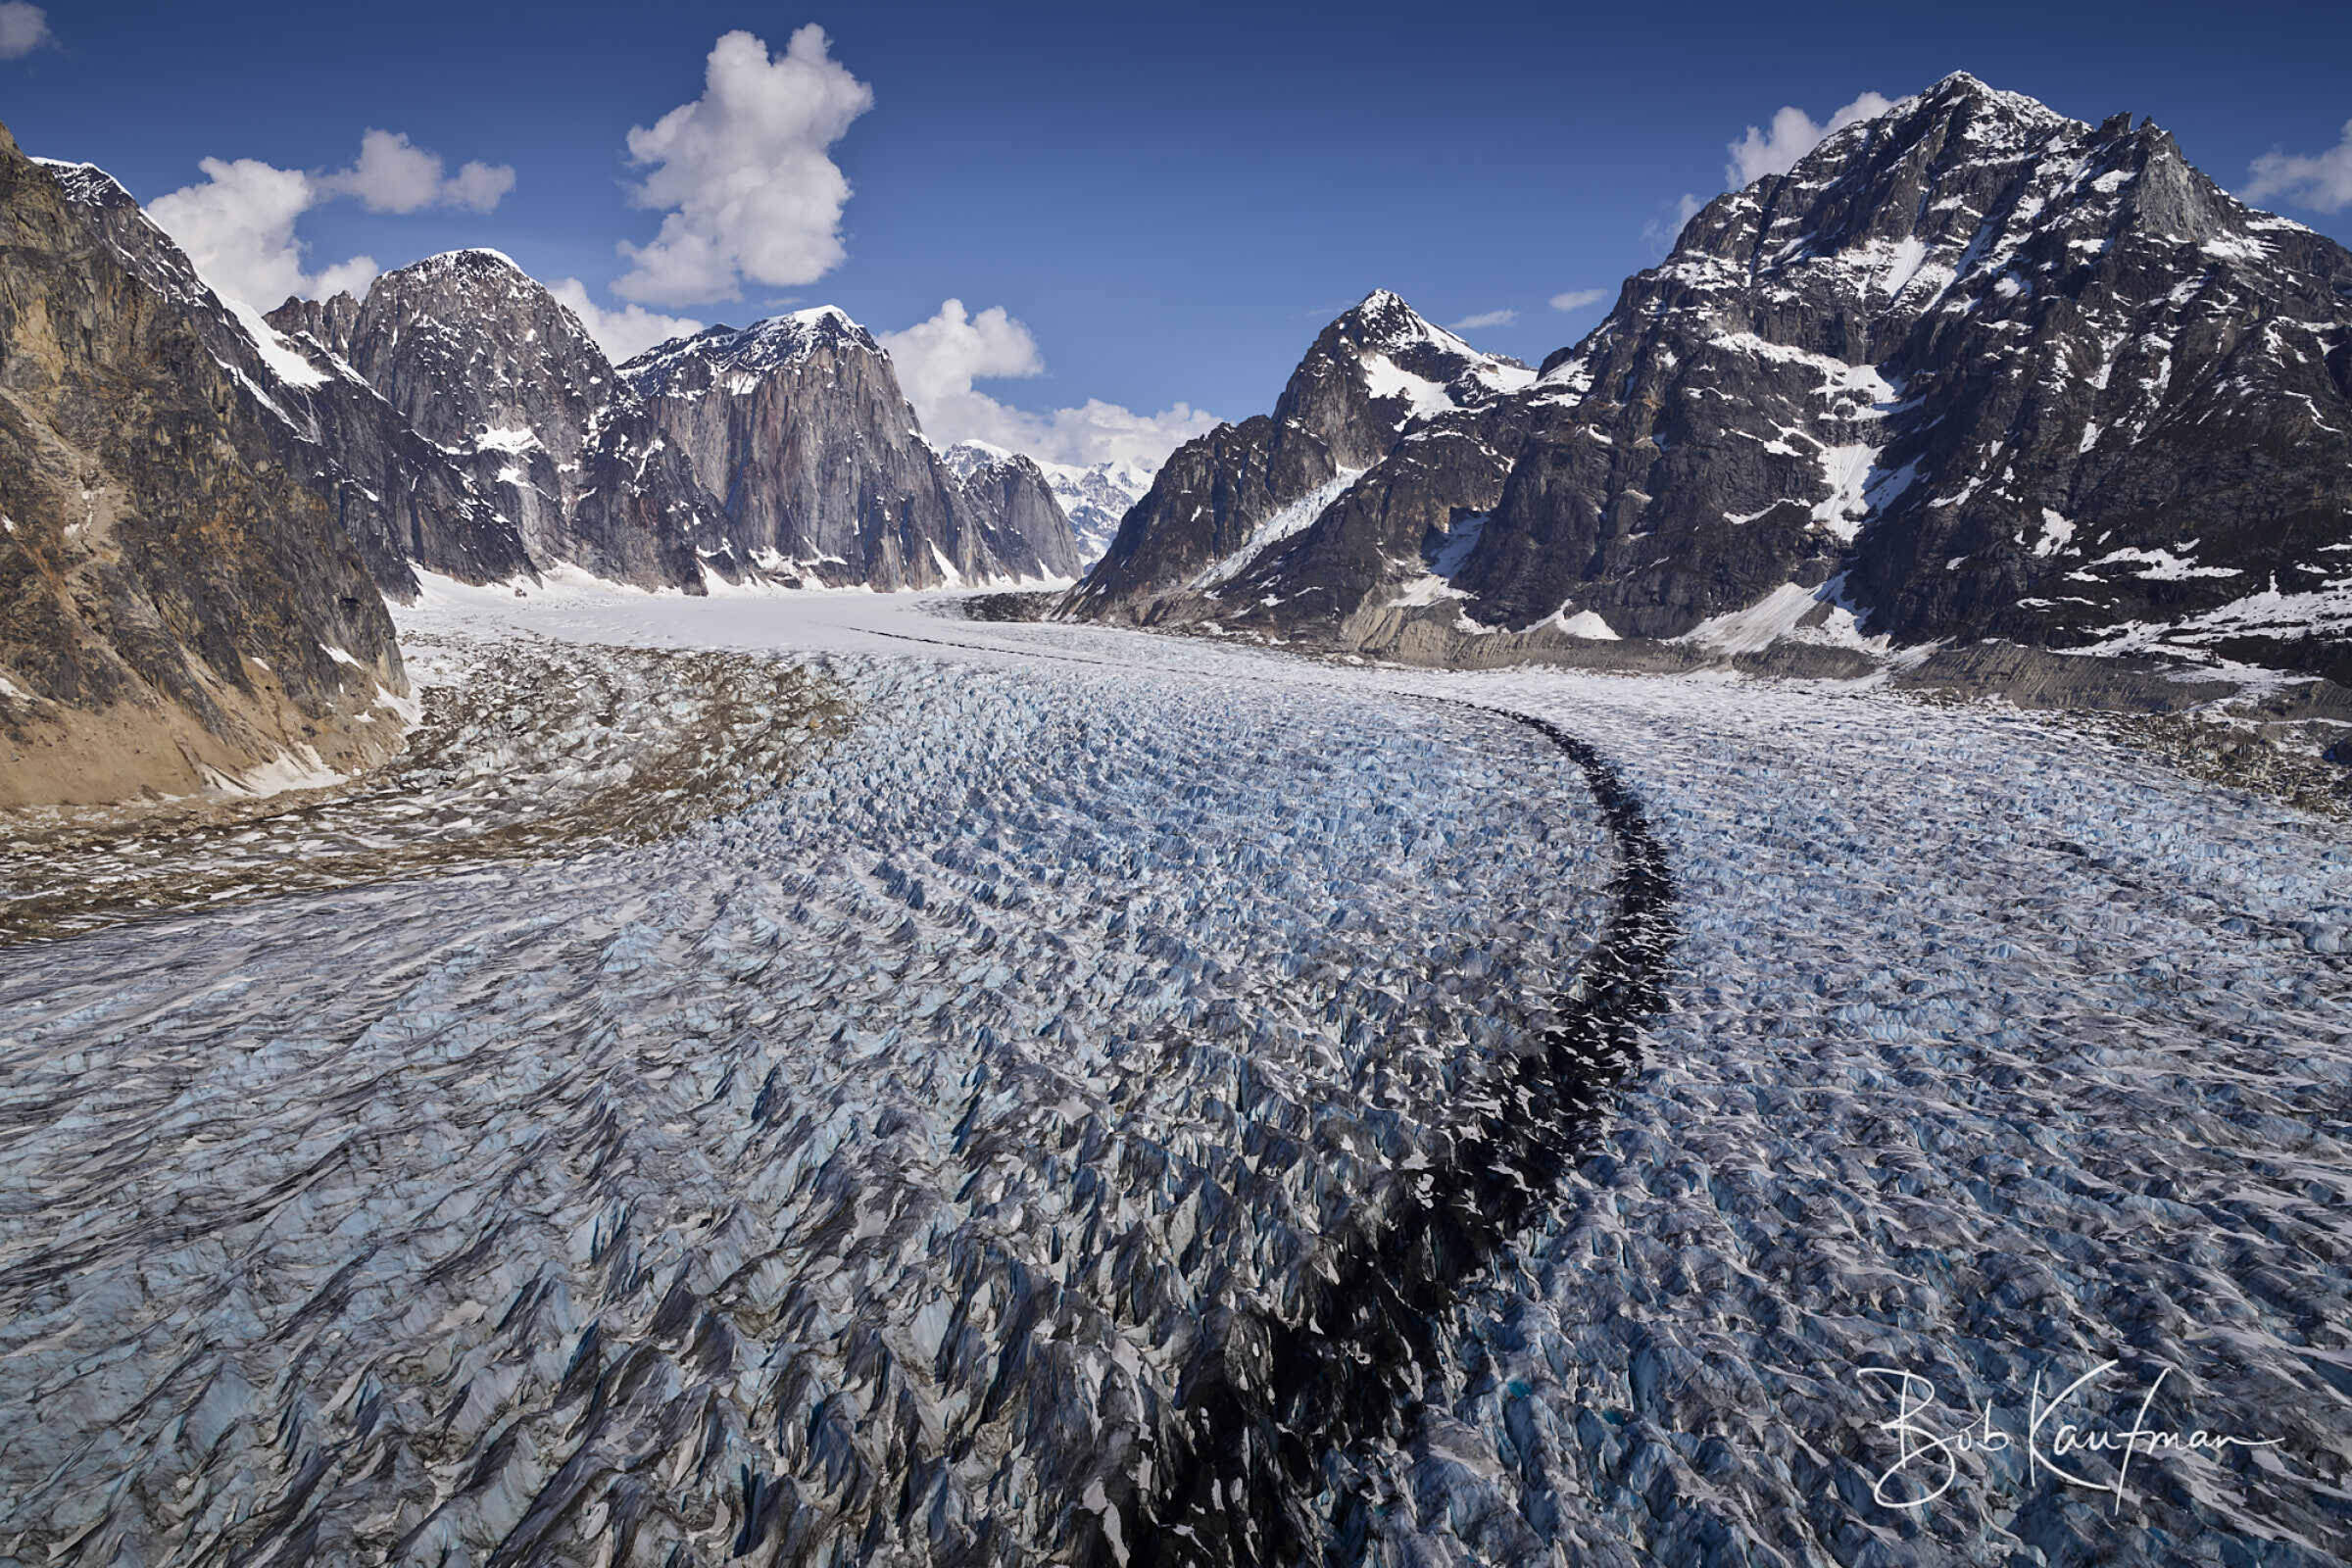
Wide Aerial of Alpine Glacier – Frozen River in a Granite Gorge
What you’re seeing:
This is Ruth Glacier—one of the most dramatic alpine glaciers in the world. It winds through a mile-deep granite gorge in Denali National Park, flanked by sheer rock walls and distant peaks. You’re still seeing the surface structure—the compression zones, the lateral moraines—but the real impact is how the glacier sits in the landscape. It’s a frozen river of ice, flowing through one of the most vertical and awe-inspiring valleys on earth.
Where to get it:
You can see this on a flightseeing tour out of Talkeetna. Most of the Talkeetna operators offering Denali flights include Ruth Glacier on their route. While you can get dramatic shots of long alpine glaciers in other parts of Alaska—like in Wrangell–St. Elias National Park, where they flow through vast, open terrain—Ruth is among the most dramatic anywhere.
Tips for getting the shot:
Shoot at 1/1000s or Faster: You may be flying lower than you think, and the terrain comes up fast. Use a fast shutter to keep details sharp.
Use a Moderate Focal Length: A 35–85mm equivalent works well to show the glacier in context without flattening the curves or exaggerating distance.
Follow the Terrain: Frame to show how the glacier flows through the valley—include ridgelines or cliffs for scale and structure.
Expose for the Highlights: Snow and ice blow out easily. Watch your histogram and underexpose slightly to keep texture in the whites.
Time It for Side Light: Morning or evening flights give you angled light that reveals texture in the ice and rock.
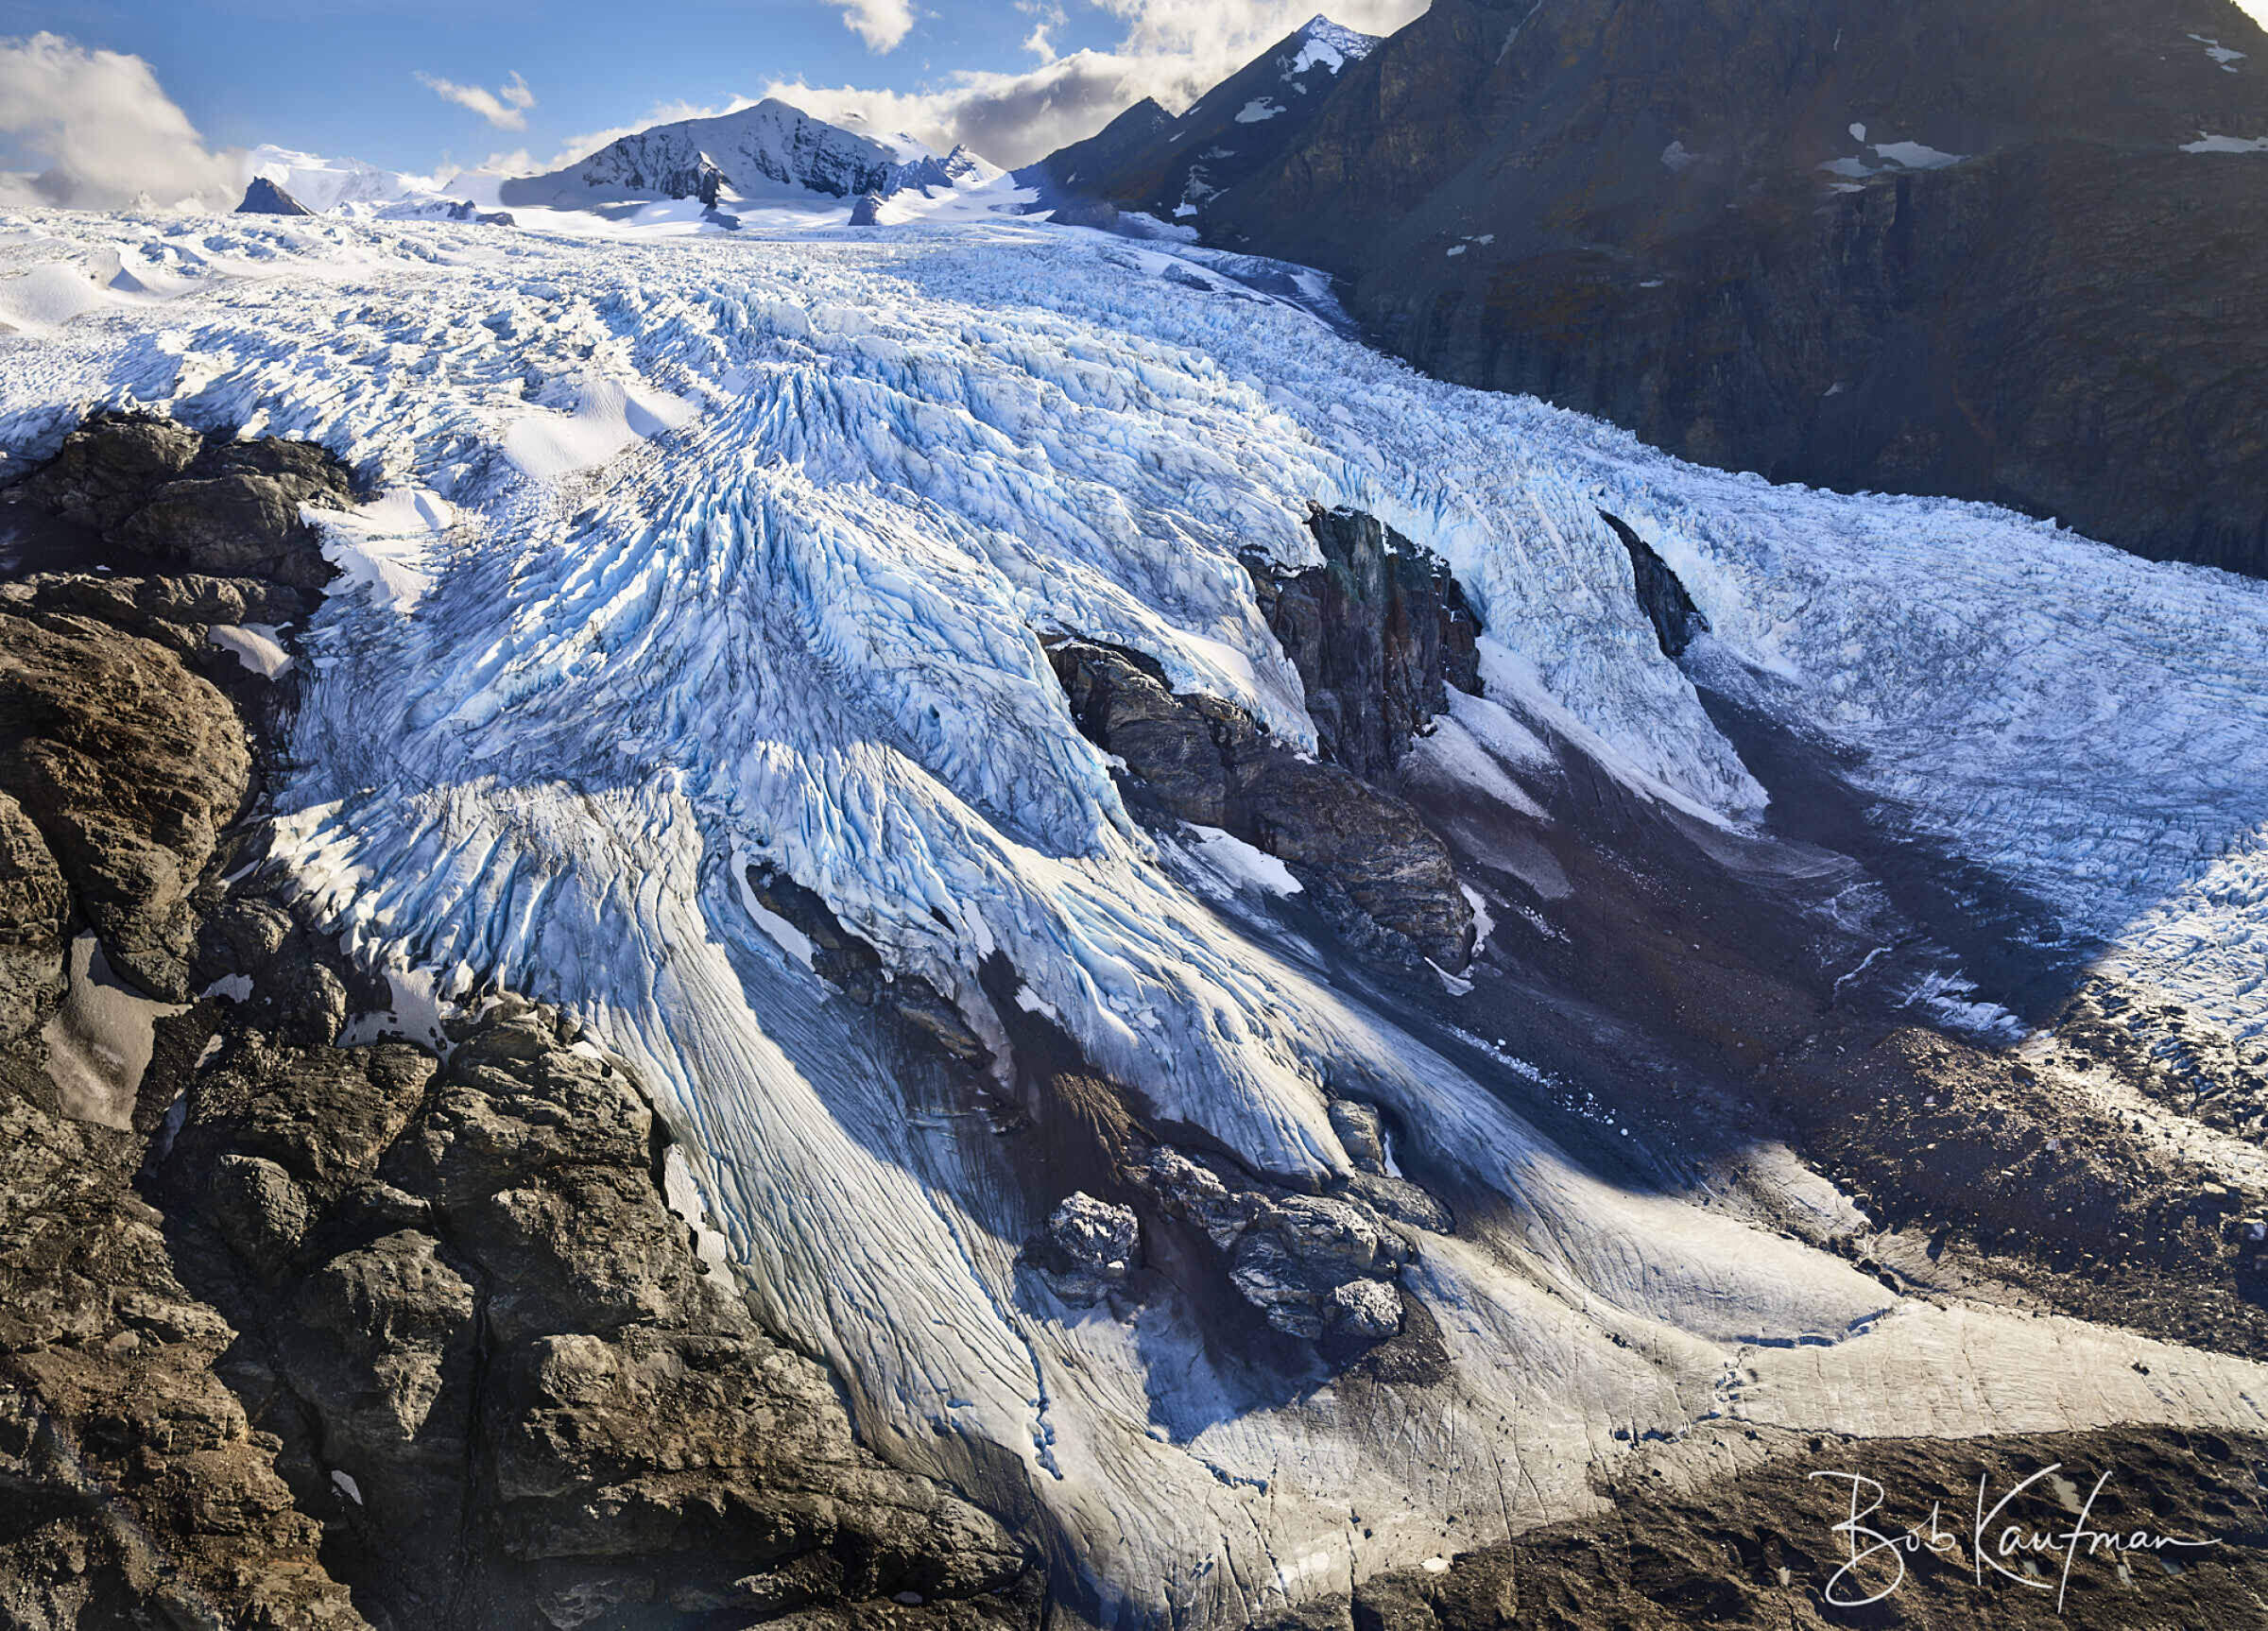
Wide Aerial of Hanging Glacier – Suspended in Descent
What you’re seeing:
Hanging glaciers form when a smaller glacier clings to the steep side of a mountain, feeding ice into a larger glacier or valley floor below. They often appear to spill over cliffs or steep ridgelines, as if frozen mid-fall. The glacier in this image, taken up the Knik River Valley, is a perfect example—its jagged surface compresses and fractures as it cascades down toward the valley below. These kinds of glaciers can exist anywhere the terrain drops off sharply, including parts of the Chugach and Wrangell–St. Elias Ranges.
Where to get it:
You can find hanging glaciers throughout Alaska, especially where mountains rise sharply. The most accessible places to see them is on a flightseeing tour up the Knik River Valley from Anchorage or Palmer. These tours often pass over glaciers that spill dramatically over cliffs, resembling frozen waterfalls. Wrangell–St. Elias National Park is another great spot to view hanging glaciers. In fact, we spoke to the folks at Wrangell Mountain Air who shared that you can see hanging glaciers on every single one of their tours. However, they’re less common in the central Alaska Range, where the base elevation is so high that glaciers tend to sit flat and broad across the landscape rather than spilling steeply.
Tips for getting the shot:
Frame from the Side: Position yourself to catch the glacier as it spills over the ridge—this angle helps show how it’s suspended.
Include the Drop-Off: Showing where the glacier detaches from the mountain helps convey the verticality and tension in the scene.
Look for Compression Zones: Where the ice starts to break apart—those twisted, buckling areas—tend to be the most visually interesting.
Keep Depth in Mind: Layering in peaks, cliffs, or valleys adds scale and makes the “hanging” aspect more legible to the viewer.
Light: Wrangell Mountain Air shared “Photographers love our last flightsee of the day in order to not have the sun directly overhead. It's no golden hour, because the midnight sun is not setting this early on in the evening, but it does help with over exposure problems, given how reflective the ice can be in such huge quantities. In the same vein, cloudy days can provide the same advantage as long as the cloud ceiling is high enough to not obscure the hanging glaciers! But it can be reassuring when bluebird days are few and far between in Alaska, that you don't actually want one for the best lighting!”
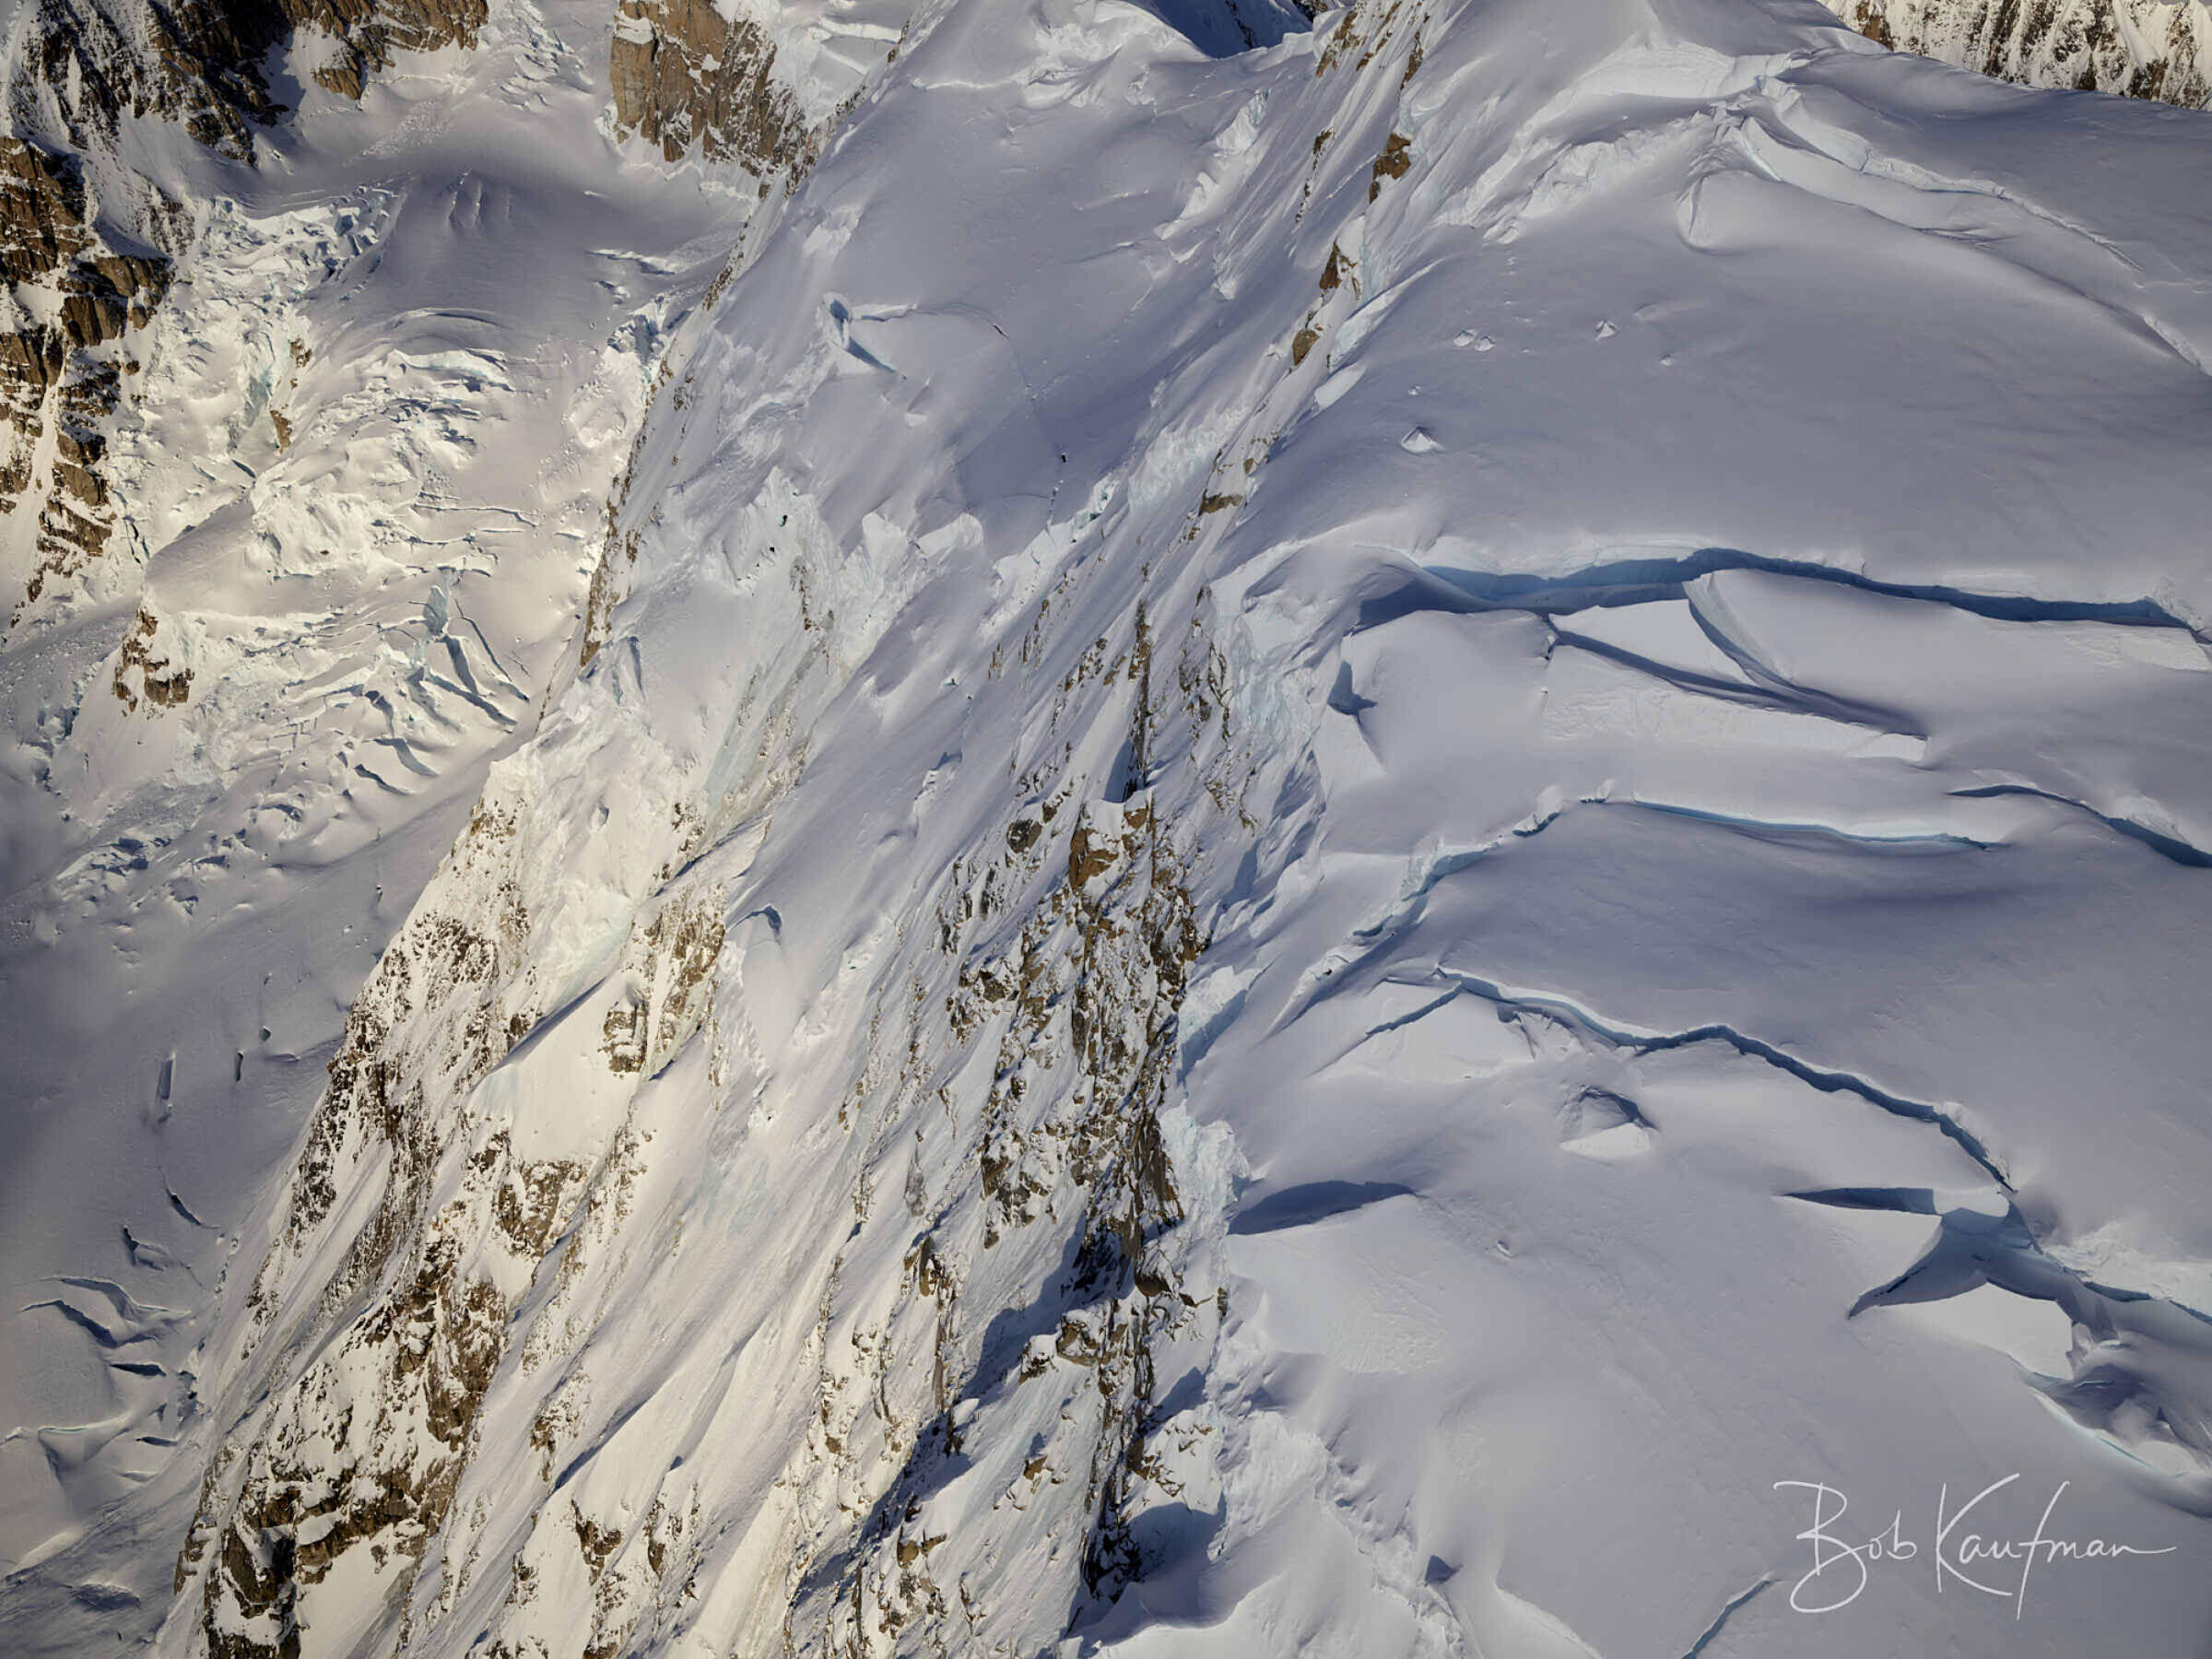
High Altitude Glacier Formations High Altitude Glacier Formations – A Frozen Colossus Above the Clouds
What you’re seeing:
Once you get above 7,000 or 8,000 feet, glaciers start to look completely different. You’re no longer seeing ice flowing through valleys—you’re looking at the upper zones of major glaciers, where the ice spreads wide across mountaintops. Massive blocks the size of houses buckle and break apart. You’ll see less exposed rock up here, except along steep, near-vertical faces. Use those rock faces to frame the fractured ice, which is marked by giant crevasses and pressure ridges.
The light is different too. The air is cleaner, and the ice reflects a paler, more luminous blue. Crevasses glow. Shadows are crisp. When the conditions line up, it can feel like flying over a frozen city—unnatural, surreal, and immense.
Where to get it:
You can see this on flightseeing tours that reach higher elevations—generally above 7,000 feet. In the Alaska Range, there are Denali flightseeing tours from Talkeetna with Talkeetna Air Taxi and K2 Aviation. In Wrangell–St. Elias National Park, some operators from McCarthy or Glennallen reach glaciers at this altitude. And in Southcentral, even some flights from Anchorage or Girdwood into Prince William Sound can get up this high if the weather cooperates. You’re looking for the upper flanks of the mountains, not the valleys.
Tips for getting the shot:
Use 1/750s or Faster: Even at high altitude, you’re moving fast. Keep your shutter speed up to avoid motion blur.
Stick to 35–70mm: A moderate focal length preserves depth and lets you frame large-scale structure without flattening it.
Watch for Repetition: Crevasses, pressure ridges, and blocky breakups often form in patterns—look for rhythm, then break it.
Let the Shadows Work: Don’t overexpose. The best shots preserve contrast between deep cracks and light catching on ice.
Shoot When the Air is Clear: High elevations often mean cleaner air and better visibility—use it to capture the crisp light and pale blues you only get up high.
From a Helicopter – Land, Hover, and Explore
Helicopters let you do what nothing else can—land on the ice, hover just feet above the surface, or walk among ephemeral features like melt pools or glacial rivers. This is where your glacier photography gets personal, creative, and up close in ways most visitors never see.
Our partner at Outbound Heli reminded us that you can even request the doors off for a heli-photo adventure—allowing for clear, unobstructed images of the glacier and surrounding landscape from the air. Helicopter tours naturally lend themselves to great photography, but if photography is your primary goal, choose a longer tour with multiple landings or a custom half or full-day adventure.
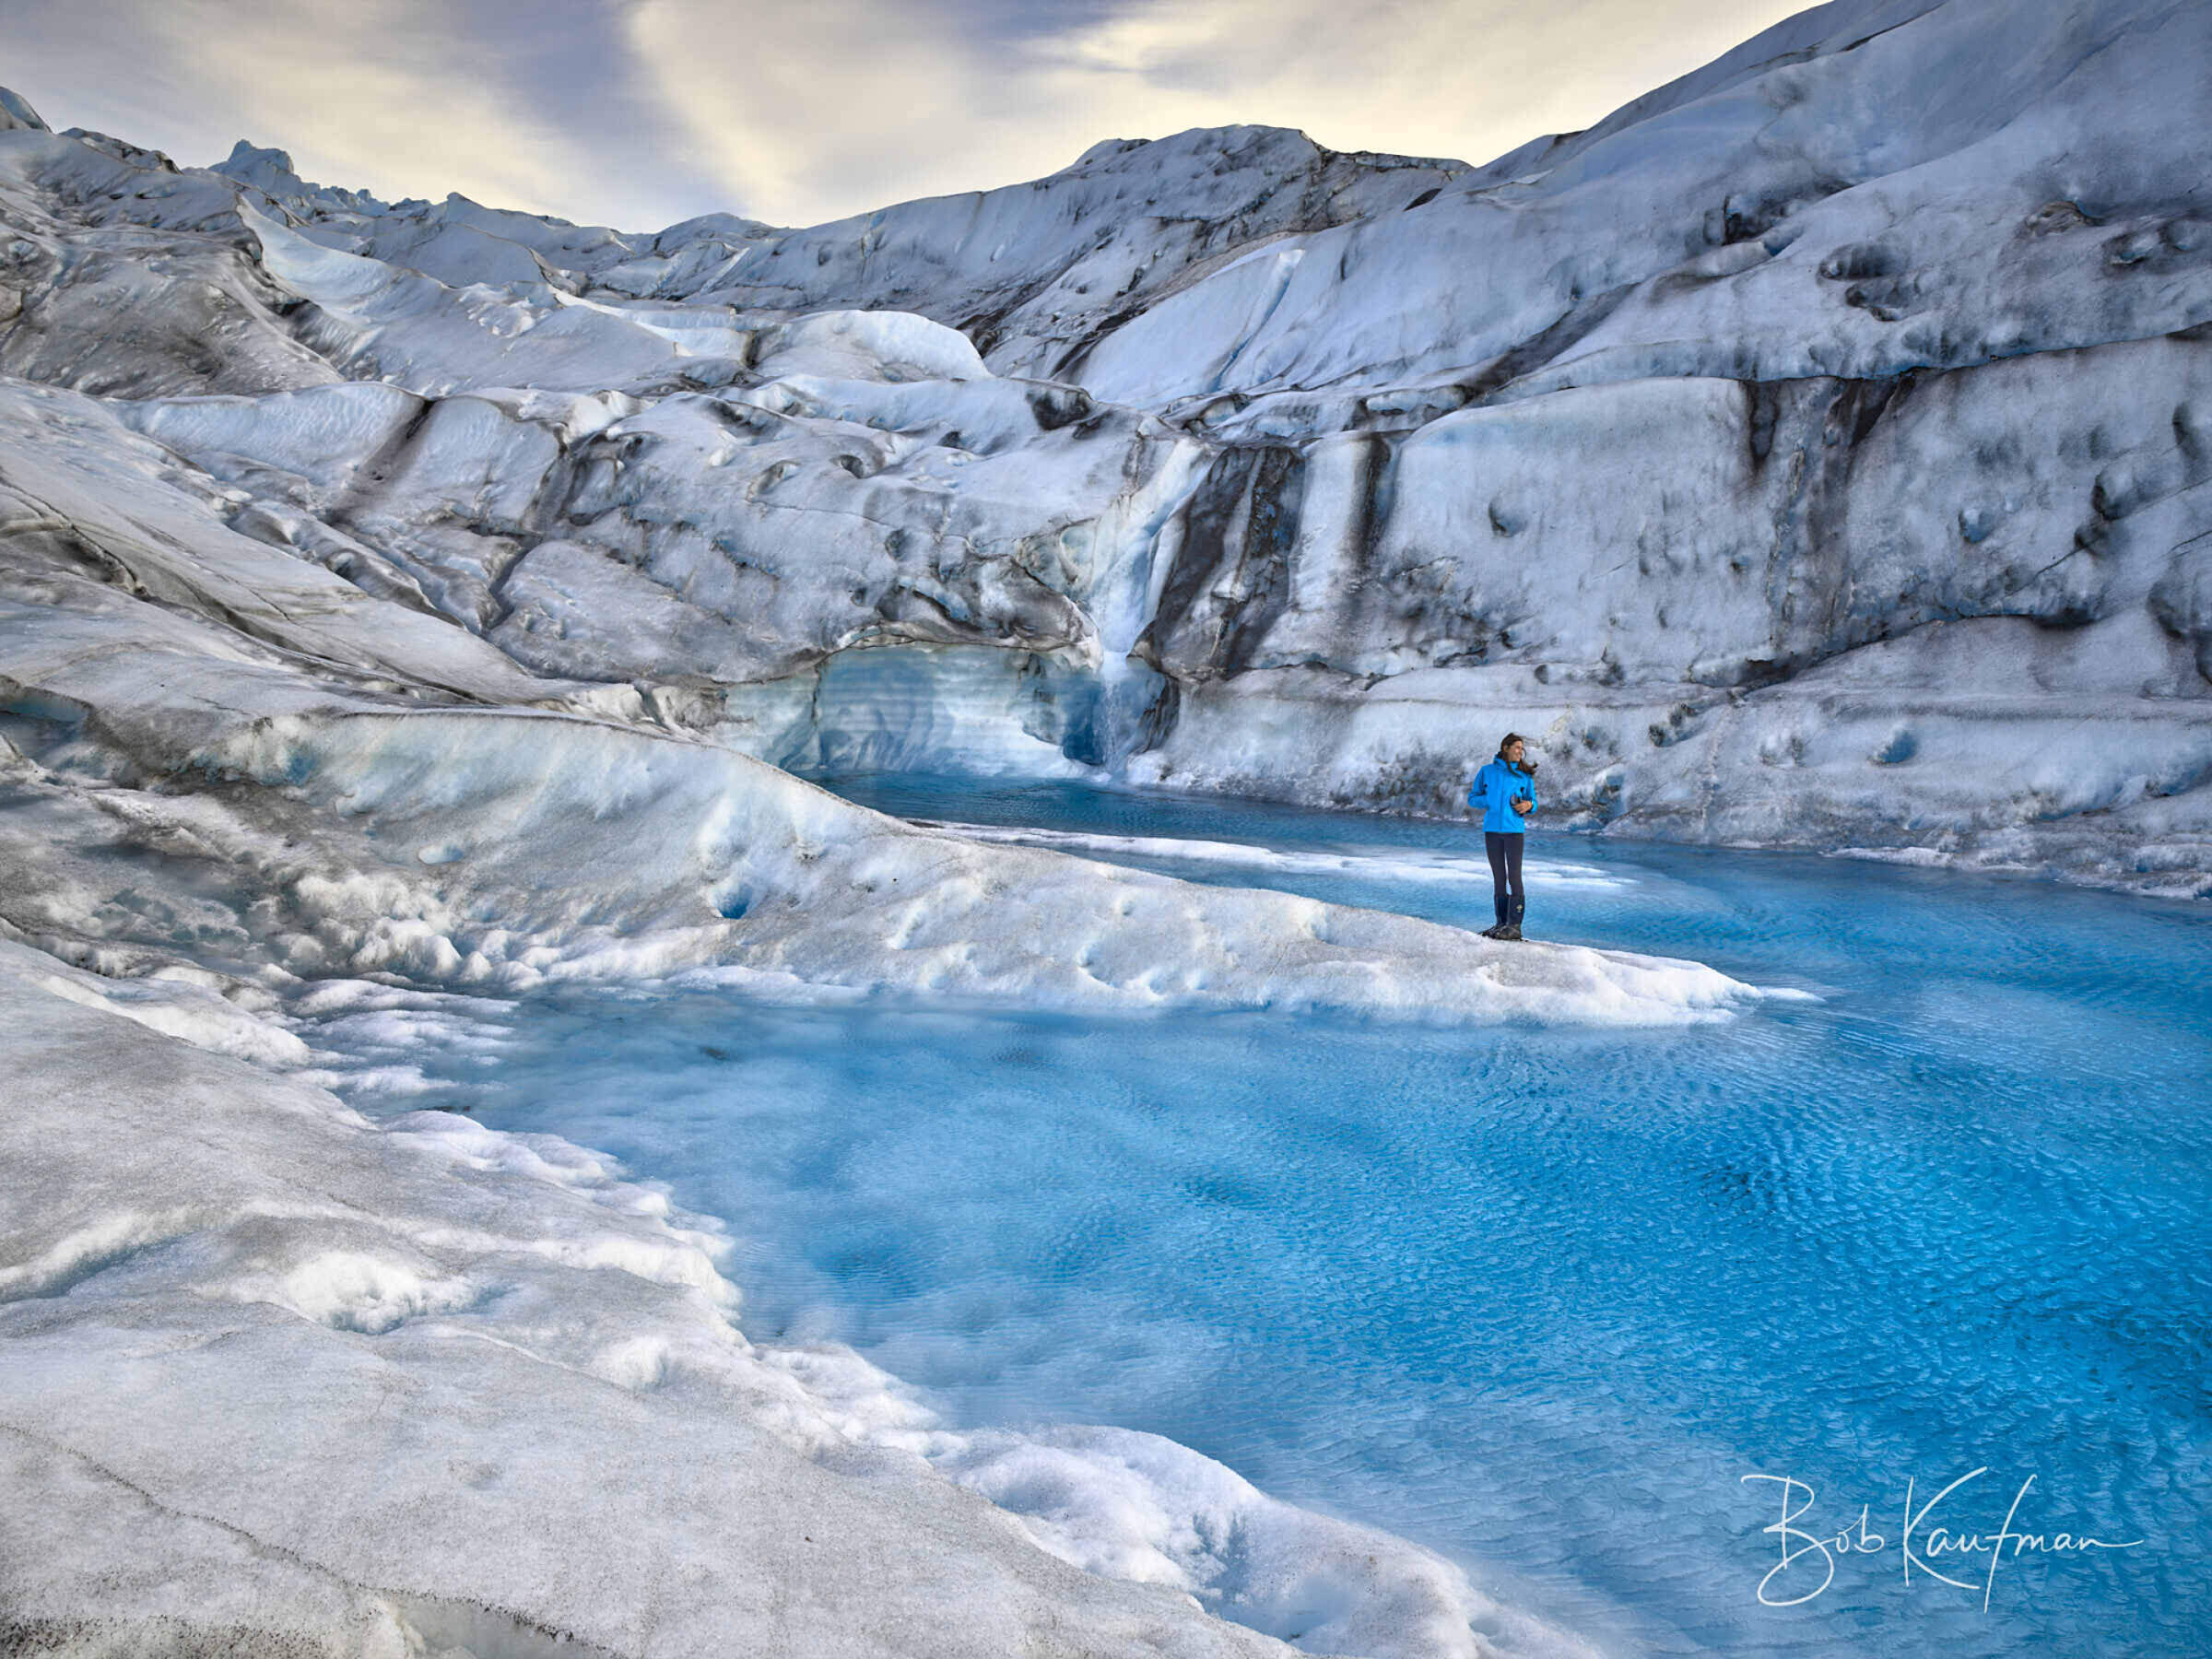
Glacial Melt Pools – Blue Pools on White Ice
What You’re Seeing:
In late spring and early summer, meltwater collects in shallow depressions on the surface of glaciers, forming bright blue glacial lakes and pools. These can be just a few feet across or stretch for hundreds of yards. They form because the glacier surface isn’t flat—pressure ridges and uneven melting patterns create basins that temporarily hold water until it drains away or freezes again. The color comes from how the light reflects off the dense, compacted ice and the purity of the meltwater.
The pools are typically present all summer, year-round actually they just freeze in the winter. They are typically melted out and accessible from mid-May to September, weather dependent. Helicopters can land on the glacier and let you walk right up to the edge of these pools—or even stand on the narrow islands between them, depending on conditions.
Where to Get It:
The best access is via helicopter tours out of Anchorage, Palmer, Girdwood, or Seward. Pools like this frequently form on Knik Glacier and occasionally on Colony Glacier as well.
Tips for Getting the Shot:
Use a Wide-Angle Lens: Something in the 24–35mm range helps include both the pool and the surrounding ice for context.
Pay Attention to Scale: If someone’s in the frame, place them on solid ground or a dry patch near the pool—not in the water—for safe scale and composition.
Time It Right: These pools don’t last long. Late May to mid-June is your window. Earlier, they haven’t formed. Later, they’ve drained or dried up.
Watch the Edges: Melt pools often have steep sides or thin ice shelves—don’t assume the edge is safe just because it looks solid.
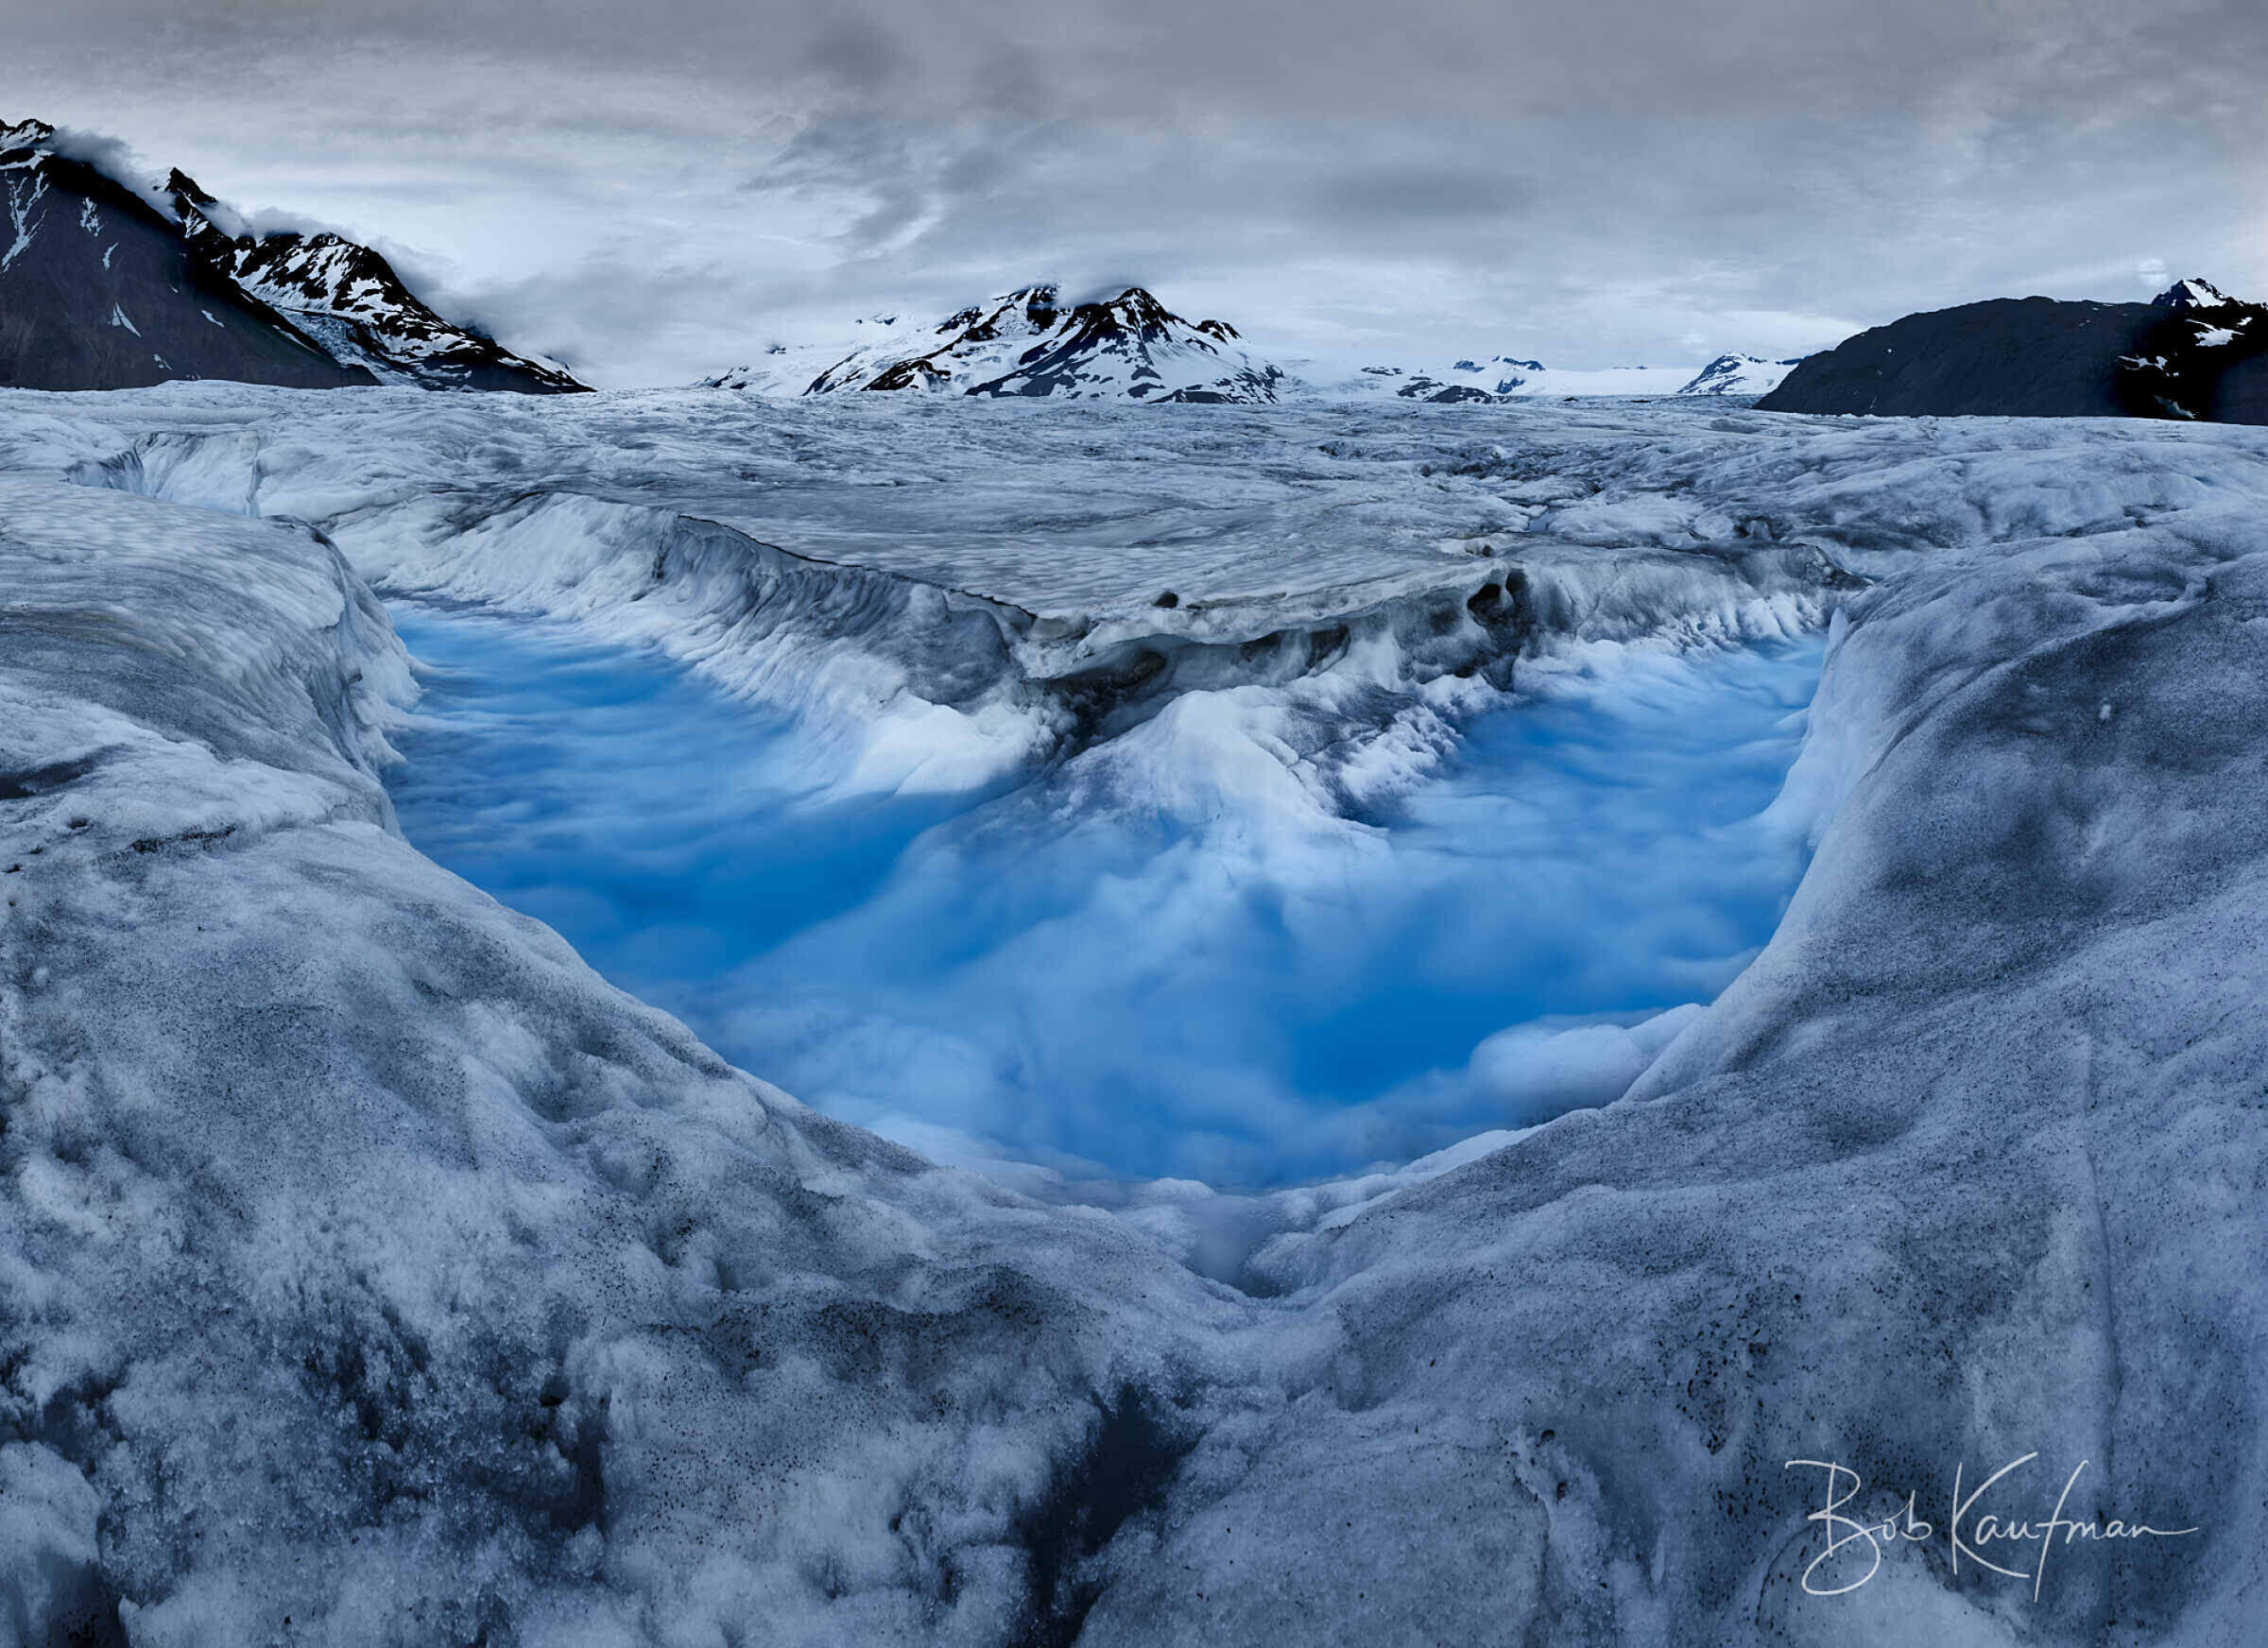
Bluewater Glacial River – Ice-Carved Runoff
Some summers, meltwater carves deep channels through the glacier surface. They’re rare and constantly changing. Pilots need to know where one is forming—and even then, it might be gone by next week. This one was found on Colony Glacier on a July flight.
Where to Get It
Ask a helicopter operator out of Anchorage, Palmer, or Girdwood if any glacial rivers have formed recently. They appear seasonally on Colony and sometimes on the lower Mat Glacier.
Tips for Getting the Shot
Ask Ahead: These rivers are rare and ephemeral. Ask your helicopter operator if one’s been spotted recently—don’t assume they’ll appear.
Bring a Wide Lens or Stitch a Panorama: The curve of the river is key. A wide-angle lens (16–35mm) exaggerates it. Or shoot overlapping frames to stitch later.
Use a Tripod if You Land: A stable base lets you slow the shutter to blur water. If your tripod has metal spikes, screw them in—the glacier is slick.
Walk First, Then Compose: You won’t get far on glacier ice, but even a few steps in either direction can change the curve or shape of the river dramatically.
Avoid Midday Glare: The color pops best when the sun is low or behind clouds. Glare flattens everything.
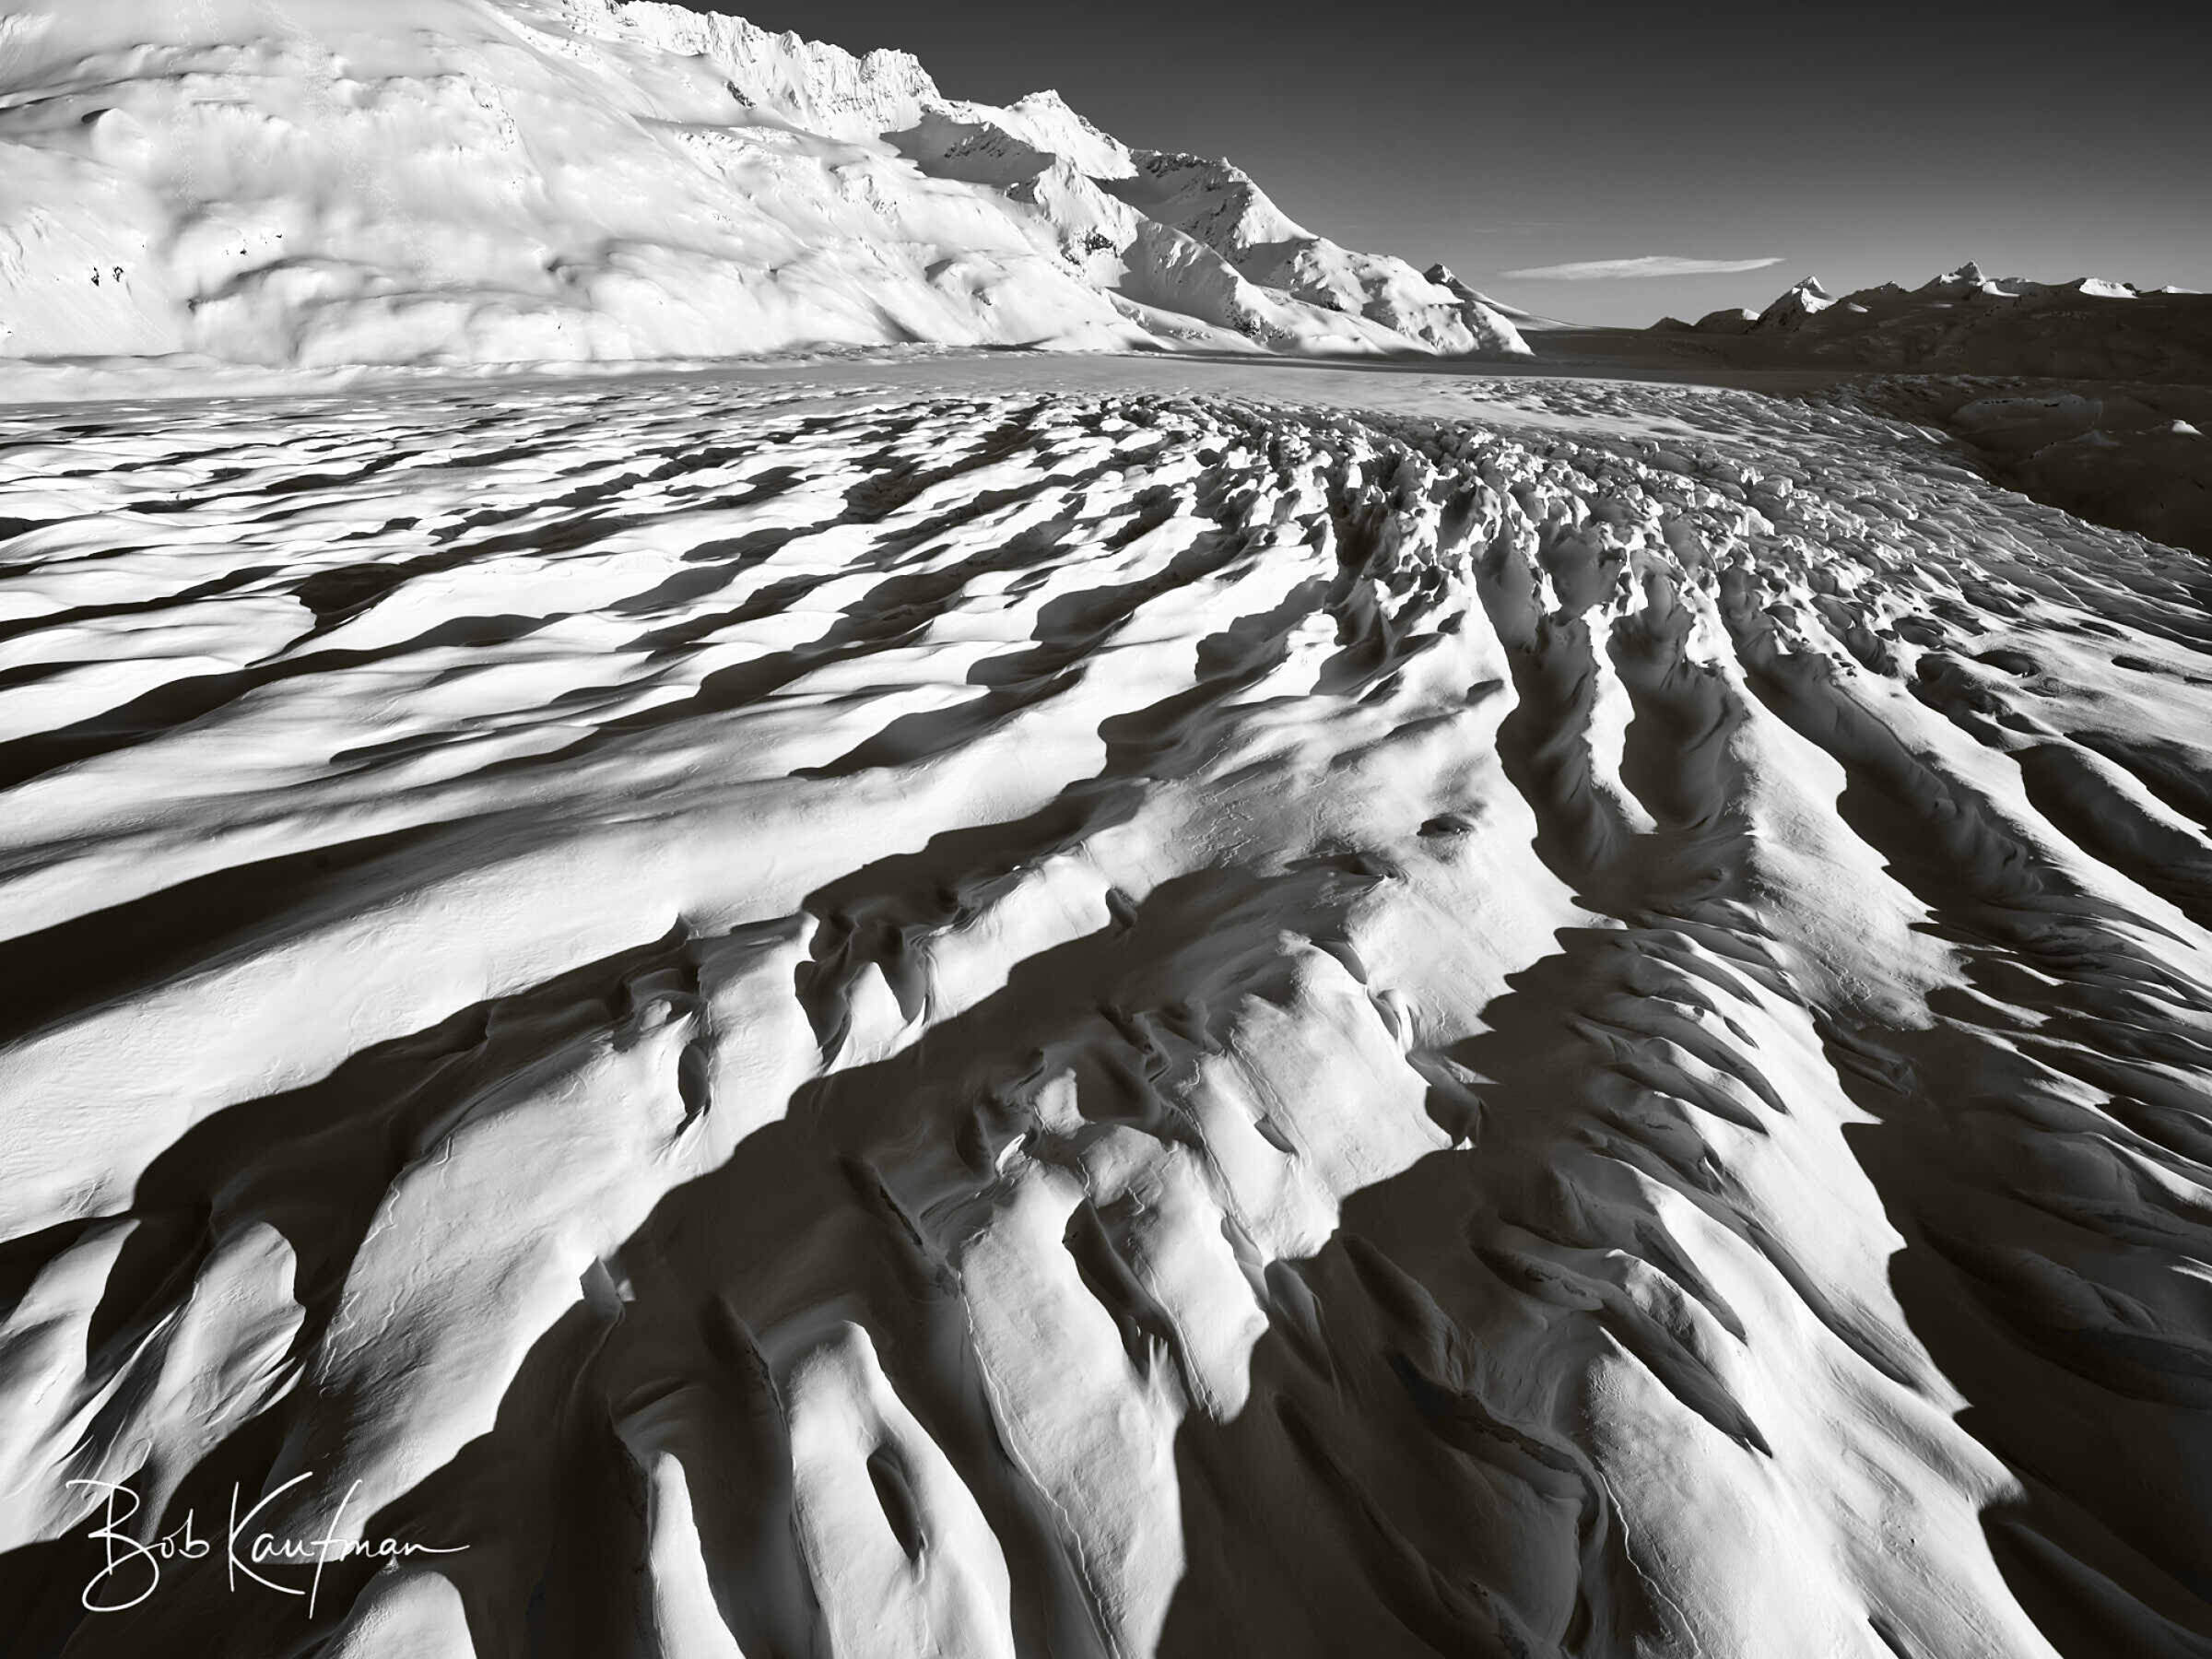
Hover Low – Abstract Ice from Above
Sometimes the best shot comes without ever touching down. Hovering just feet above the glacier, you can shoot straight down or trace the ridges at an angle. From this height, the glacier’s texture becomes abstract—lines, folds, and pressure ridges flatten into almost graphic forms. It’s a view you can only get in a helicopter, and only with a skilled pilot who knows how to hold position in wind. This shot was taken over the Matanuska Glacier.
Where to Get It
You can get shots like this over Colony or Knik Glacier with a helicopter out of Anchorage or Palmer. Matanuska Glacier is another good option, best accessed by heli from Girdwood or Palmer.
Tips for Getting the Shot
Shoot Through an Open Door or Window: If your pilot allows it, avoid the distortion and glare of plexiglass.
Look for Rhythm: Pressure ridges, melt lines, collapse zones—glaciers form natural patterns. The best shots often have a break or tension in that rhythm.
Frame Abstract: From this angle, you’re not shooting a landscape. You’re capturing shape and light. Compose like it’s graphic design.
Polarizer with Caution: It can deepen contrast and cut glare, but it also costs you light. That might force a slower shutter or higher ISO. Make sure there’s enough light for that.
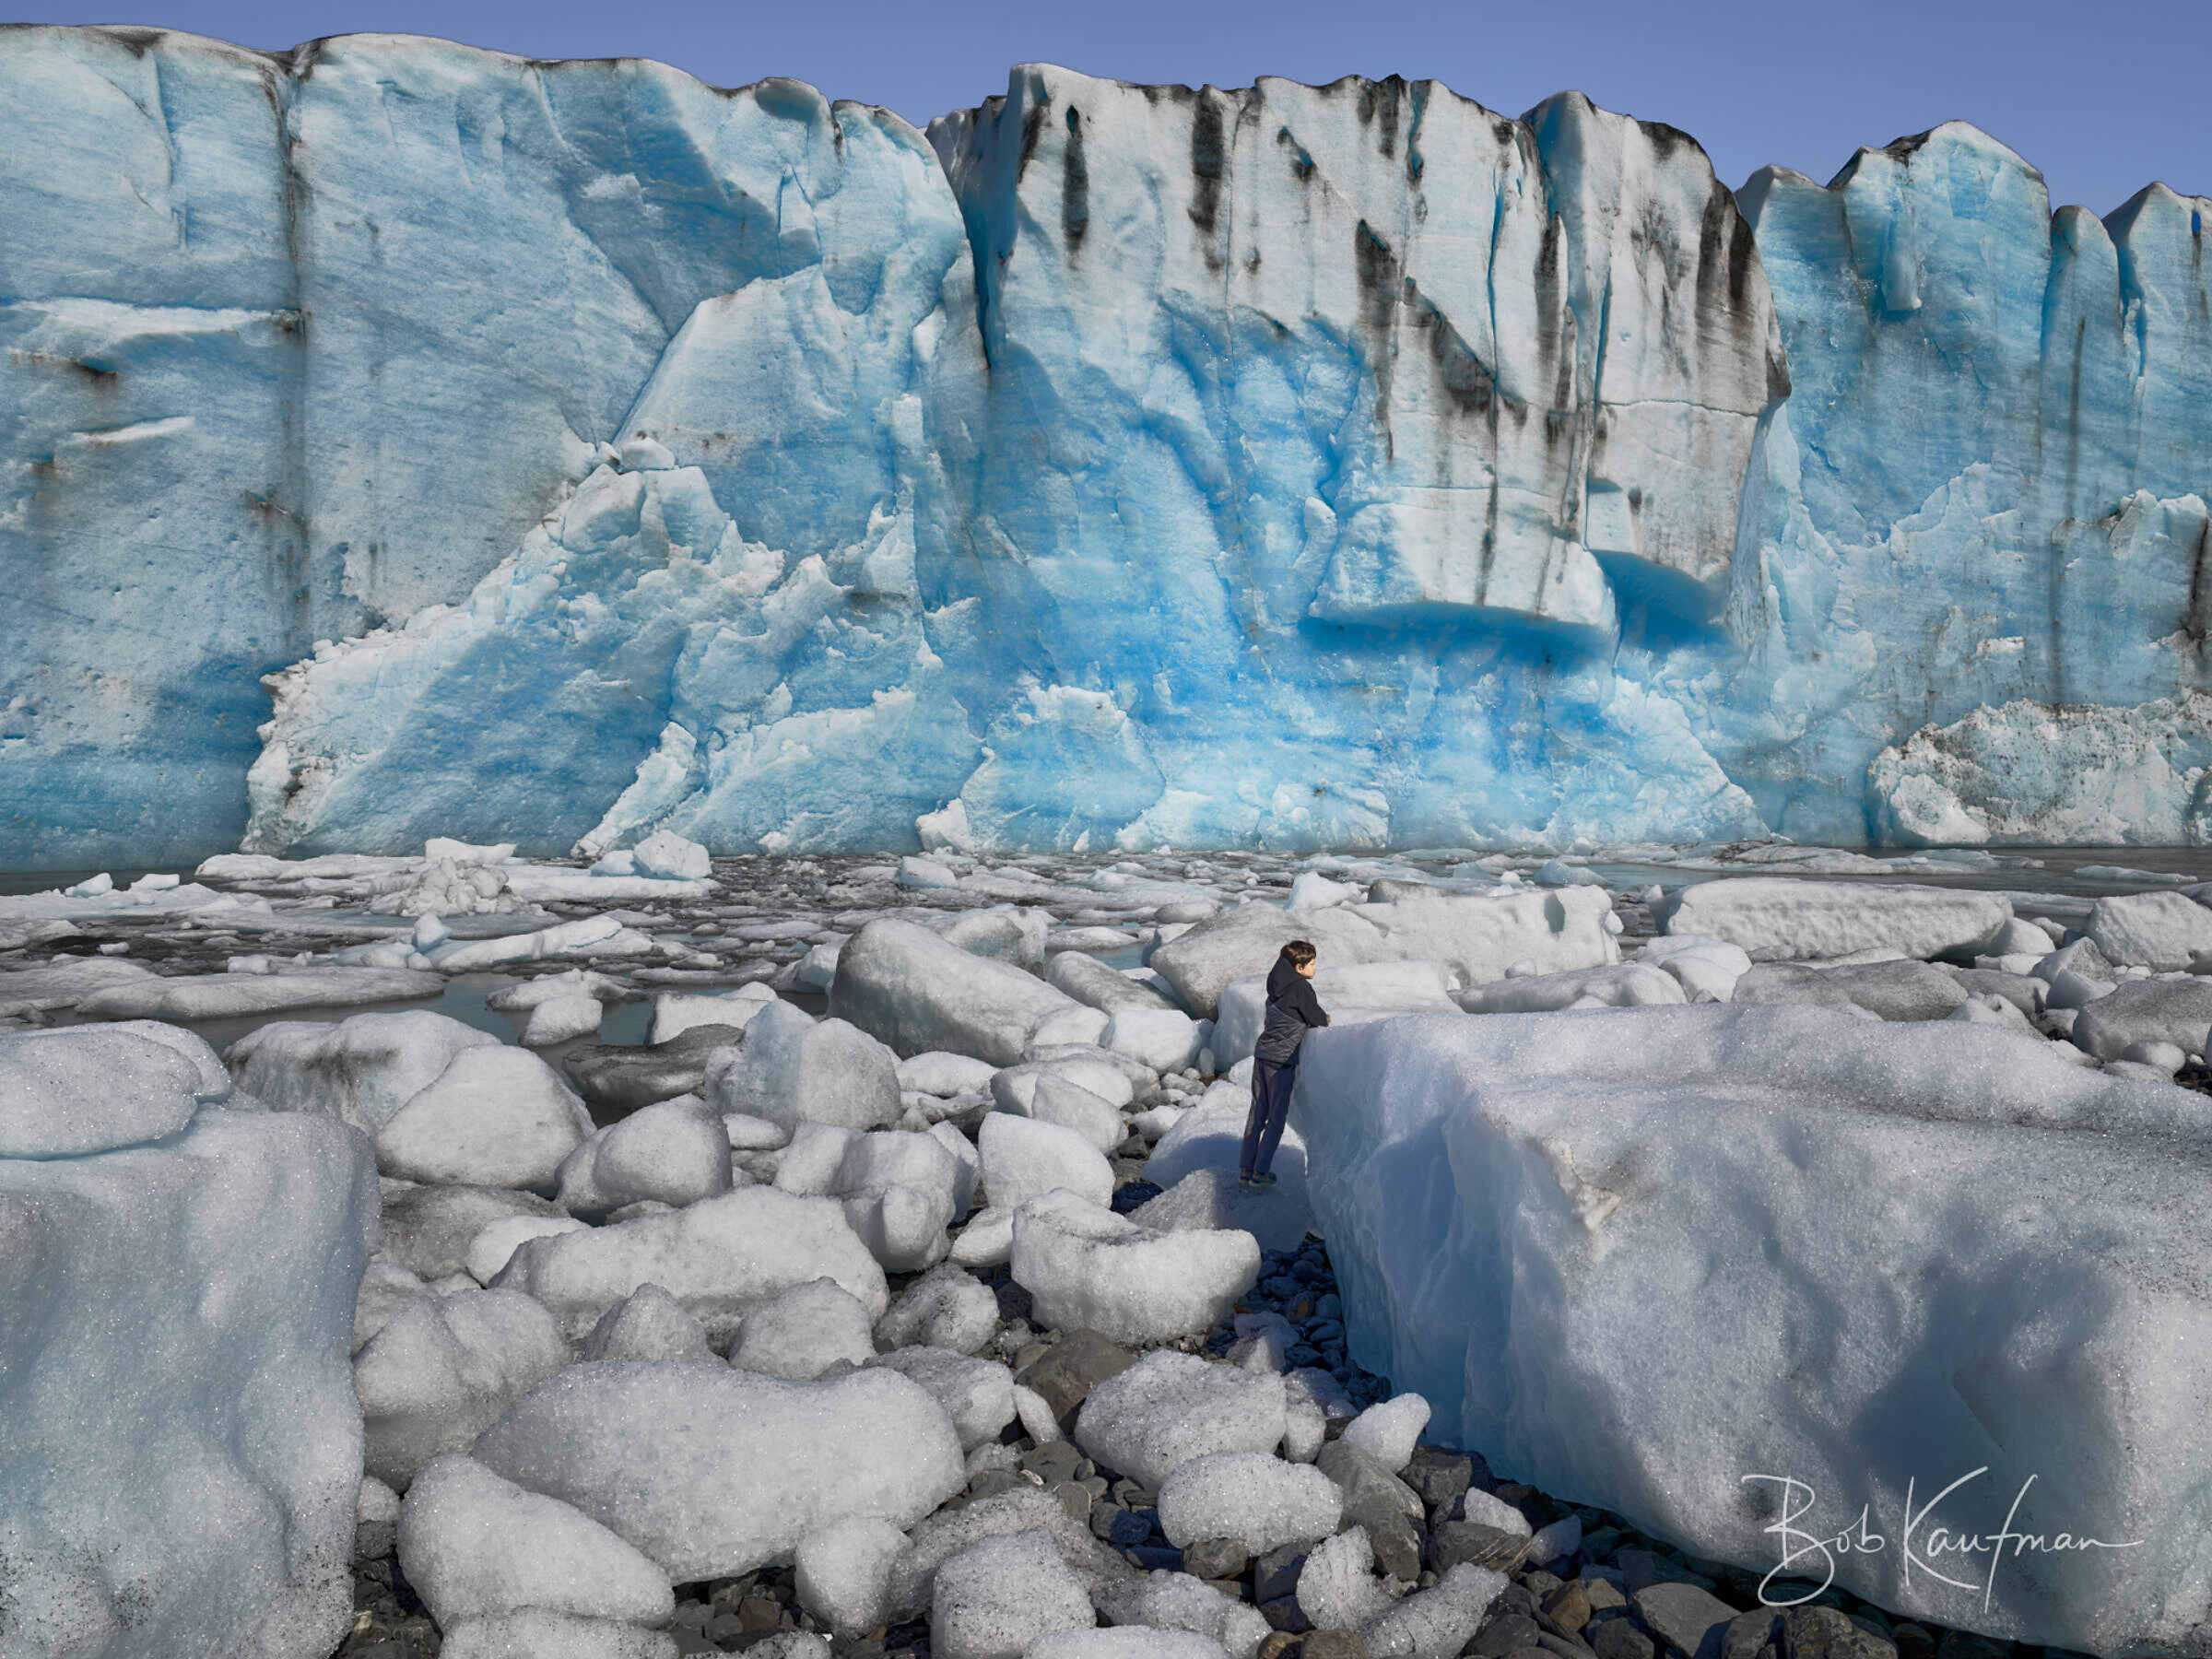
Field of Ice – The Iceberg Graveyard
What You’re Seeing
As glaciers retreat or calve, they can leave behind a maze of stranded ice blocks. When the tide goes out, especially in late summer or fall, you may find yourself walking among house-sized chunks scattered across the beach. It looks like the tide receded from an iceberg graveyard.
Where to Get It
This kind of shot only comes together when the timing is just right—low tide, good light, and enough stranded glacial ice to make it worth the effort. Certain beaches in Prince William Sound, especially near active tidewater glaciers such as Harriman Glacier, occasionally deliver. But getting there requires advance planning, a private boat, and some luck.
Operators like Discovery Voyages and UnCruise offer access to these beaches, but the best chance of success comes through a dedicated photography tour. These tours are built around light and conditions, with small group sizes and enough flexibility to wait for the right moment. They handle logistics, secure private boats, and target locations that are otherwise difficult to reach.
Tips for Getting the Shot
Plan ahead: You’ll need to time your visit with a very low tide and good morning or evening light. Research tide tables carefully—Prince William Sound has multiple tide stations, and not all tables are accurate for every location. Ask your boat operator which station best matches where you’re going.
To plan light and shadow: Shademap.app is a valuable tool—it lets you simulate sun angles for specific dates and times anywhere in Alaska.
Wear rubber boots: You’ll likely be walking through shallow tidal pools and slick, saturated ground to get the best angles. The most compelling shots often include water in the foreground—whether that’s standing water on the bay floor or glistening wet sediment. That reflection can bring out the shape and color of the ice.
Stay aware: These ice blocks are massive, unstable, and unpredictable. They can collapse with no warning. And if the tide’s rising, it’s easy to get stranded—especially if you’ve walked out onto an exposed flat or between icebergs. Tides in Alaska can move fast and unevenly. Look around every five minutes. What was dry ground could quickly become an isolated island with no clear route back. Develop the habit of checking—not just where you are, but how you’ll get back.
Jökulhlaup Shot – After the Flood
What You’re Seeing
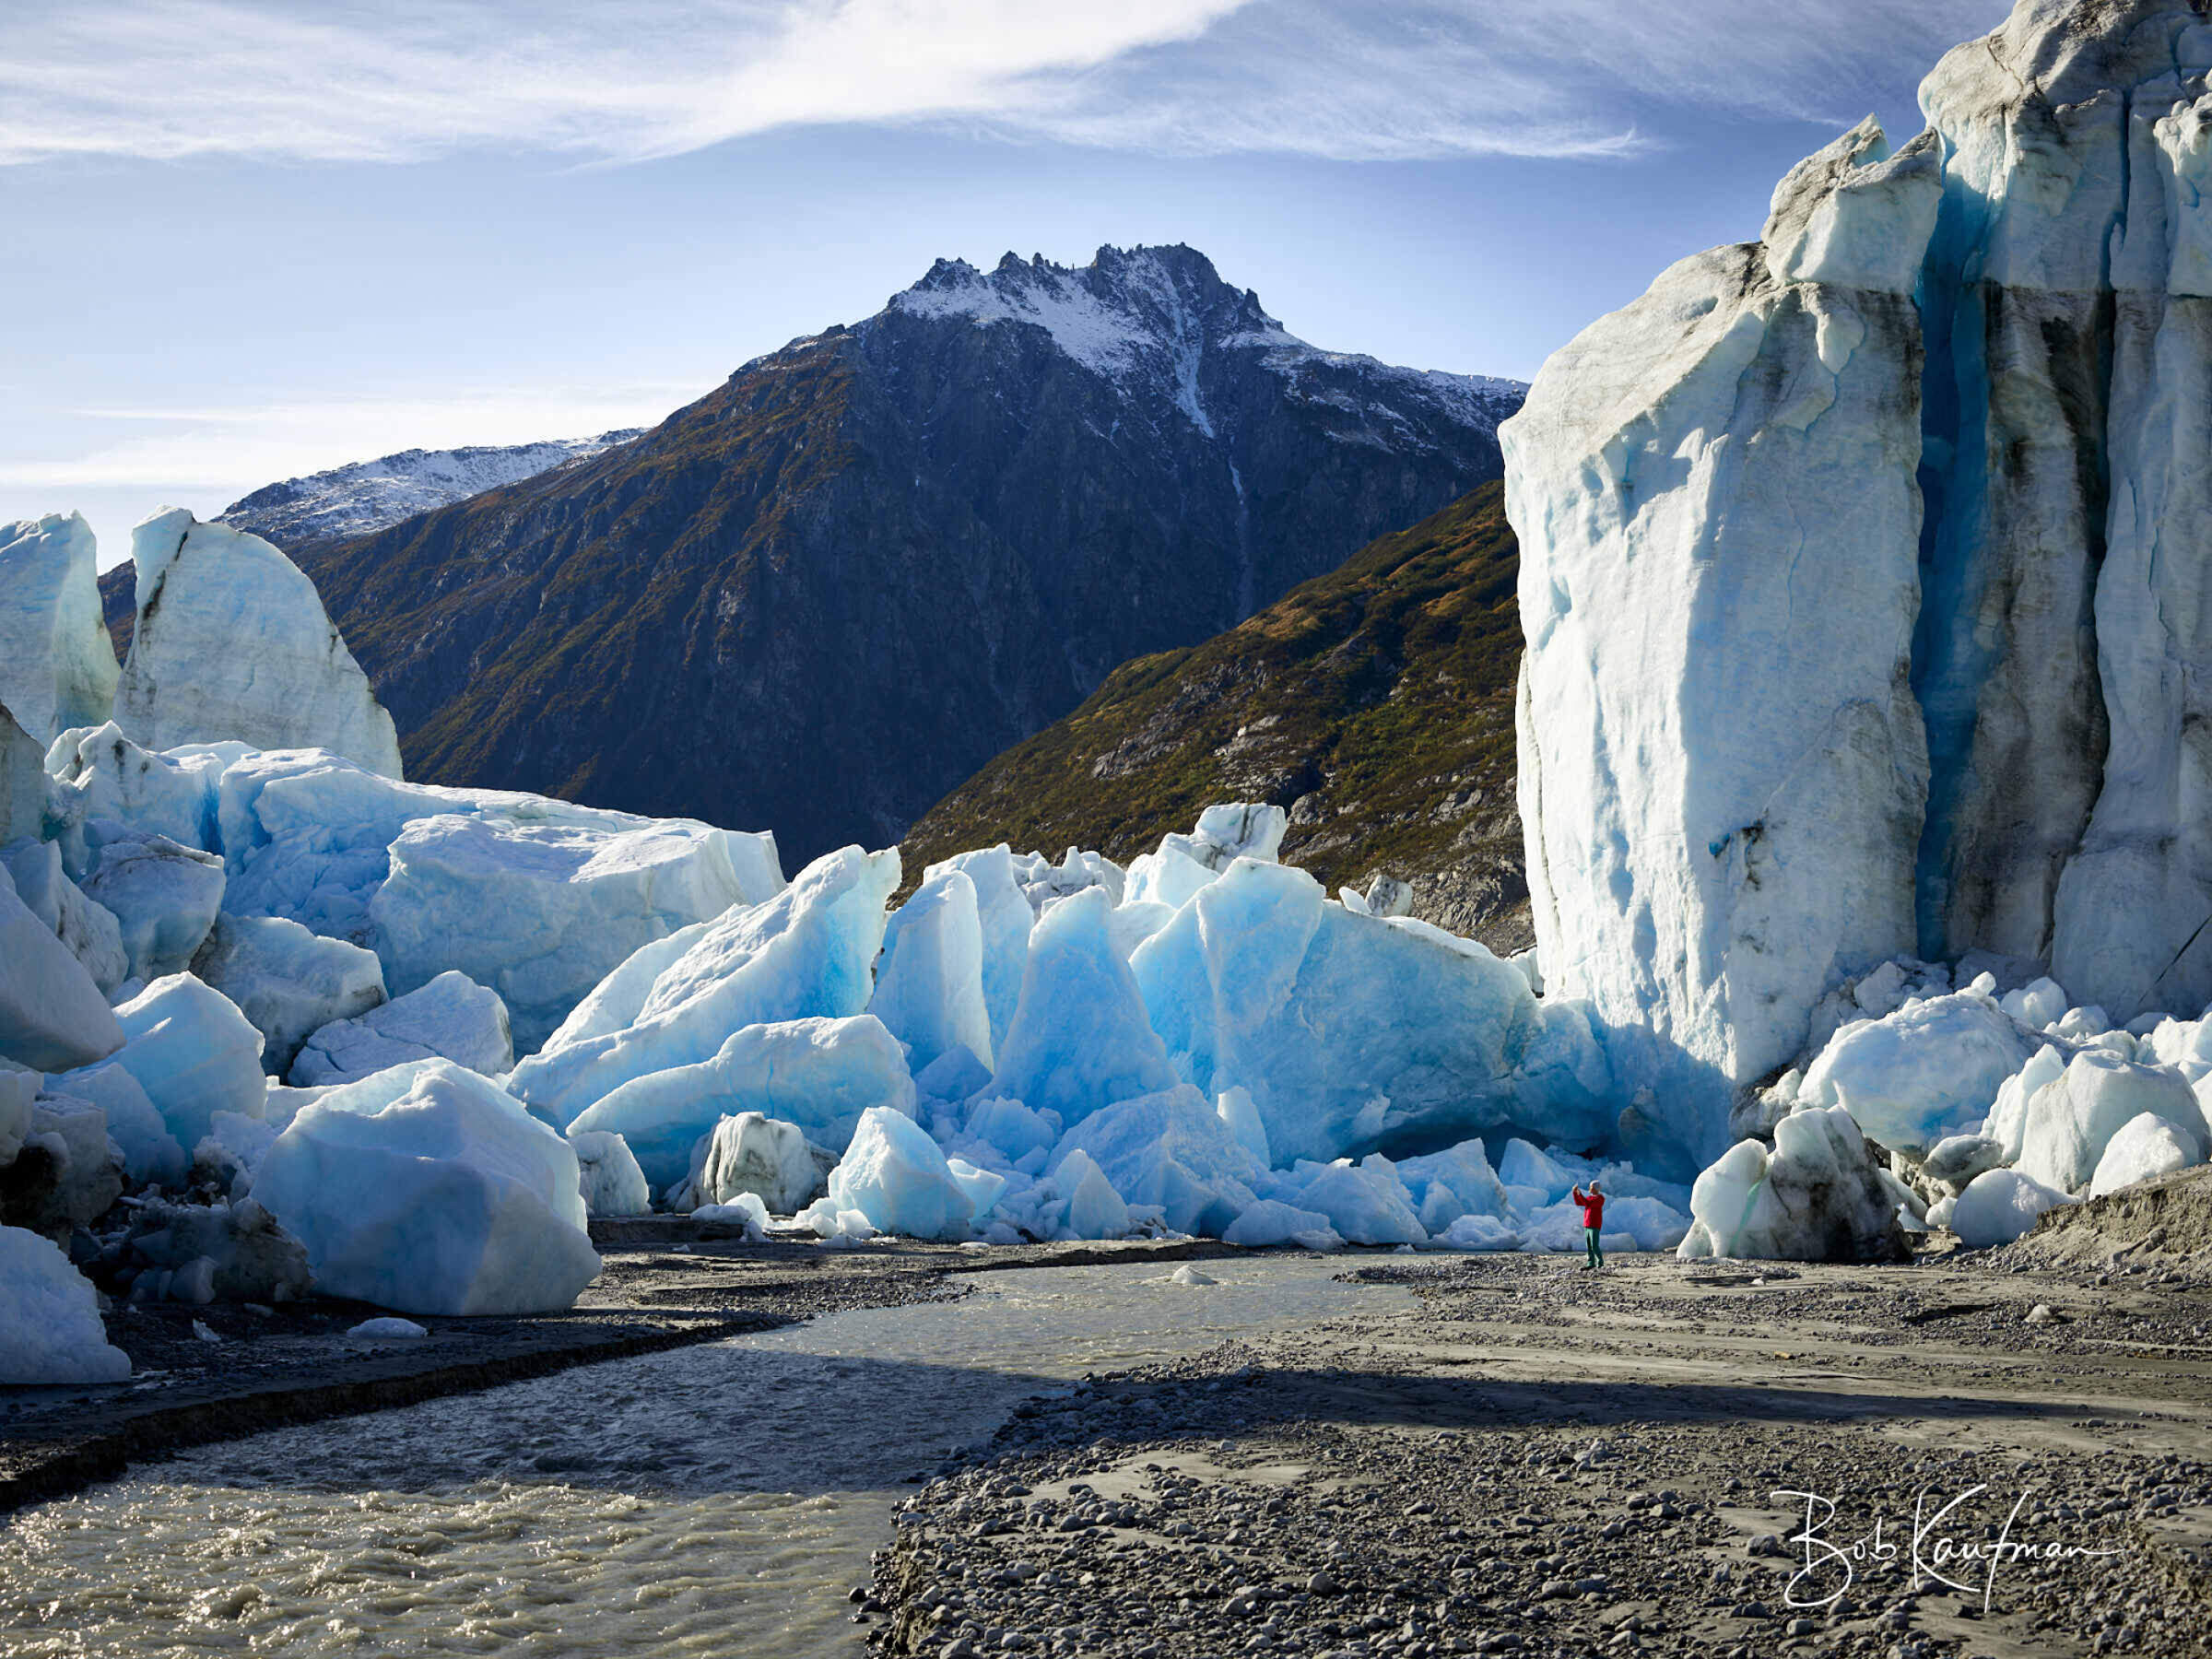
Jökulhlaups—glacial outburst floods—occur when an ice-dammed lake suddenly drains, unleashing a massive torrent of water beneath or around a glacier. What’s left behind can be otherworldly: a drained lakebed littered with stranded icebergs and towering ice formations, sculpted by water and time. These scenes are rare, temporary, and powerful. The ice can look like castle spires, shattered glass, or broken monoliths, often spread across a vast, empty basin where water once stood.
This shot was taken at Blockade Lake, 78 air miles southwest of Anchorage near Lake Clark National Park. The helicopter landed deep in the well of what had been an enormous ice-dammed lake. It likely burst a few weeks earlier, revealing an 11-mile-long expanse of fractured, stranded ice. The subject walked cautiously toward the looming blocks to give a sense of scale. There was no one else for miles. The scene was pristine, dangerous, and unforgettable.
Where to Get It
There’s no easy way. These scenes require luck, scouting, and helicopter access. Even then, you’ll need a place to land with sufficient clearance from ice towers that could collapse. Blockade Lake is in the Neacola Mountains near Lake Clark National Park and can only be reached by helicopter. It doesn’t form every year—and when it does, most of the 5-mile length may offer no safe place to touch down. Another location is Strandline Lake, about 45 miles northeast of Anchorage. It was once a popular destination, but the lake hasn’t formed in several years. These sites depend on seasonal conditions, ice dam formation, and meltwater accumulation. Most years, they’re inaccessible—or don’t exist at all.
Tips for Getting the Shot
Scout from the Air: These landscapes are enormous, and the ice formations aren’t always where you expect them. You may need to circle the lakebed before finding a viable shot—or a place to land.
Include a Person for Scale: The scale is hard to convey without a human figure. If conditions allow, have someone stand at a safe distance near the formations.
Work Fast: These scenes change quickly. Ice collapses without warning, and even a warm afternoon can reshape the entire field. Get your compositions quickly before shadows shift or conditions worsen.
Use a Wide to Mid Lens: A 24–70mm lens gives flexibility to shoot the vastness of the lakebed as well as isolate interesting shapes.
Watch for Composition Anchors: Stranded icebergs tend to scatter unpredictably. Look for leading lines—water channels, gravel bars, or ridgelines—that guide the eye into the shot.
Don’t Assume It’s Safe: These are unstable, raw environments. Don’t approach the ice unless your pilot or guide says it’s safe, and always keep your helicopter within quick reach.
Bonus Shot: Sunset Over Ice - The Mood That Lingers
Some shots don’t fit neatly into a category. They’re not about scale, or movement, or rare formations—they’re about atmosphere. They happen when light, timing, and terrain all line up for just a few minutes, and the glacier becomes something else entirely.
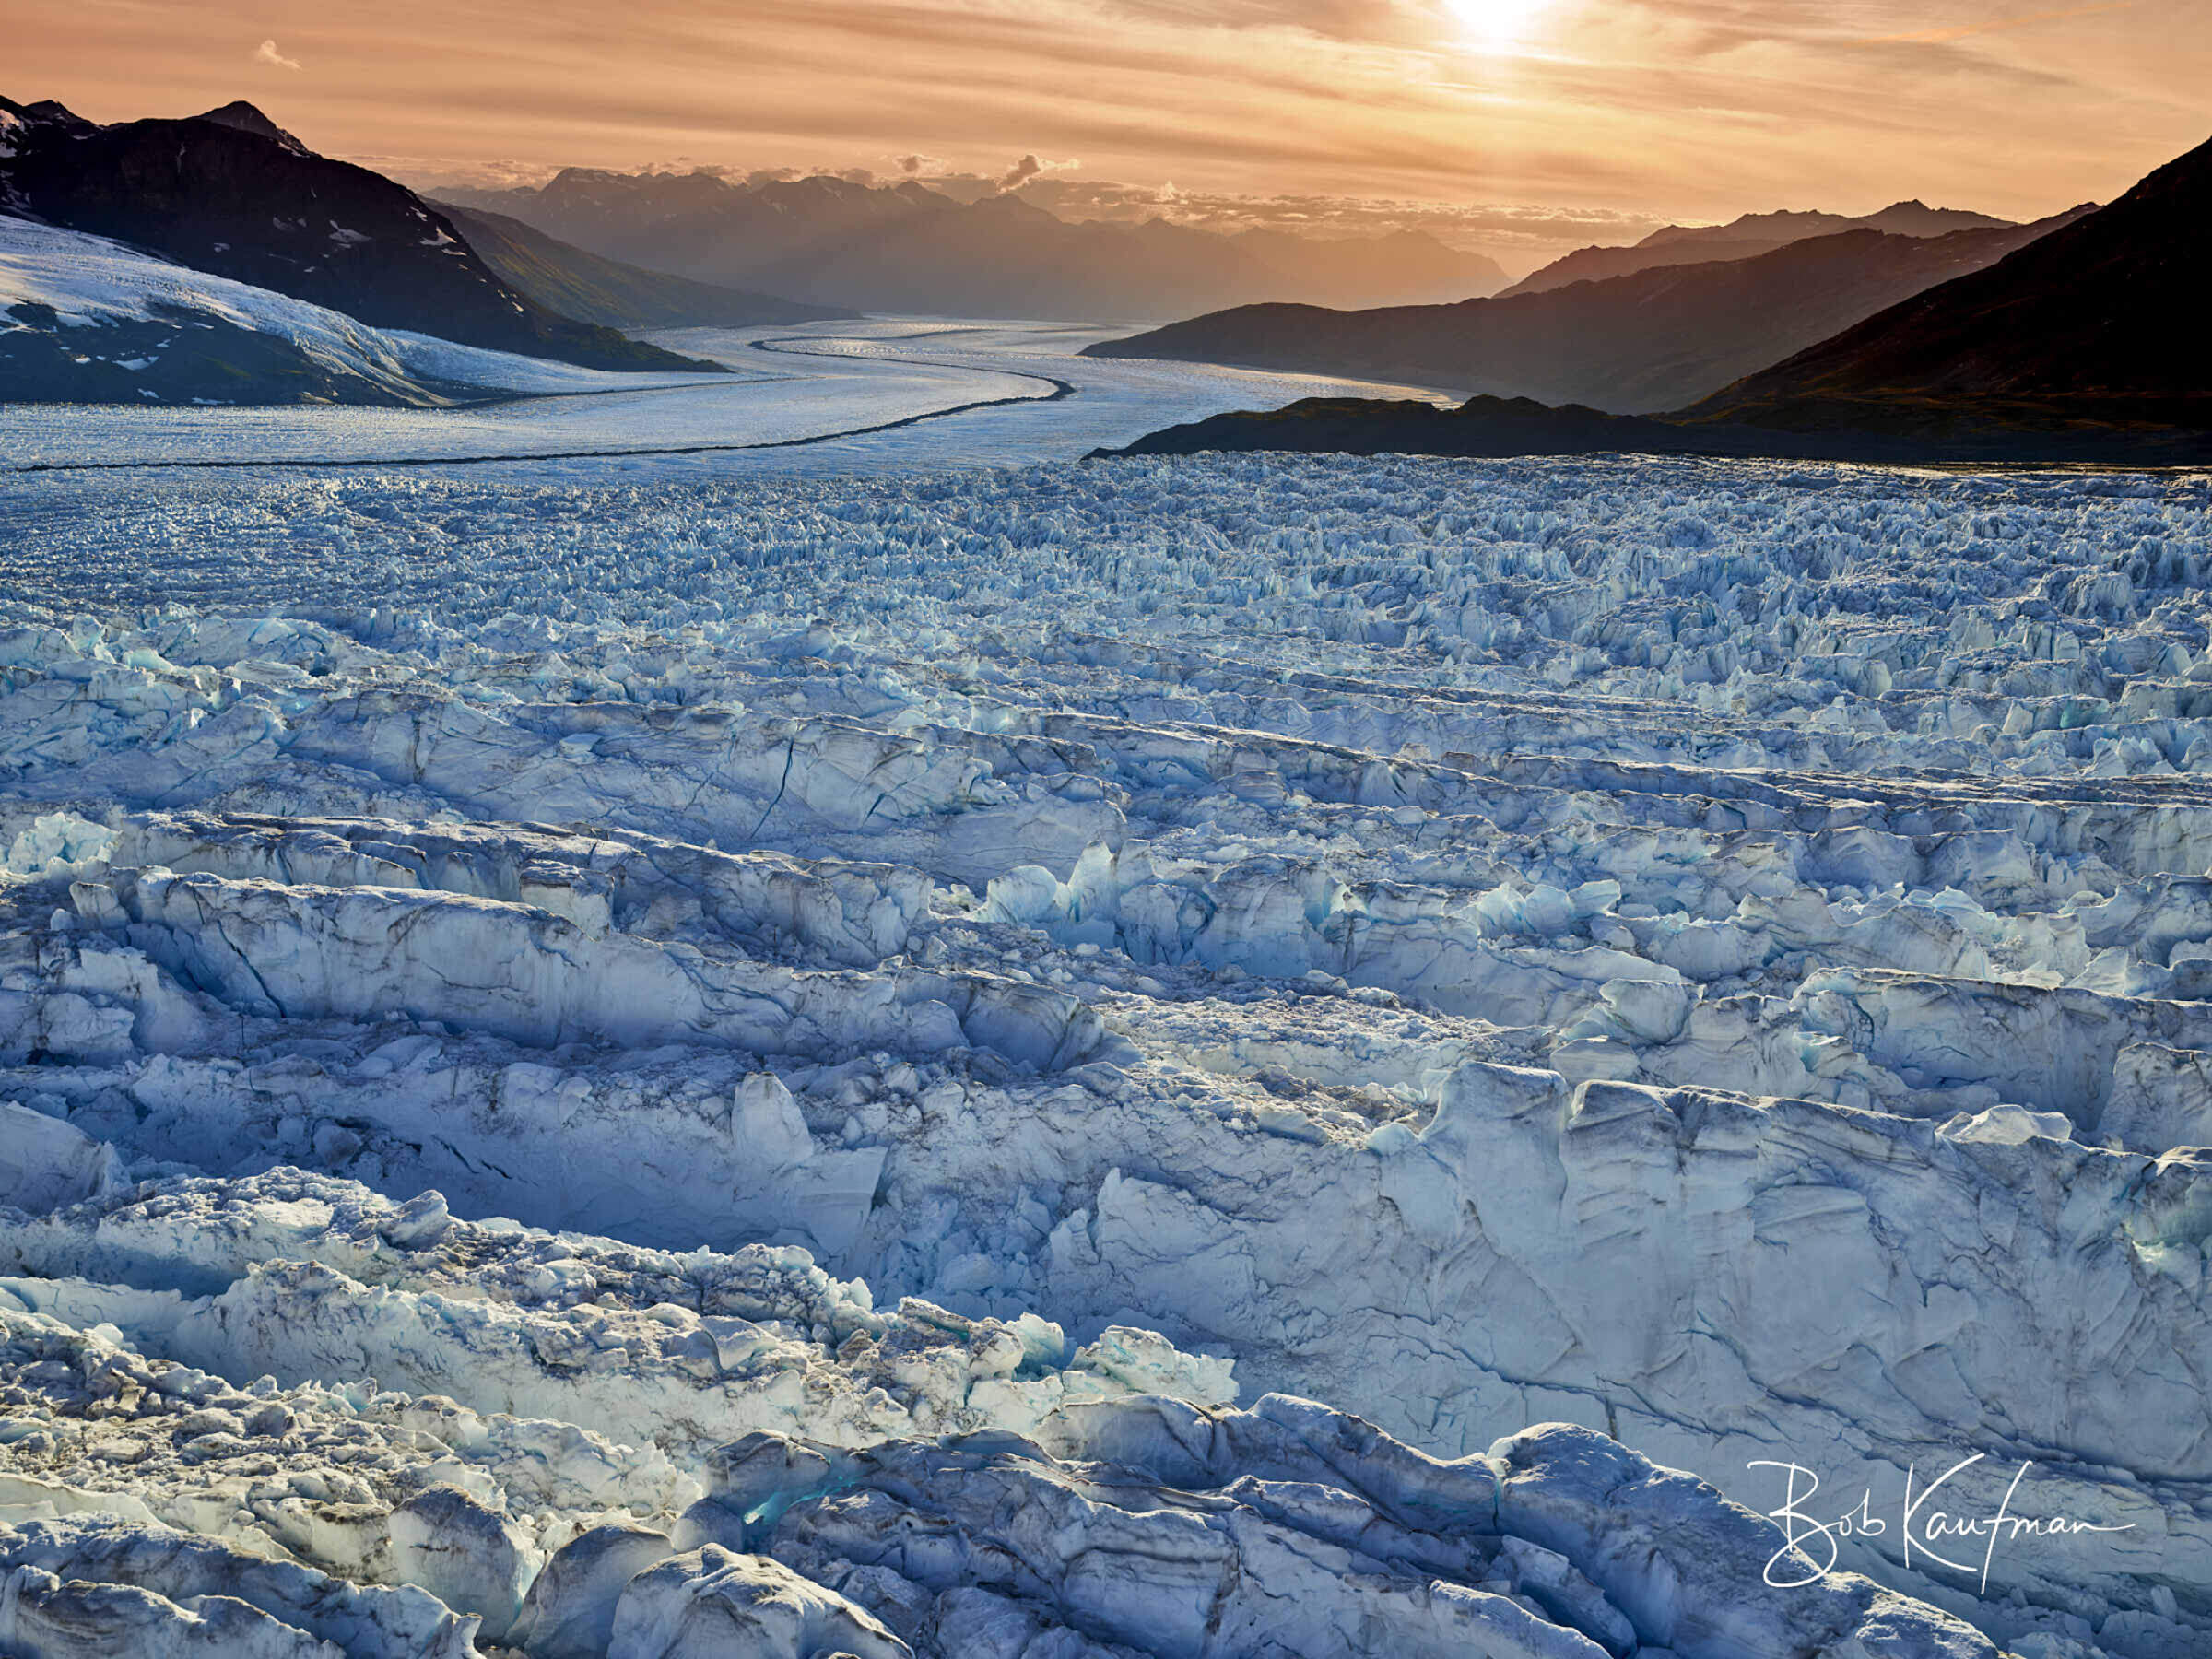
This image was taken above the Knik Glacier at sunset, where a field of crevasses caught the last side light of the day. The entire surface shifted from pale blue to lavender and gold. There was no dramatic calving, no rare formation—just stillness and scale and light.
Bob Kaufman returned to this exact spot four different times before the conditions came together for this moment. He’d spotted the series of ridges—nearly 15 miles from the glacier’s toe—and kept coming back in search of the right combination of clouds, angle, and texture. He was flying in a helicopter, shooting with a medium-format camera that could preserve the subtle gradients and ice detail. The thin cloud cover added drama to the sky, softened the contrast, and turned the scene into something quiet and unforgettable.
These kinds of images aren’t guaranteed. But that’s part of the draw. It’s not just about the photo you bring home—it’s about the chase. The patience. The process. Being out there when the light shifts and suddenly the ice isn’t what it was a moment ago.
Final Thoughts: The Scenes Are Worth Chasing
Some only happen at the right tide, in the right month, in the right light. But that’s what makes them meaningful.
You don’t have to be a professional to capture something unforgettable. Whether you’re carrying a high-end camera or just pulling out your phone on a day cruise, the magic is in noticing what’s in front of you—and being there when it changes. A soft glow on the ice. A sudden calving. A reflection that vanishes a few minutes later.
Great images don’t come from checking a box. They come from chasing moments. Watching light shift. Walking a little farther. Looking twice.
You might not get the shot you imagined. But you’ll get something. And in the process, you’ll experience Alaska in a way few travelers do—not just as scenery, but as something alive, shifting, and worth chasing.

