Beyond the Shoot: How to Make Your Alaska Photos Look Great
By Daniel Quick
The negative is the equivalent of the composer’s score and the print the performance." — Ansel Adams
Prepping for a photo shoot with Alaska as the subject still raises my excitement level and fills me with thrilling expectations—and it’s been that way now for more than 50 years. I’ve never tired of traveling through some wilderness setting, camera in hand, looking for that special shot or stopping along the roadway to capture a scenic setting too gorgeous to pass by.
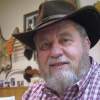
Alaskan photographer, Daniel Quick
Perhaps you’ve been planning your own special trip to Alaska, for months or even years, with expectations of taking some amazing photographs. Often, a visitor to this Great Land will spend a couple of memorable weeks enjoying their Alaskan adventure and shooting as many shots as possible. But then—just when things were really starting to get going—their dream trip is over and the photo shoot is done.
But here’s the thing: While the shoot may be over, the photographs are not necessarily final versions. In fact, your photographs are probably less than half done. And that’s good, because the fun has just begun.
Building the Cabin
Throughout the history of photography, the field shoot has always been just the starting point. Classic photographers like Ansel Adams toiled for days deep inside their darkrooms producing stunning works of art, often spending much more time there in the dark than they did in the sunny field with their large-format cameras.
Think about it this way: If you were building a cabin, you’d need to spend time in the forest gathering logs suitable for the project. You’d need to choose the right trees, pick logs that will complement each other, know how many and what size they should be, and get them to the building site. But it’s only after all that prep work that the real work begins: setting the logs in proper order, cutting and fitting the corner notches, constructing the walls and roof supports, planning, cutting, and finishing the windows and doorways. . .on and on it goes. That’s post-production, and that’s the time when the cabin is really built.
It’s the same with photography. The photo shoot is when the photographer is doing the prep work of gathering material: thinking about the time of day, the lens, the camera settings, the number of exposures, and the composition of the scene. But it’s later, sometimes much later in the darkroom, where the “cabin is built.”
In fact, assuming the field work is properly done, the post-production phase can be an even more intense process. It can also prove more rewarding than the camera work alone. Today, our darkrooms have become a digital wonderland, with photographic tools that would have been unimaginable only a few years ago. Post-production programs like Lightroom, Photoshop, Affinity Photo, and ON1 Photo Raw— just to name a few—have opened up a whole new world of “darkroom” magic.
We’re not going to spend time here teaching the tricks and treats of such programs. They usually come with their own training videos that allow even a casual camera buff the chance to pick up skills and methods to greatly enhance their photographic experience. For now, let’s just consider some basic enhancements to apply after the field shoot is completed.
Making the Magic Happen
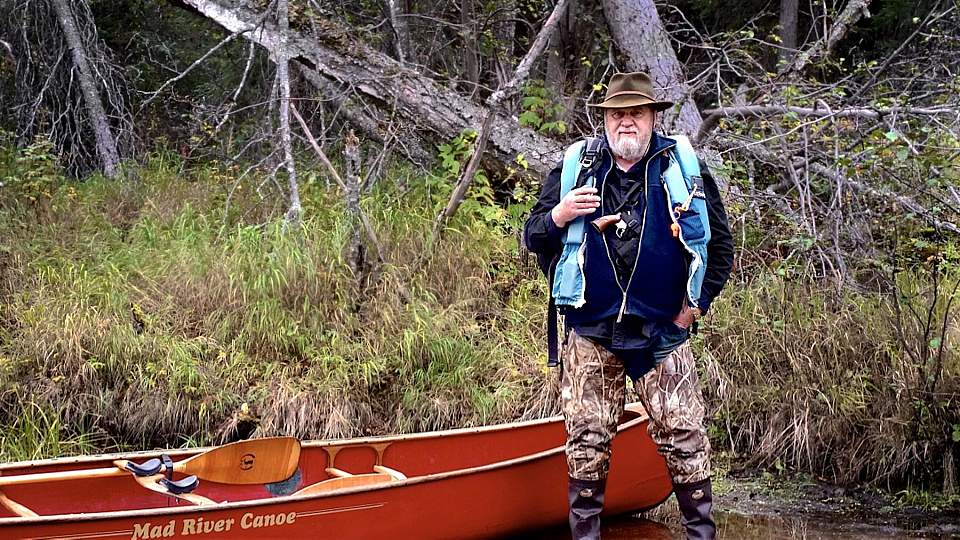
I once had the chance to take a couple snapshots of the homestead cabin of Andrew Berg (1869–1939), Alaska’s very first registered guide. (The home has recently been moved from its wilderness location to the headquarters of the Kenai National Wildlife Refuge, near the town of Soldotna.) Not having enough time to properly address the subject, I had to shoot it on the fly. Though the resulting photos covered the subject, I felt a little post-production work would help to better celebrate its historical value.
For example, the information signs located at the lower right of the photo are a distraction. A closer inspection of the cabin door and front log work shows small white streaks caused by snowflakes falling at the time of the shoot. They should be removed. The sky is okay, but it could be a little more interesting. Some cropping and tonal adjustments would also help.
Finally, since Berg built the cabin in 1936, maybe we could give the overall photo some additional character—changing it to a sepia tone and adding some minor scratches and faded borders that would help communicate the feeling of earlier days in Alaska’s history.

None of those adjustments were difficult to achieve. In just a few minutes, I used sliders to modify the saturation, contrast, and exposure, then added a sepia tone. The sky replacement was a more involved process, but I seamlessly completed it with a few additional clicks and simple slider adjustments using ON1 Photo Raw, which greatly simplified the process and achieved amazing results.
What was once a simple snapshot is now a much more pleasing photograph, better representing the subject’s historical value. Beyond that, and more importantly, the post-production process was a lot of fun. My digital “darkroom” was just as enjoyable as the field shoot, and it certainly expanded my total photographic adventure.
Adding Character
One of the beauties of today’s post-production editing is that the original photo still exists, no matter what you might have tried during the edit. Most digital darkrooms are non-destructive, meaning the original photo remains untouched. Plus, you can make further adjustments at any time. Or you could change your mind, eliminate some part of the previous edit, and replace it with a new idea. You can even start over and go in a completely new direction, adding to your portfolio yet another version of the same photo. That’s exactly what I did.

I liked the sepia tone version, but thought it would be fun to slip back in time to some former day when Andrew Berg was living in the cabin, nestled deep in the Tustumena wilderness. What if we saw the cabin on some winter’s night long ago, with Andrew snug and warm within its comforting walls? I could shift the colors and tones to a darker time of day; add a warm glow to the window to complement the blue-ish color it cast on the snow; throw in a little smoke coming out of the stove stack with another warm glow there, and include some tiny cinder sparks—then put it all under a star-filled sky with the aurora tiptoeing into the scene.
This process involved more than some simple adjustments and retouching—it required additional skills and some artistic interpretation. I was truly producing a whole new photograph, one I might send off to be printed and then hang on my wall.
Admittedly, this would be challenging for someone just learning about the possibilities afforded by a digital darkroom. But with some online training and a little persistent practice, these more radical changes are well within reach. Plus, I had such an enjoyable time in the process! And that’s kind of the point. Photography is so much more than point and shoot. And perhaps you’ve been missing out on some of the most rewarding parts.
Mastering the Digital Darkroom
Mile 15 on the Denali Highway: Before
Let’s look at some other examples of what a digital “darkroom” can do to enhance the value of photographs. This photo was taken around mile 15 on the Denali Highway. Admittedly it’s a little underexposed, but purposely so. I liked the clouds and I wanted to avoid overexposing them, since I’ve found it easier to bring up shadow areas than to recover overexposed skies.
I almost always shoot in RAW format. The downside of RAW files is that they’re considerably larger than other formats. The upside is that they contain much more digital information, and reaching down deep into all that data offers some wonderful possibilities during the post-production efforts.

Mile 15 on the Denali Highway: After
My work in the “darkroom” brought back the underexposed areas, gave definition to the clouds and mountains, and emphasized the muted colors, restoring them with wonderful vibrance. Cropping then defined the scene and brought it all together.
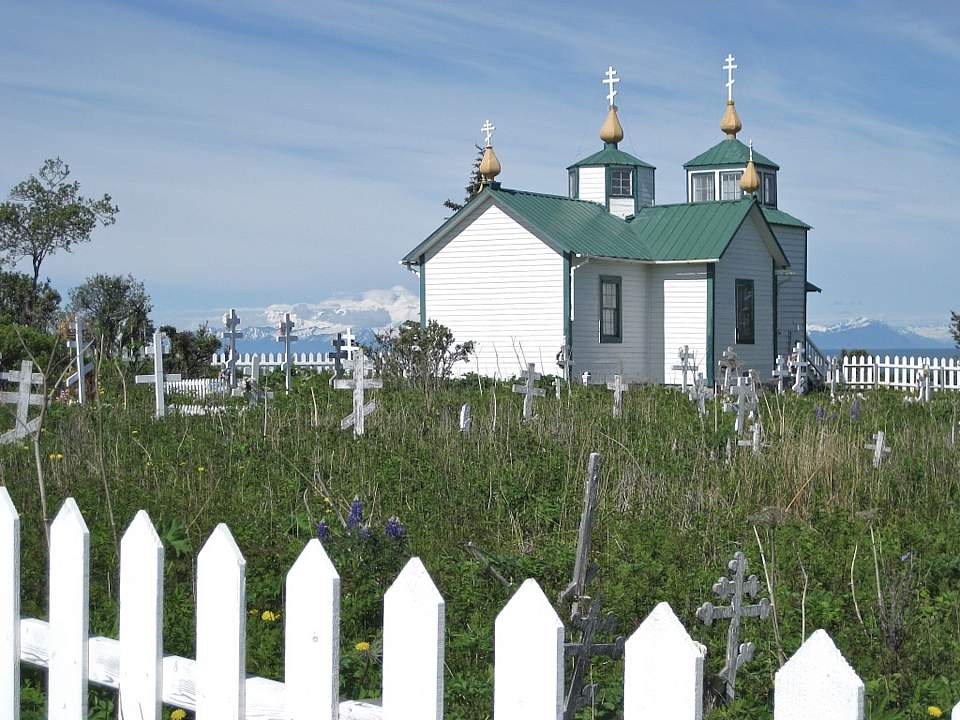
Ninilchik Russian Orthodox Church: Before
Speaking of cropping—it’s one of the most important steps in the post-production phase of photography. It’s a good idea to leave a little space around your subject during the shoot and save the final cropping for post-production. Take for example this shot of the Ninilchik Russian Orthodox Church, located 44 miles north of the town of Homer, along Alaska Highway #1. Again, this is more of a snapshot than a fine photograph. But the focus is good and the scene has some potential.
Cropping certainly helped in this case, and I made important adjustments to features like saturation, contrast, and exposure using the editing program’s sliders. Also, the original had only a smattering of flowers, but I wanted a richer floral display. Adding those additional flowers to the foreground takes more training and development, but that just adds to the total enjoyment of the craft.

Ninilchik Russian Orthodox Church: After
Enjoy your Alaskan adventure. Bring your best equipment, shoot and shoot and shoot, and then—come rain or shine—keep shooting some more. Gather a truckload of material to take back with you. It may be a sad moment when your time is up, but know that there are still hours of enjoyment waiting to be explored at your leisure in your own private digital darkroom.

Mile 80 Denali Highway: Before

Mile 80 Denali Highway: After